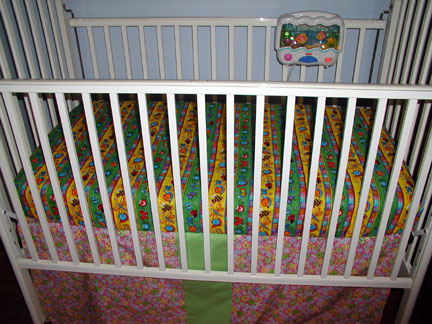
First off, Jeannie of whatthehay is sharing a tutorial on sewing your own cribsheets. She writes:
After finding out that we were pregnant with our first baby, I began the long and fun process of collecting all of the things that a new human needs to survive. First on the list? A CRIB of course! Beyond the crib (which we found at a consignment sale, along with the crib mattress) a baby needs crib sheets. Happily, Rosie has a talented grandma who was more than happy to provide her with many of the essentials of baby survival – a quilt (with strict instructions to USE it), a few totally cute outfits and 4 crib sheets.
Rosie’s Grandma is a sewing kind of lady and back when I was a kid, money was tight and so, well, she sewed. Beyond making nearly all of our clothes that weren’t hand-me-downs, she also devised a pattern for a crib sheet. Back in the day, people actually made their own sheets for their big beds, too, and she adapted this pattern from one of those patterns.
If you have a baby shower coming up, check out her crib sheet tutorial for a very useful, unique gift.
Secondly, I started another blog called craftevolution.com. It’s still in early development, but come visit to see some ideas for Halloween costumes based on basic sewing patterns and let me know what you think about the blog.


Digital Scrapbook Papers are not only for scrapbooking. You can use them for a a lot of different craft projects.
Where To Get Them
- Digital Scrapbook Place: You must register to gain access to their freebies page, which offers a myriad of digital papers
- Crafts Beautiful: this British DIY site provides a ton of tutorials. Every month Crafts Beautiful introduces a new set of “backing papers.”
- Shabby Princess: Here you can find gorgeous sets of papers and embellishments. I used the 2005 holiday sampler for the projects on this post
What To Do With Them
- Print on paper and make paper beads, paper boxes (Mirkwood Designs has nice templates), envelopes, stationary

- Print on fabric using either inkjet fabric sheets or, for larger pieces of fabric, have your designs printed by Spoonflower and make appliques, key chains, napkins

- Print on shrink film (Shrinky Dinks) to make tags, earrings, charm bracelets, mobiles, drink charms

- Print on iron on transfers and decorate onesies, T-shirts, did I mention napkins?

- Create cross-stitch patterns using a tool like Artopik

What do you like to do with these papers?
P.S. Thank you to Meggie Cat who inspired this post with her collection of online tools and freeware.
]]>
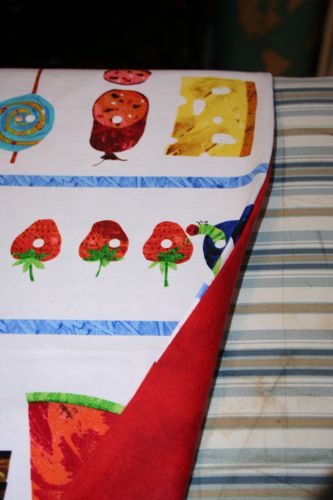
Now that I have done this once, I think I can seriously do it in half an hour (and you can too!) For the front I used 1 yard of nice cotton fabric- I love this series of prints from “The Hungry Caterpillar” books. The backing is 1 yard of lightweight cozy quilting fleece, a marbled red.
1) Line up fabrics wrong sides together and sew around 3 sides. I used a serger on all 3 sides but you could use a regular sewing machine too.

2) Turn fabric so it is right-side out and press neatly around all 3 sewn sides. Fold 4th side under and sew across the edge, starting and stopping just short of each corner.
3) Lastly, starting with the 4th edge just sewn, sew on top of the fabric around right-side edge, turning just short of each corner. This will hold the 2 pieces together. I could have also sewn across the blue stripes for added accent since this fabric is patterned this way (but before sewing around right-side edge). You could also sew a pattern on top, or around the characters on the fabric.
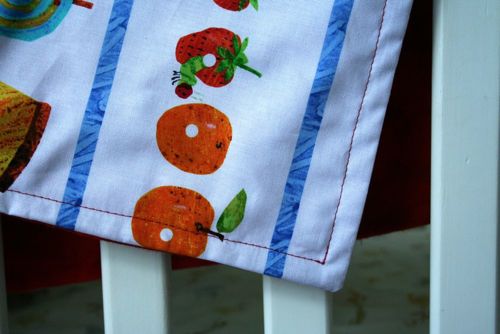
Very quick, easy and inexpensive! Great for summer traveling, picnics, for a crib or pack n’ play!
]]>
Here are a couple of projects and works-in-progress currently pending at my household:
Cashmere Sweater Blanket

This is for my grandmother for her 90th birthday. Her birthday is on March 31th. Do you think I can finish and ship it by then?
Stenciled Baby Top

I’ve been wanting to follow Joy’s stenciling instructions for a year now. Here’s the perfect project: a tiny little shirt for my friend Vanessa who is due in April.

My daughter became inspired by the whole process, although she deemed the color choices lacking, she did manage to pull together a cool design.
Another Vest

There was a time when I actually finished an entire adult sweater, usually for the boy friend de jour. Then I started making children’s sweaters, again with collars and full length sleeves. Now I can’t even be bothered to start on sleeves and Elizabeth did not want a collar, which leaves me with another vest.
Elizabeth picked the colors and decided she liked stripes. I thought stripes alone were boring and went through some knitting books to try some new patterns. Now she has a stripy sampler just in time for spring.
So, what are you working on?
]]>Here are just a few on my favorite model:
First, using overalls, bandana, kids’ cowboy hat, and a party favor badge- the Cowboy!

Repeating with the overalls and bandana, a train bucket and whistle, and striped hat and jacket (that I got second hand for $1!) – the Train engineer!

Camo pants, vest, fisherman hat, toy fishing pole that came with a puzzle, a small camo backpack of mine, and I cut fish out of felt and strung through twine – the Lucky Sportsman!

Why not borrow from another holiday? Green sweatpants, a red shirt inside out with felt cut out collar (also good on green for Kermit), a red gift bag or stocking for candy, green shoes, and a dollar store elf hat (which I would pin smaller) – the Cutest Little Elf!

Or try getting use out of that suit bought just for a wedding or Easter – carry a Bible and go as a Preacher, put on a campaign button and be a Politician, a bow tie, beard, and book as a Professor, a little suitcase as a salesman!
I saw a few other inspiring ideas on the Today show last week like a:
Train Conductor costume - a dark 3-piece suit with a pocket watch chain and piece of gold braiding glued on a hat with toy train in hand.
Cheerleader or Football player - with mop heads for pom pons and colorful electrical tape for uniform stripes and numbers.
Remember it just needs to be fun, cute, and easy for the child to wear. I like to dress my child up as something he can be when he grows up since he wants to copy his dad so much anyway. I like cute and simple better than scary! So look through the kid’s dresser and pair things together you wouldn’t normally. It will be fun to dig together and get their imagination going too!
Any other ideas you want to share?
]]>I picked up more craft porn this weekend and got a copy of Sock and Glove by Miyako Kanamori. This book was originally written in Japanese, but what I love most about it is the ease at which the projects seem. Not only are the directions simple, but the pictures are as well. You’re not bombarded with a lot of type – just cute pictures that tell a story. And best of all, you don’t need any fancy crafting supplies – just needle, thread, scissors, stuffing and old socks and gloves.
The last time I ventured into this arena, I didn’t fare so well. But after seeing the adorable elephant on pg. 27, I decided to give it a go, and so without further ado, I give you Nigella
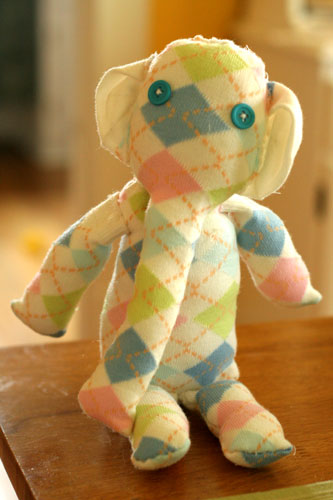
I made her with a certain little girl in mind, but truth be told I hate to part with her. Lucky for me, I have an extra set of socks identical to the ones I used, so I shall fashion another one for myself. While the project wasn’t super quick (three hours from start to finish), it was easy and was done while enjoying some evening down-time. Now, I have a pair of striped socks that are longing to become a zebra.
]]>
I can’t believe it’s almost time!! Brian, Lucy and I are leaving for Nogales Monday morning. This is a picture from the Cuirim House where we’ll be staying. I am nervous, excited, scared, anxious and thrilled among other things. We will be gone for 51 days but who is counting??
The suitcases are out and filling up. Lucy’s laundry is done and her bag is almost packed. I just got this itch to sew and do more poly clay before I leave. I sorta feel like I did before I had Lucy. Like I needed to try EVERYTHING, cause when she got here I wouldn’t be able to do anything. So I should do it all now! I’m really trying to pace myself but my crafty side is taking over. I just can’t stop. Brian, can I please make some Fimo stuff tonight??
I made her this sheet/blanket from this super soft fabric. It’s really light weight and it will be nice for Mexico cause it’s so hot there. She looks like Mary in a Christmas play..

And i’ve been trying my hand at some Polymer clay techniques. I even had a “poly party” and I’m doing another one before I leave. I’m slightly obsessed. Here’s what we came up with before we baked them.

God provided all of the funds we needed for travel and we are so thankful. I put up an Etsy shop with my Cuirim Craft Fair left overs. What ever sells will go toward the rest of our time there. If you would like to order something, my mom is going to be shipping it since I’ll have no internet in Nogales. This will be quite the adventure. I’ll post more clay, knitting and sewing goodies when I get back. I just wanted to say good-bye for the summer. May your summer be filled with crafty goodness and excitement. Keep us in your thoughts and prayers. If you’d like to see more Mexico pictures go here.
]]>
I ironed the vinyl to the entire piece I had cut out for a large bag lining, then sewed the bag together. I thought it might be good for carrying home cold groceries so the moisture wouldn’t soak through the fabric bag. (Let me know swap buddy if you have found this to be a good idea.) This might work well also for lining diaper bags since I know I have spent much time cleaning up spilled juice or a busted hand sanitizer bottle from the bottom of the bag. It is easy to iron on and the result is waterproof and very shiny!

I thought I had a brilliant idea to make diaper changing pads; cut a square, iron on my vinyl and serge the ends, but the vinyl cannot be machine washed, so obviously that won’t work. But I must find something else! What have you used iron-on vinyl for? Any ideas that have worked well for you or things I could try? (I have 2 yards of it left!!)
]]>I grabbed a onesie that my daughter has outgrown, and for the fabric for the T-shirt I used an adults XL shirt I got on sale from Michaels.

I cut off the bottom of the onesie to make it into a shirt, and then cut along the seams to take the onesie apart. This gave me a general idea of the shapes I was looking for, and using them as reference I drew the pieces out freehand on the yellow T-shirt.

I sewed along happily, thinking that I was going t have an cute little shirt that would work with the diaper I was making. I am making a brown and yellow wool cover and a fitted diaper with giraffes on it, so I used brown thread on the yellow shirt so that it all matches.
Well, here is how the shirt turned out:

I’ve used the arrows to show the errors I made. I missed part of the neckline on the right hand side, the neckline itself is much too high and would choke the baby if they wore it. My left seam was about a half inch towards the middle of the shirt (must have made the back wider than the front) and the left arm seam doesn’t line up with the left side seam.
All in all, its not that bad considering I didn’t use a pattern. But definitely not wearable! Guess its time to search and find that pattern I have and use that ![]()

All you need is: elastic, 2 small buttons, a seam ripper, and sewing machine or needle.
1. I cut 2 pieces of 1/2″ elastic about 2″ long. (adjust to the amount you need garment taken in)
2. I used the seam ripper to cut a slit to fit my button toward the end of each elastic piece. (this was easier than using the button holer, if it frays a little it will be okay.)
3. Line up how much you want the elastic drawn in and sew button into pants.
4. With button through your elastic hole, pull elastic to desired place and sew vertically over opposite elastic end. I did not make it adjustable with more than one button but you easily could.

This literally took me about 5 minutes and I think will save me some money if I don’t have to skip a season with his pants. Any other tips for fitting thinner kids in their clothes?
]]>