
This bracelet is a birthday present for my friend Jessica and a salute to her family. On October 5th 2005, after he had just turned four years old, her son was diagnosed with a rare form of leukemia. Last week, Spencer’s mediport was removed signifying the end of his chemotherapy and a huge milestone in his treatment. As Jessica wrote:
.. after 778 days,
approximately 200 pokes of a needle,
over 2,000 pills,
countless doses of tylenol,
anyone’s guess as to how many I-V drugs and fluids,
hundreds of thousands of prayers and wishes,
and at least 250 trips to the hospital,
I am so very very very very happy to announce that this extremely brave, tough, amazing little boy is completely finished with chemotherapy!!!
The bracelet is inspired by the red Relentless bracelets Spencer’s family and friends have been wearing to support him and anyone else fighting this disease. To put it together, I collected anything red I had in the house; new beads, old beads from jewelry I bought on a trip to Taiwan 21 years ago, charms I received as presents, glass, potato beads, sterling, clay, and metal. I then started making loops to attach all these treasures while listening to the book Jessica selected for our book club.
Happy Birthday Jessica!
]]>Choose Something Like A Star, Robert Frost
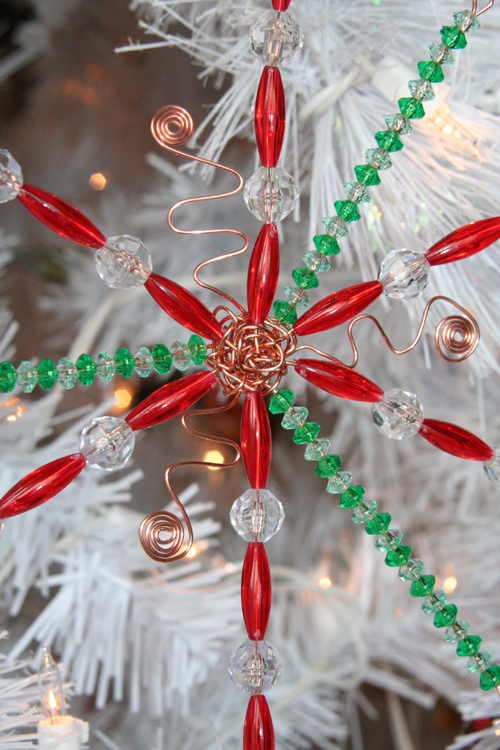
Here is an hour-long project for that last minute gift. My friend always gives me an ornament for Christmas and when I saw this year’s I had a “Hmm, I wonder if I can make one of those” moments. (Did I mention that I tend to procrastinate and suddenly making a star was way more important than typing up overdue PTA meeting minutes?)
So here it goes:
Materials
- 20 gauge or slightly thicker wire. I used copper wire from the hardware store.
- Wire cutter, pliers
- Beads, washers, popcorn, buttons, or anything else you can think of to string on the wires
Step 1
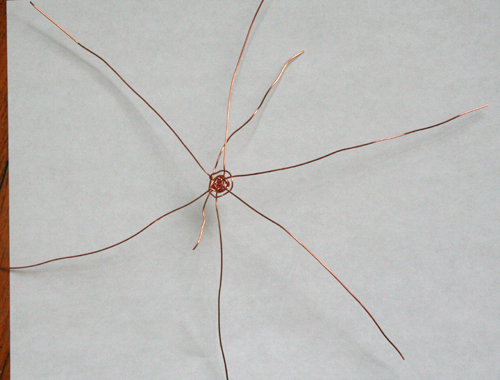
For a six point star cut three 12 inch lengths of wire and one 6 inch length to tie the wires together.
Step 2
Lay out the three 12 inch wires to make a star shape. Then take the opposite ends of the bottom wire, cross them over the middle of the star and begin securing the wires. Repeat with the remaining 2 wires. This may require some fiddling. Basically you want to kind of wrap the wires around each other to make a star shape.
Step 3
Further secure your shape by using the 6 inch length of wire and basket weaving around the center of the star. Go over one wire and under the next, and so forth. Once you get to the beginning, you have to wrap the wire around the first “ray” so the securing wire can go the opposite way on the second round. In other words, if the wire went over the first “ray” the first time, it should go under the “ray” the second time. (Please let me know if there’s a better way to explain this.) Do this until you find that the ends of the wire are fairly secure and the whole contraption looks like a star. (Oooh, this could also make a good spider.)
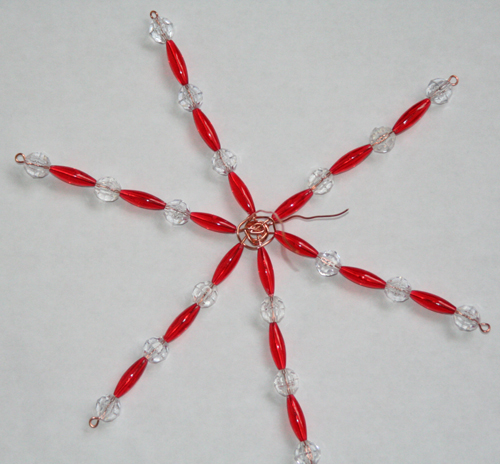
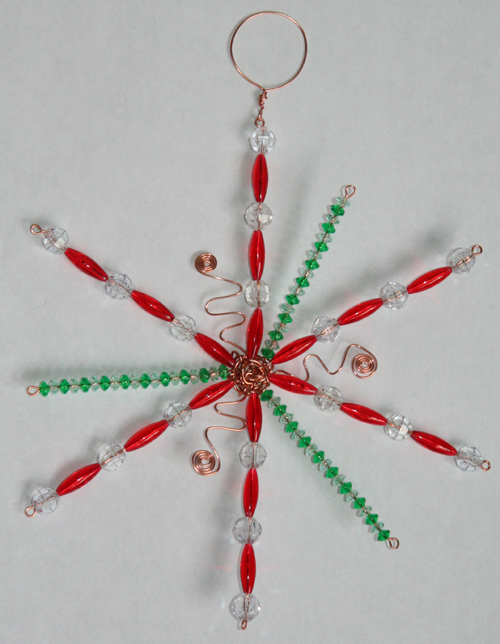
Step 4
Start decorating your star. I used beads, but I think you could make a really cool star using stuff from the hardware store like washers and nuts and anything else you can thread. At the end of the wire, make a basic loop to prevent everything from sliding off. (See wigjig.com for instructions.) Repeat with the remaining wires. Tie a ribbon, string or wire off one point to hang up your star and you’re done.
Variations
- Make a second star, stack the two stars and tie them together to make a 12 pointed star.
- For a kid version, use chenille wire and decorate with beads or buttons
- Use popcorn and dried cranberries to decorate the wires
- Make a glam star with silver wire and crystal beads
- Don’t decorate the wires, just use your pliers to bend them this way and that

Reporting directly from Santa’s workshop: It’s a mess. Do you craft on the floor? I often do. It tends to be the last available spot for me to spread out since most of my table tops are covered with last month’s homework and advertisements. Also, when you’re beading the beads won’t roll off the table. (duh ![]() )
)

Given the current state of affairs at my household, my extreme handmade gifting pledge (I will only give handmade presents made by myself) will probably only extend to the female members of the family. The nice thing about making the kind of jewelry I’m capable of putting together is that it only takes a very finite amount of time. After one hour I feel like I was creative and actually finished something. For inspiration, check out Beading Daily. For how-to’s I like Rachel Nelson-Smith’s site. After following her tutorial on how to form a basic loop, I finally got it!
So who will get these pretties?

All you need are a toggle clasp, head pin (looks like a straight pin without a point), beads and pliers.

For the stitch markers, you will use the round part of the toggle clasp. This gives you a seamless circle that wont snag on your yarn. You can get the toggle clasps in a variety of sizes, most will fit up to a 10.5 US needle.
Thread your beads onto the head pin, making sure the bottom bead is small enough that they wont slip off.

I don’t have a picture for the next step, but you simply thread the head pin through the bottom of the toggle clasp part, and you will bend the head pin around to secure it. You then trim the head pin so that you don’t have a long piece of metal sticking out ![]()
Here are a set of finished ones that I made to show that:

I like to tuck the end of the head pin into the top of the bead, or as close as I can get it, then you don’t get any snagging on your yarn.
There you have it – beautiful and unique stitch markers in no time at all!
]]>Benjamin: Yes, sir.
Mr. McGuire: Are you listening?
Benjamin: Yes, I am.
Mr. McGuire: Plastics.
–The Graduate
My name is Simone, and lately I’ve become completely obsessed with plastic shopping bags. I think it started when I couldn’t stuff another bag into the bottom of my holder without pushing fifteen more out of the top. On the other hand, I also could not bring myself to toss them because, after all, they were perfectly good bags. I then stumbled upon crocheting strips of plastic into, you guessed it, another bag. Since one tote-sized, crocheted bag takes at least 30 to 50 shopping bags, this project did make a dent into my collection.

Oft cited My Recycled Bags.com provides excellent instructions on how to prepare recycled plastic yarn from shopping bags and shares some crochet patterns for this kind of yarn. Once you have a ball of plastic “yarn,” you can also mix it with other materials. For example, I made this bag by alternately crocheting rounds of plastic yarn and yarn made out of denim strips.

I think it would be kind of fun to follow the Daisies’ crochet instructions, make different kinds of plastic squares, and sew them all together into. . . a bag. (If anyone can come up with something else to crochet besides a bag, please let me know. A rain poncho perhaps?)
Recently, I saw a posting about fusing plastic bags to make a plastic fabric. That inspired me to make plastic beads out of fused plastic bags.

You use the same technique you would apply to making paper beads, i.e. cut a triangle out of the “fabric” and roll it up from the broad to the narrow end. You may encounter more resistance from the plastic than you would from paper. I first roll up a bead without applying glue. I then unfurl the bead, apply the glue (Uhu Mosaic) and roll it up again. Like paper beads, you can leave the bead like that or apply a layer of lacquer.

Lastly, I decided to make a wallet out of two ‘I Love NY’ bags and a white trashbag without any print on it.

* I fused the three bags together and cut out a 6 1/2″ x 4 3/8″ rectangle.
* I then cut out two 4 3/8″ x 2 5/8″ rectangles out of clear vinyl left over from some bedding packaging that I had saved for just such an occasion. These will become the inside pockets on the left and the right side of the wallet.
* I then basted the pockets to the left and the right of the rectangle with a glue gun to keep everything in place.
* To finish it off, I trimmed the wallet with a 31″ long piece of 7/8 inch ribbon. The ribbon is folded in half and sewed on around the wallet through the fused plastic and the vinyl with a top stitch.
Start to finish the whole project took me a little over an hour. You could add a velcro closure to the wallet to keep everything in place, if you don’t stuff it with as many random pieces of plastic as I tend to do.
Now I’m worried that New York will encourage businesses to cease the use of plastic bags. In that case, where will I get my raw materials? Have fun with plastic. Let me know if you have any other ideas of what to do with this stuff.
]]>
I fell in love with these shell earrings I found at a shop this week that I go to only about once a year. One earring hook was missing and the other definitely needed to be replaced but I would replace any hooks if buying used jewelry. This helps to brighten up the piece as well. This find was timely since my son broke an ornament and I felt bad not buying anything. (What a good excuse!)

Often I have gotten a bag of vintage beads or buttons for ~$2, and for that there are usually some treasures inside. Now that I am in with all the owners downtown the ladies will save out bags of buttons for me (and give me a great price!) Finding actual treasures may be a challenge but the character and uniqueness they come with may be worth it!
]]>
Below are mini magnetic dishes, about 3″ across. My husband brought me home a box of 4 of these dishes from a tool store. They are wide which is great to toss my pins in as I sew without having to precisely stick them in a pin cushion. The black bottom is also magnetic so you can even hang it vertically from a metal cabinet. My favorite part about this is that since the bottom is magnetic if you drop pins on the floor you can just hold this wide magnet over it and gather them up. I hate picking up pins! (I hate nail maintenance more!)


I have toyed with the idea of making an animal or shaped stuffie to set the dish in for decoration, but haven’t yet. Any ideas?
P.S. Check out his shop while thinking about your craft organizational needs. I know my husband is proud when he sees me putting his ideas to good use.
]]>
She spends hours on this stuff.
I swear there is a difference between “artists” like her & my friend Joanna and “crafters” like me and my girlz. I mean, Amy and Joanna actually feel their work. When they finish something it is like they have given a piece of their soul. Not me I just try it out and if it works I’m like, cool! Then I try something else. I love that there are different ways to craft. It’s not that I feel less than them or anything they are just a different breed. I’m just thrilled to see art like theirs. That they spend any time with “crafters” like us is just a gift.

I stenciled this then gave it to Amy. She spent hours beading it for me before we made it into a bag. Here’s the way the bag turned out. Sweet work Amy – thanks so much!! Brian and Kirsten are going to love it. We are going to give them this bag with the fat check we made from the Cuirim Craft Fair in it.


By piercing holes with a tiny hole punch or even the earring post you can custom make anything into an earring holder. The little brown bags came with a piece of cardstock inside. The tiny white cards open and came with envelopes. Then I found sets of the little woven baskets at the dollar store. I love anything in miniature size!


Another fun part is decorating the wrapping. I bought this Love stamp since Love is my last name, to stamp on things I make and because I was selling these for Valentine’s Day. I love giving these miniature gifts as a small thank you or inside of another package. I am looking now for new wrapping ideas. Is there any you would like to share?
