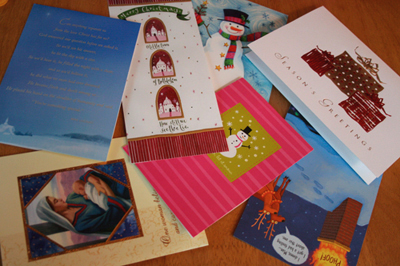
Okay, I understand, enough with the holiday theme already. However, as the year draws to a close and you are contemplating the pretty cards on your mantle, consider saving them for one of these projects:
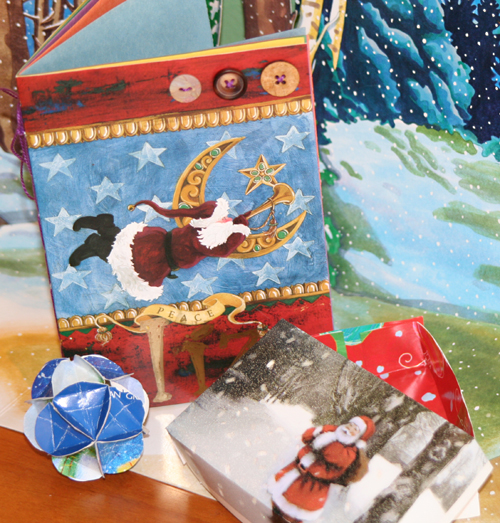
A Ball
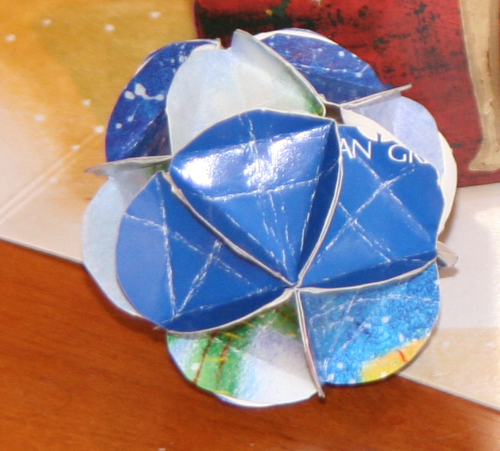
All Free Crafts.com has a tutorial on making a ball shaped ornament out of a card. This is a fun little project that turned out better than I had expected.
A Box

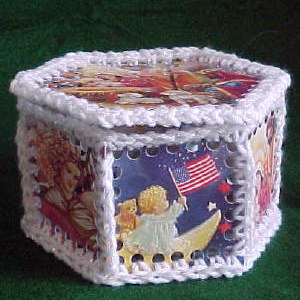
Julie Bolduc has instructions for a hexagon shaped lidded box. I actually didn’t receive enough suitable cards to make this box (16), but it looks like a cool project that you could make out of a variety of papers.
A Book
In July, Jennifer shared a guest posting on making a mini journal. You could follow her instructions and create a similar journal using a holiday card as a cover. The book could be left blank, you could turn it into an Advent journal with a little thought or activity for each day, or you could make a special address book for next year’s holiday cards.
A Luminary
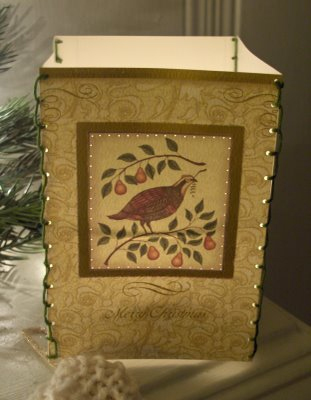
Kawaii Crafter made these pretty luminaries out of Christmas Cards. I think the picture says it all. They are the perfect thing for dreary days during the next three months, at least in the Northeast.
Other Cool Ideas
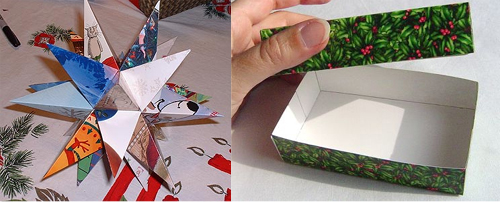
Jenny Harada made a funky star. It looks like you’ll need about 10 cards for this project.
And here is Diane Gilleland’s popular greeting card gift box as featured on her blog CraftyPod
I hope this is some inspiration to Reuse before you Recycle. Maybe you can make a little something before 2008 begins.
From all of us at Crafty Daisies: Happy New Year!
]]>
Choose Something Like A Star, Robert Frost
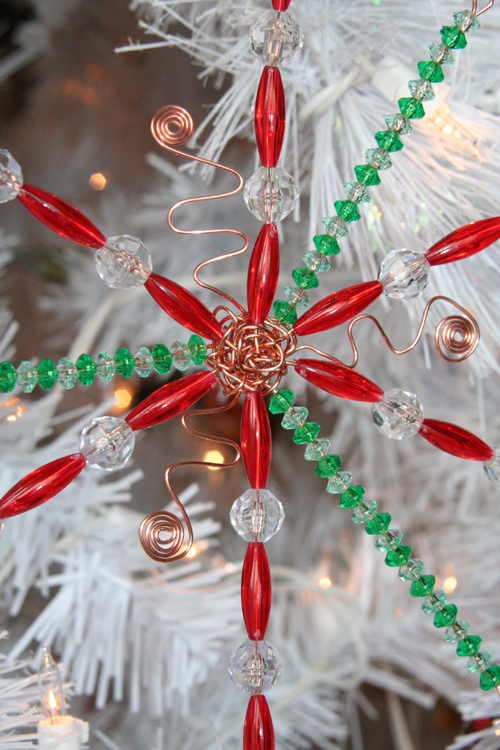
Here is an hour-long project for that last minute gift. My friend always gives me an ornament for Christmas and when I saw this year’s I had a “Hmm, I wonder if I can make one of those” moments. (Did I mention that I tend to procrastinate and suddenly making a star was way more important than typing up overdue PTA meeting minutes?)
So here it goes:
Materials
- 20 gauge or slightly thicker wire. I used copper wire from the hardware store.
- Wire cutter, pliers
- Beads, washers, popcorn, buttons, or anything else you can think of to string on the wires
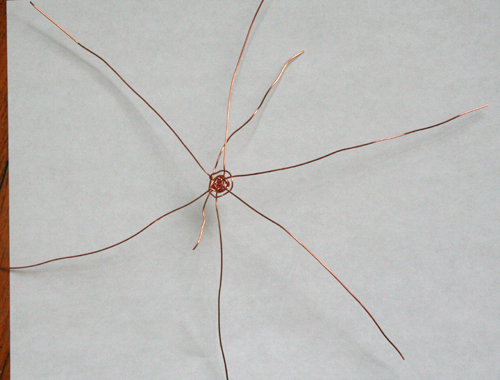
Step 1
For a six point star cut three 12 inch lengths of wire and one 6 inch length to tie the wires together.
Step 2
Lay out the three 12 inch wires to make a star shape. Then take the opposite ends of the bottom wire, cross them over the middle of the star and begin securing the wires. Repeat with the remaining 2 wires. This may require some fiddling. Basically you want to kind of wrap the wires around each other to make a star shape.
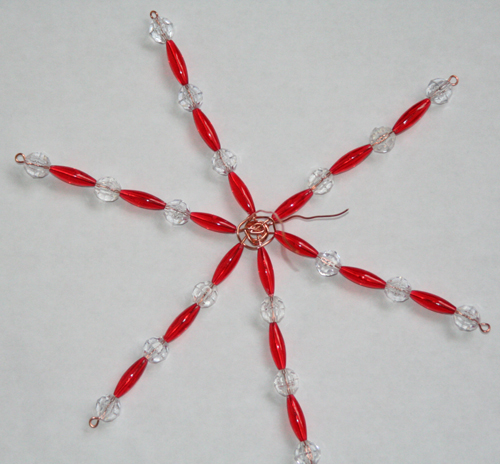
Step 3
Further secure your shape by using the 6 inch length of wire and basket weaving around the center of the star. Go over one wire and under the next, and so forth. Once you get to the beginning, you have to wrap the wire around the first “ray” so the securing wire can go the opposite way on the second round. In other words, if the wire went over the first “ray” the first time, it should go under the “ray” the second time. (Please let me know if there’s a better way to explain this.) Do this until you find that the ends of the wire are fairly secure and the whole contraption looks like a star. (Oooh, this could also make a good spider.)
Step 4
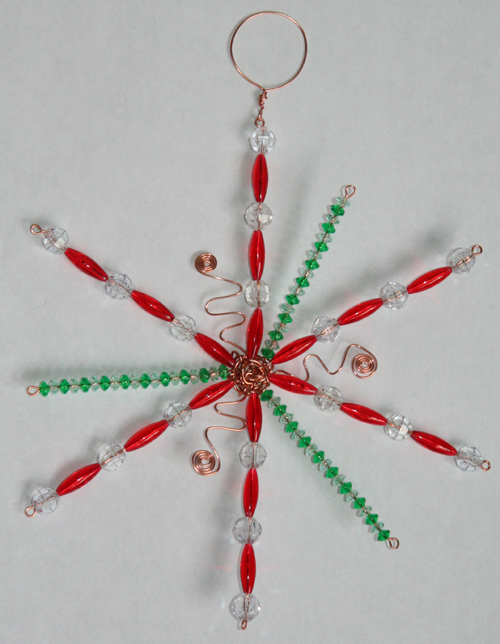
Start decorating your star. I used beads, but I think you could make a really cool star using stuff from the hardware store like washers and nuts and anything else you can thread. At the end of the wire, make a basic loop to prevent everything from sliding off. (See wigjig.com for instructions.) Repeat with the remaining wires. Tie a ribbon, string or wire off one point to hang up your star and you’re done.
Variations
- Make a second star, stack the two stars and tie them together to make a 12 pointed star.
- For a kid version, use chenille wire and decorate with beads or buttons
- Use popcorn and dried cranberries to decorate the wires
- Make a glam star with silver wire and crystal beads
- Don’t decorate the wires, just use your pliers to bend them this way and that
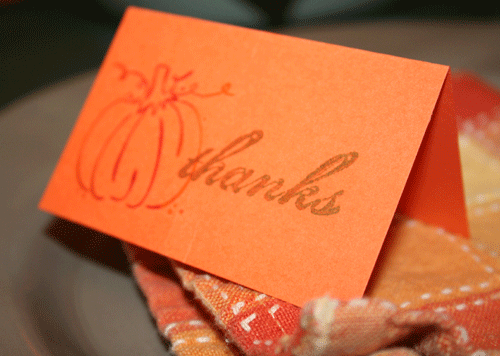
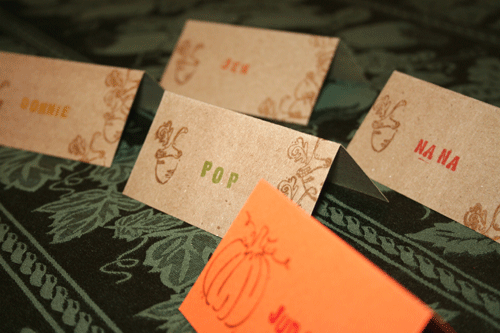
I know I am a few days past Thanksgiving, but I wanted to share an idea that I like to use for my holiday table that you could apply toward your upcoming Christmas plans- stamping placecards, messages, or labels.
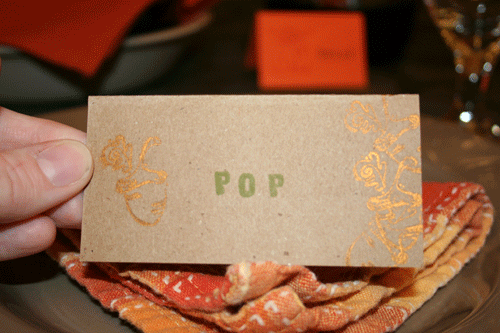
I cut cardstock about 3″ by 3″ and love to use metallic ink great for holidays like copper color, gold or silver. Very festive! With a tiny aphabet or message stamp I create labels for each member of the family around the table. Sometimes I have written a small message inside or written specifically why I am thankful for them or love them. You could even make a game of it or hide the winner of a small prize, or first to get in the buffet line! There are lots of ways to be creative here and make your meal more memorable!

I have also used these cards to disperse reminders about the table (like the “Thanks” cards), or as labels when there are many people visiting my buffet. For example to label: Regular or Decaf coffee, a baked dish or dessert, Splenda or sugar, etc. This would be a great craft to let the kids in on too and let them help you stamp or decorate with holiday stickers. These would look beautiful coordinated with the stamped napkins or paper tablecloth posted earlier this month. Get stamping!
I grew up in Germany and advent calendars were always a big deal in my family. I remember this beautiful embroidered calendar my mother made for my aunt with all kinds of interesting little packages attached to it. My brother and I would discover calendars made out of matchboxes and walnut shells or just wrapped up little packages tied together with string. Last year, my mother even put together a calendar for my brother’s dog. So in the spirit of the season, I went online to browse for some inspiration for this year’s calendar.
Paper Calendars
Kids Craft Weekly explains how to put together a cute origami cup calendar. You could also make little origami boxes as explained by Lisa Lam from U-handblog, or just simple cones and fill them with goodies.
Another fun idea from Kinder Stadt is to use toilet paper rolls and to turn them into snowmen, Santa Clauses, or penguins. 
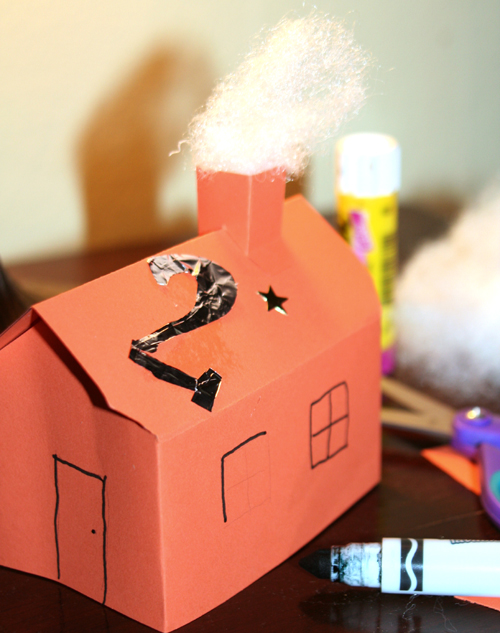
If you have the space you could create a whole village of 24 houses. Marilyn Scott-Waters of The Toymaker has a great template for a house complete with chimney.
Fabric
Jenny B. Harris of Allsorts just reposted instructions for her felt pocket calendar. I think you could also re-purpose her elf shoes. You could make 12 pairs of shoes and hang them from a clothesline.
Last year, Susie of Susie’s Country Garden made a garland of little stockings.
Eldrid Røyset Førde from Bremanger, Norway has English instructions for a different stocking type calendar.
I also like this quick calendar by Shizzyknits.

Other Materials
Splitcoaststampers has a tutorial for a calendar using little favor tins.
Miniature terracotta pots are another popular starting point for advent calendars. Turn them upside down, add a Styrofoam ball for a head, and paint them to make Santas, elves, snowmen, etc. Then either glue them on top of the box that will contain the gift, or cover the bottom with felt and/or cardboard to hide the gift in the pot itself. Here is a German tutorial from Creadoo with pictures of “potty” creatures to give you some ideas.
I’ve finished my calendar what do I put inside?
If you are still recovering from a Halloween candy hangover and are worried about lead levels in gum ball machine toys, you may want to consider filling your calendar with different activities. Kiddley has a list of activities you could use. You could also put pictures of friends and family in your calendar and put together a progressive collage, or collect or make some ornaments to hide in the calendar and then hang off a branch or your tree.
For more inspiration, go to flicker and search for pictures in the adventcalendar cluster.
]]>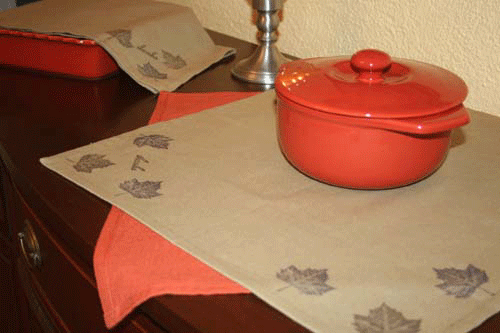
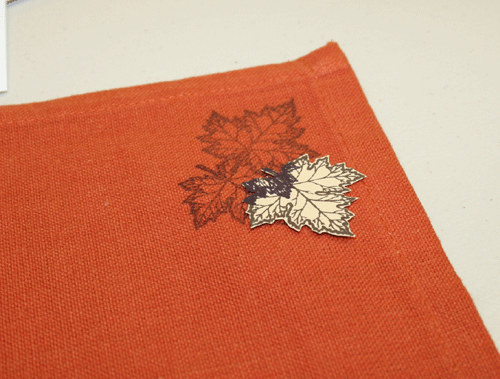
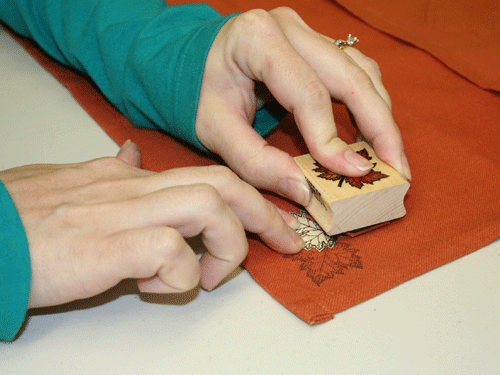
I borrowed this idea from an old Martha magazine – stamping napkins, tablecloths, or towels for the holidays. These large napkins could make lovely certerpieces or could line the table length or buffet that you serve from. A great, quick hostess gift or decoration for any holiday!
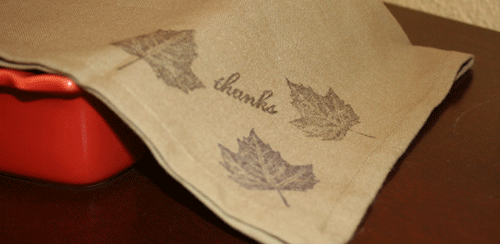
This is one of those perfect projects: Cheap, Quick, Simple, and Not Messy! Literally, a 5 minute project. As you can see some are stamped all the way around, in the corners only, or clustered around the corners. All these looks using only one stamp!
Needed:
Package of Cloth napkins
Stazon permanent ink pad
Holiday picture stamps or messages
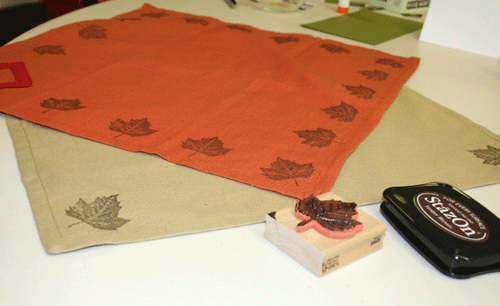
My friend also cut stamped a leaf and cut it out in order to stamp the leaves clustered in a corner without overlapping the leaves. The paper leaf blocks the ink to keep each leaf looking crisp.
Note that I am only using Brown and Plum Stazon ink and one stamp so you can obviously be alot more creative with this idea! I am hoping to find holly leaf or star stamps to decorate for Christmas.
]]>1. Blank scrapbooking calendars - Date a blank calendar for 2008, and at the end of each month create a themed scrapbook layout for the top of the calendar page. For example, February could be a Valentine’s theme, and July could be all about summer fun. This would be a great gift for anyone who would love a year full of memories to keep forever!
2. A themed card gift set – Make a 2008 dated calendar and fill in all the birthdays / anniversaries / celebrations that you think will be celebrated. Throughout the year, make a card for each of the dates recorded (for example, if you have 6 anniversaries, then you’ll need 6 anniversary cards). Give both the calendar and cards together with a nice pen, and you have a great gift for someone who is super busy or tends to forget those important dates.
3. A square a month afghan – sew, knit or crochet a different square for each month of the year. They can be themed or not, but I would suggest making each month different. In December, attach all the squares together for a unique throw that will surely be a conversational piece.
These are just a few ideas to get you started on next year’s Christmas gifts, which will be easy on both the pocketbook and stress level by being completed throughout the year.
]]>
Cut around specific shapes, or take a decorative backdrop and cut shapes in it. Punch a hole in the top for tying them on and cover any writing on the back by gluing a piece of paper over it. You can even embellish them with glitter, sequins or ribbon.
It doesn’t take any time at all, and you’ve turned those beautiful Christmas cards into beautiful gift tags for next holiday season.
