
It’s 90 plus degrees and I could be sorting out summer clothes and putting winter stuff away, however, I’d rather be sewing! While attempting to deal with such mundane chores, I found a pair of Elizabeth’s jeans. While they are way to short for her, the waist still fits perfectly for my skinny child so they became the object of another refashioning exercise.
Part 1: Cutting up the Jeans

- Lay out the jeans and cut off the legs right below the crotch. This will be the top tier of the skirt.

- Open up the seam between the legs.
- Look at the top part of the jeans and measure the distance from the waist to about one inch below the zipper of the jeans. In my case that was 6.5 inches/16.5 cm.
- Mark this distance all around the tier.
- Even out the bottom of the tier by cutting along your mark.


Part 2: The Math
Calculate the Width of the Ruffles
- Decide how long you want the skirt to be and subtract the length of the jeans top tier from this number.
- Divide the remainder by the number of ruffles you wish to add for ruffles of equal width. This skirt is 16.5 inches long. 16.5 – 6.5 inches for the top tier = 10 inches. 10 inches divided by 2 ruffles = 5 inch width per ruffle.

Calculate the Length of the Ruffles
- Measure the circumference of the bottom edge of the top tier and multiply this number by two. This is the length of the second tier ruffle.
- Multiply the length of the second tier ruffle by two. This is the length of the third tier ruffle.
These calculations will give you two fairly full tiers of ruffles. If you want the skirt two be less full, make the ruffles a little shorter.
Part 3: Cut the Fabric
With these measurements, cut your ruffles. You may have to join one or more strips of fabric to get the requisite length. For example, my first ruffle had to be 50 inches long and the fabric was 45 inches wide, so I had to cut another 5 inch strip to make up the 50 inches.
Part 4: Ruffle the Ruffles
- For each ruffle, join the lengths of fabric you cut out to make a long strip.
- Use your preferred method to finish the raw edges of the strips. I sewed a zigzag stitch along the edges.
- For each ruffle, sew the long strip together to make a loop.
- Ruffle the second tier ruffle by sewing long basting stitches along the top edge of the fabric.
- Mark each quarter of the top jeans tier, e.g., front middle, left side, back middle, right side.
- Repeat this for the second tier ruffle.
- With right sides together, pin the second tier ruffle to the top jeans tier matching the quarter markings.
- Gather the fabric between the markings by pulling the top thread of the basting stitch.
- Evenly distribute the gathers.
- Sew the second tier ruffle to the top jeans tier. Repeat this process for the next ruffle(s).


Part 5: Finish the Skirt
At this point you should have attached all the ruffles.
- Hem the bottom tier.
I’m currently infatuated with bias tape hems. This skirt features homemade tape made out of matching fabric. For instructions on making this tape check out Step Four of the cashmere blanket tutorial. You could also just make a traditional double fold hem. (Fold the bottom edge to the inside and press, fold again, press and stitch.)
Dance the night away. This is the perfect party skirt.
]]>I got a few new books during the last months, which means y’all will be inundated with book reviews. The first one is Sew What! Skirts by Francesca Denhartog and Carole Ann Camp.

The premise of the book is that you can create your own funky designs with their instructions and a few basic sewing skills. The 16 different styles featured in the book are variations on two patterns: the straight skirt and the A-line skirt. The writers provide straight forward instructions on how to measure and draw the necessary patterns. In addition, they explain how to finish edges, make darts, sew hems, add different kinds of waistlines, and insert zippers.
Exhibit A, my Memorial Day project, is a fairly simple A-line skirt. It’s based on the East Meets West skirt in the book except I changed the zipper around, added a lining and used bias tape for the hem.


I love this hem. It was super fast and looks very neat.
It took me about an evening to make the pattern and cut out the skirt and three hours to put the whole thing together. The waist ended up being about 1.5″ too wide. Next time I would make the pattern smaller, and the A-shape less wide, and maybe try darts for the waist.
What I like about the book is that it gives you a solid basic footing to go forth and experiment with whatever look, fabric, trim, etc. you want to work with. A Flickr search renders 530 pictures. Below is just a small selection of what I found. If you do end up getting this book, make sure to go to the publisher’s website for the errata page. There are a couple of mistakes in the book that you would want to correct before you start cutting up your fabric.

I think Storey redid its website because the errata page I downloaded two days ago disappeared. (Thank you to Meredith for noticing this.) For anyone who has an early uncorrected edition, the corrections on the pdf were as follows:
Page 65 Half Circle Wrap:
All you need is 1 length of 42″–45″ fabric (about 2 1⁄2 yards for the average person), plus 1⁄8 yard for the waistband and ties. If you are larger than average, or prefer a fuller skirt, it’s better to use fabric that is 58″–60″ wide (about 3 1⁄2 yards, plus waistband yardage).
. . .
You will need to add to the W measurement to allow
for fabric overlap in the back of the skirt. To do this, measure where your waistline will be, then add 12″ to 14″ (or the amount you want it to overlap). Divide by 3 and round up to the nearest 1⁄2″. Then make your string compass as instructed.
Page 117 Nature’s Child:
under Stuff You Need it should read:
2 lengths* of 42″–45″ fabric
3⁄4–1 yard of complementary fabric
]]>
I finally found the time to make this skirt from this pattern:
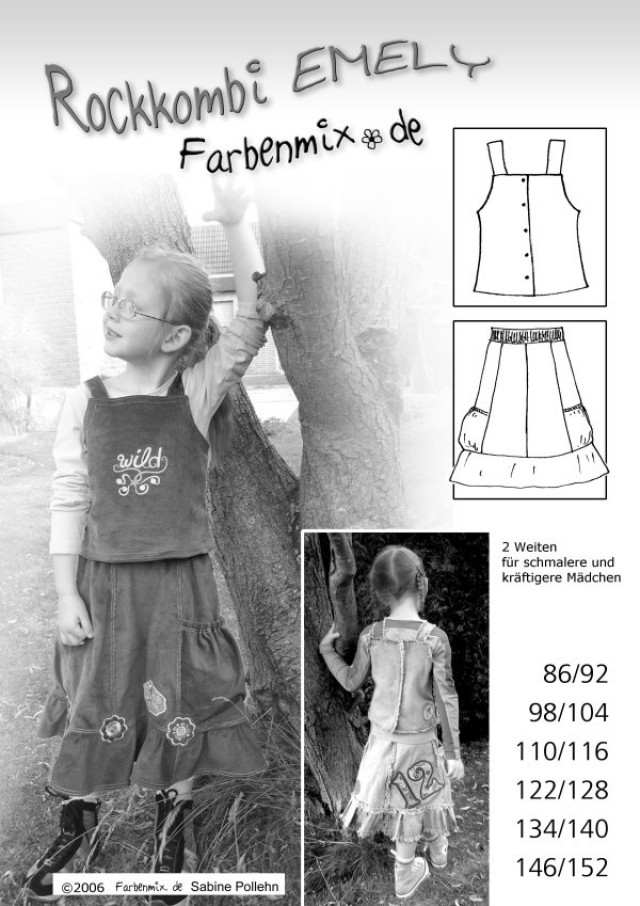
Farbenmix is a German company, thus the European sizing. Their patterns are pretty straightforward and leave you with lots of room to personalize the finished piece. You can access step-by-step, illustrated instructions in English for many of the models. They also feature examples of many variations for each pattern to inspire your inner designer. And, for all you craft fair participants and etsy shop owners, they allow you to sell your finished piece based on their pattern as long as you are selling individual items and not churning out mass produced clothing. This is a list of their retail partners including some American online shops.
P.S. No, this is not a paid endorsement, I just like their stuff. ![]()

So, when my daughter began to outgrow her much loved khakis I began my hunt for some trim. Luckily our local notions store had a stack of it. I decided on three different kinds and bought a yard of each. The trim should be at least two inches wide to get a noticeable extension of length. To ensure my daughter’s buy-in, she decided which trim would go with which pants and we were on our way.

To attach the trim, you measure the perimeter of the leg bottoms and add two inches to that number. In my case the perimeter measured 13 6/8″ plus 2″ equals 15 6/8″. Cut two pieces of trim to this length.

To clean up the cut edges, fold over a half inch at each end and zigzag stitch across the width of the trim.

Then attach the trim along the line of the bottom leg hem allowing for an inch of overlap at the inner leg seam.

Once you’ve come full circle, sew together the overlapping ends of the trim.

Finish with a few stitches across the bottom of the trim overlap.

Should you have some leftover trim as we did, you can fashion a stylish and quick headband by attaching 1 inch wide braided elastic to each end of the trim.
]]>Before:

After:

$7.50 for coat, $3 on buttons, and $5 on drycleaning = $15.50! Not bad!
Send a pic if you have a great update to share!

Though I love the first apron I made, I found a much quicker formula. I simply converted a kitchen towel into a full apron. This is a quick 30 minute project and who can resist with such cute prints out there!

First, Run a needle and thread in and out evenly very close to the trim and draw it to the tightness of gathering you like. I loved this towel because it had the rust colored trim on the top and bottom already.
 <
<
Then pin your ribbons (20") in place and sew over the gathering, making sure it IS wrinkled under the needle and that the fabric doesn't flatten out. I also burn the edges of the ribbon with a lighter so that is does not unravel, very lightly so you don't change the color of the ribbon.
Last, I measured 2 ribbons 28" inches long and measured where at my waist I wanted to tie the apron. Again, I burned the ends of the ribbon and pinned them into place along the back right and left edges of the towel and sewed just over the ribbon, along the original towel seam.
Voila! So cute and automatically comes with a matching towel! This would be a great, quick, housewarming gift!
If this fruity set is perfect for your kitchen I have a couple of sets available here!

Heather’s pattern is free to download and was very simple to use. Her directions and diagrams were great, and this is a great way to use up those skinny pieces of fabric left over. Check it out!
I made these to send off to our Joy and a few other friends who are melting in Mexico.


With Cuirim Craft Fair happening tomorrow, we had a pow-wow last night to tag auction items, organize small details, and make screen-printed shirts.

Joanna had offered to show us how they’re done, so with all our crisp, white tees, we watched and marveled at the process of screen-printing.


And Joy, so incredibly excited about us having t-shirts for the fair:


We’re all so excited about the fair, and anxious to see how much money we’ll raise for the Cuirim House. We’ll definitely be posting pictures next week, so check back to see how it all turned out. And thanks again to Joanna for doing our shirts for us and letting us use your supplies!
]]>I grabbed a onesie that my daughter has outgrown, and for the fabric for the T-shirt I used an adults XL shirt I got on sale from Michaels.

I cut off the bottom of the onesie to make it into a shirt, and then cut along the seams to take the onesie apart. This gave me a general idea of the shapes I was looking for, and using them as reference I drew the pieces out freehand on the yellow T-shirt.

I sewed along happily, thinking that I was going t have an cute little shirt that would work with the diaper I was making. I am making a brown and yellow wool cover and a fitted diaper with giraffes on it, so I used brown thread on the yellow shirt so that it all matches.
Well, here is how the shirt turned out:

I’ve used the arrows to show the errors I made. I missed part of the neckline on the right hand side, the neckline itself is much too high and would choke the baby if they wore it. My left seam was about a half inch towards the middle of the shirt (must have made the back wider than the front) and the left arm seam doesn’t line up with the left side seam.
All in all, its not that bad considering I didn’t use a pattern. But definitely not wearable! Guess its time to search and find that pattern I have and use that ![]()

All you need is: elastic, 2 small buttons, a seam ripper, and sewing machine or needle.
1. I cut 2 pieces of 1/2″ elastic about 2″ long. (adjust to the amount you need garment taken in)
2. I used the seam ripper to cut a slit to fit my button toward the end of each elastic piece. (this was easier than using the button holer, if it frays a little it will be okay.)
3. Line up how much you want the elastic drawn in and sew button into pants.
4. With button through your elastic hole, pull elastic to desired place and sew vertically over opposite elastic end. I did not make it adjustable with more than one button but you easily could.

This literally took me about 5 minutes and I think will save me some money if I don’t have to skip a season with his pants. Any other tips for fitting thinner kids in their clothes?
]]>