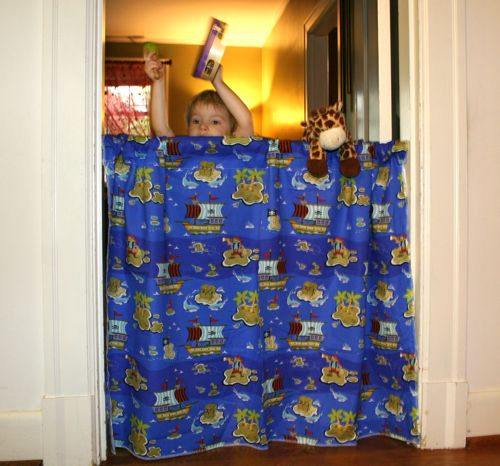
With a $4 tension rod and 1 yard of fabric we have already had hours of fun around our house playing with puppets and stuffed animals, having musical concerts, and using as a special door into my son’s room with a “doorbell” you have to ring.
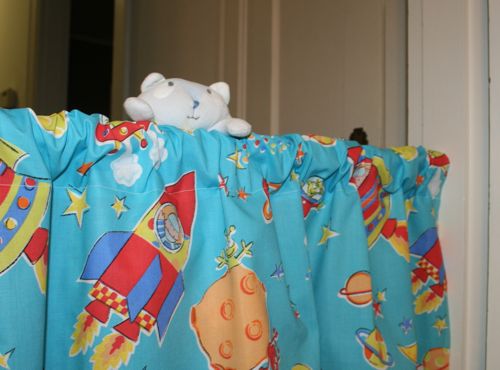
Two of the sides of fabric didn’t even need hemming because they were the finished edge off the bolt and the other 2 ends I serged and turned over and hemmed across to make a casing for the rod. I have specialized curtains too by “monogramming” with a large felt letter sewn on and sequin ribbon stripe near the top, to make it more girly. There is so much you could do to personalize this to your child’s taste, like the different fabrics shown that I have used. And with it less that 3 feet tall it is perfect for a toddler to stand behind or an adult to sit behind.
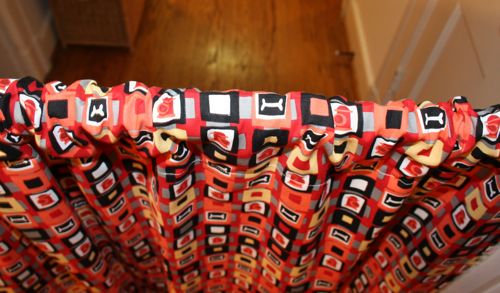
I love a 10 minute project that can really spark his imagination and turn our ordinary hallway into a fun place!
]]>
Now that I have done this once, I think I can seriously do it in half an hour (and you can too!) For the front I used 1 yard of nice cotton fabric- I love this series of prints from “The Hungry Caterpillar” books. The backing is 1 yard of lightweight cozy quilting fleece, a marbled red.
1) Line up fabrics wrong sides together and sew around 3 sides. I used a serger on all 3 sides but you could use a regular sewing machine too.

2) Turn fabric so it is right-side out and press neatly around all 3 sewn sides. Fold 4th side under and sew across the edge, starting and stopping just short of each corner.
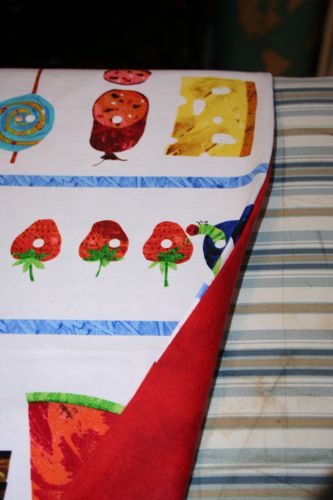
3) Lastly, starting with the 4th edge just sewn, sew on top of the fabric around right-side edge, turning just short of each corner. This will hold the 2 pieces together. I could have also sewn across the blue stripes for added accent since this fabric is patterned this way (but before sewing around right-side edge). You could also sew a pattern on top, or around the characters on the fabric.
Very quick, easy and inexpensive! Great for summer traveling, picnics, for a crib or pack n’ play!
]]>
This towel set came folded in thirds so I used the pleats to narrow this towel to better fit as an apron. I made a 2″ overlap from the pleat on the right and left and pinned the neck strap within the pleats. Then sewed across the top, securing the neck straps. Next I measured 15″ down from the top and sewed down the pleats. This left it to flair like a skirt a little at the bottom.
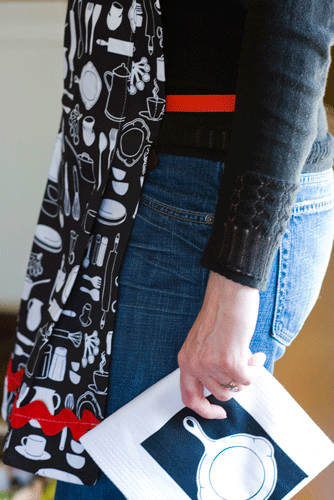
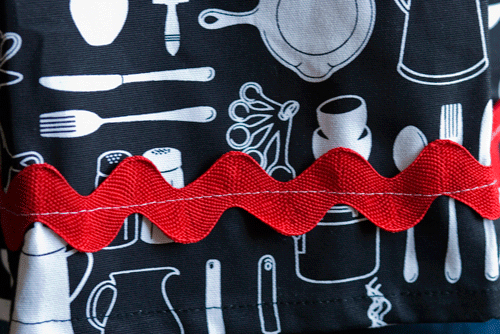
I tucked the ric rac ends under on the back side and sewed down the middle of the ric rac on the front. This would be such an easy way to make any color combination to match any kitchen.
I used grosgrain ribbon for the waist ties. I burned the ends slightly so that they wouldn’t fray and just sewed on the back side along the edge seam higher than where the sewn pleat ended. Super quick and easy!
This apron can be found at my shop in black and red.
]]>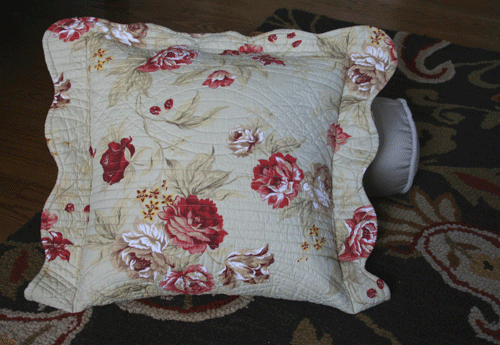
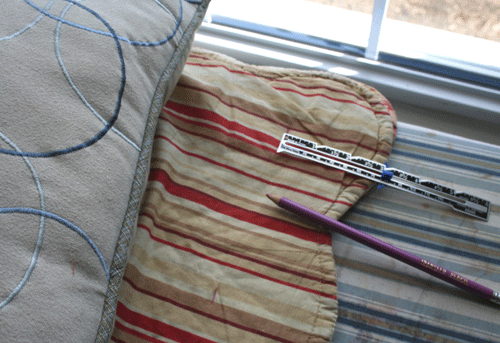
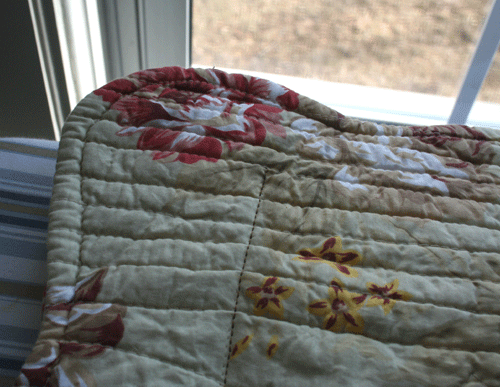
I found a single king-sized sham to make a cover for my old couch pillow. I like using shams because they are already lined, thick, and since they are quilted already have style to them. I also like to be able to take the pillow cover off and wash it since we snack alot on our couch. The sham was so long that I could fold it in half and perfectly surround my old pillow.
To make your own:
1. Fit pillow (or make one desired size) and measure how far in to make the seams. I made a mark all the way down with chalk. I liked the striped fabric the inside was lined with and the scalloped edges, so I decided to sew the seams on the right and left on the right side of the pillow sham, stopping a few inches from the top. This left a slight flap so I could see the reverse lining. (do not sew on the wrong sides as I marked to do here!)
2. Sew down chalk line on top (right side) of sham, or on reverse side if you want to turn it inside out (like making a normal pillowcase).
3. Measuring down on the inside along the top I used adhesive strips of velcro every few inches to attach at the top. Even though this doesn’t need to be opened every day I am going to now sew a line down the middle of the velcro because it hasn’t stuck as well as I’d hoped.
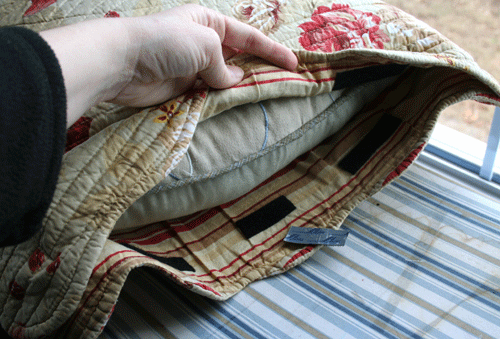
I liked that this was $5 update and the recycling of my old pillow!
]]>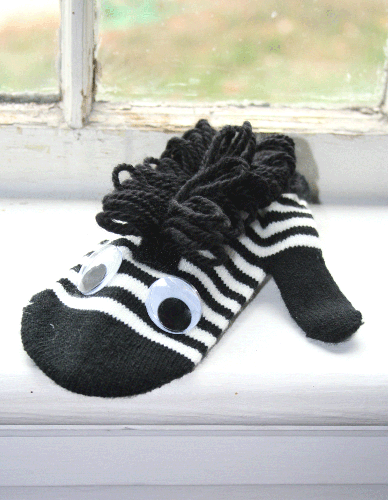
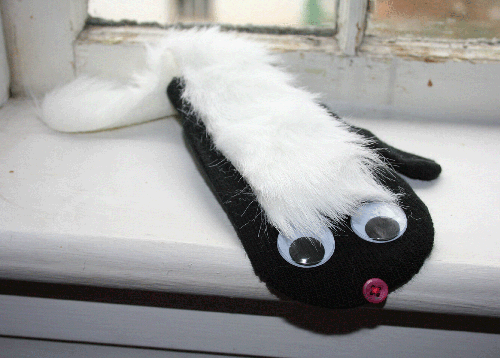
These black and white striped mittens caught my eye as I walked through my favorite store. What an easy, instant way to make a zebra!
So I grabbed a variety pack of googley eyes, felt, and yarn and introduce Zeal the Zebra!
The part of Zeal that I was most proud of was his mane.
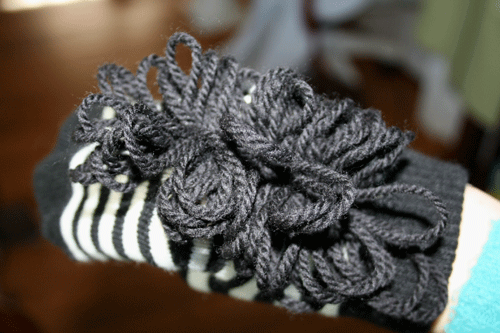
To make the mane: I held out my index and middle finger and using black wool yarn, held the end of the yarn with my thumb and ran the yarn around my two fingers in a figure eight. Then I carefully slid the looped yarn off my fingers and onto a piece of velcro about 5″ long (the soft side). Spread the mane out on the velcro as you desire and sew down the middle holding the yarn in place. Then attach the mane strip to the mitten with fabric glue. I used fabric glue also to stick on the eyes and a rounded pink strip underneath for a tongue. A quick 10 minute addition to your kid’s puppet show!
If Zeal is for you I have one left in my etsy shop and his sweet friend Skip the Skunk!
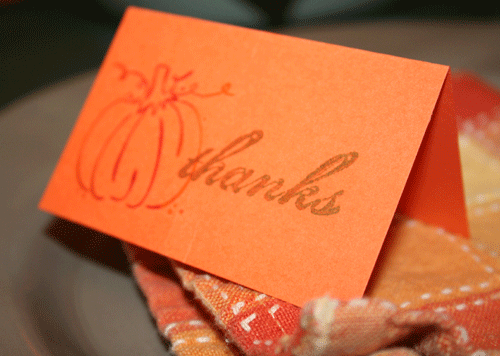
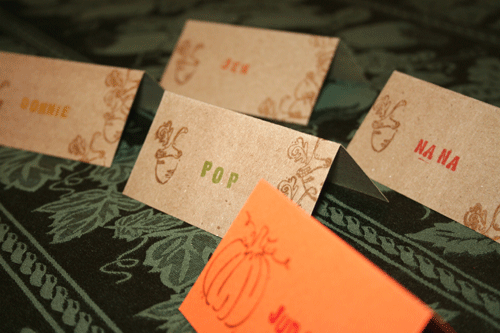
I know I am a few days past Thanksgiving, but I wanted to share an idea that I like to use for my holiday table that you could apply toward your upcoming Christmas plans- stamping placecards, messages, or labels.
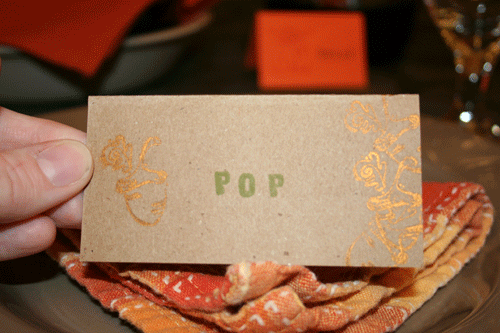
I cut cardstock about 3″ by 3″ and love to use metallic ink great for holidays like copper color, gold or silver. Very festive! With a tiny aphabet or message stamp I create labels for each member of the family around the table. Sometimes I have written a small message inside or written specifically why I am thankful for them or love them. You could even make a game of it or hide the winner of a small prize, or first to get in the buffet line! There are lots of ways to be creative here and make your meal more memorable!

I have also used these cards to disperse reminders about the table (like the “Thanks” cards), or as labels when there are many people visiting my buffet. For example to label: Regular or Decaf coffee, a baked dish or dessert, Splenda or sugar, etc. This would be a great craft to let the kids in on too and let them help you stamp or decorate with holiday stickers. These would look beautiful coordinated with the stamped napkins or paper tablecloth posted earlier this month. Get stamping!
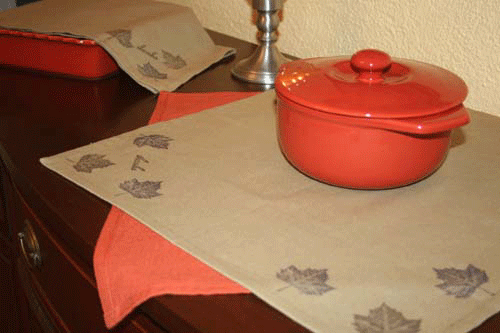
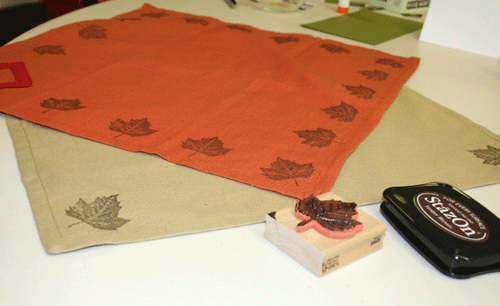
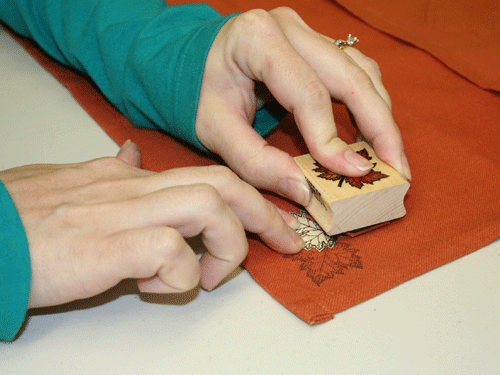
I borrowed this idea from an old Martha magazine – stamping napkins, tablecloths, or towels for the holidays. These large napkins could make lovely certerpieces or could line the table length or buffet that you serve from. A great, quick hostess gift or decoration for any holiday!
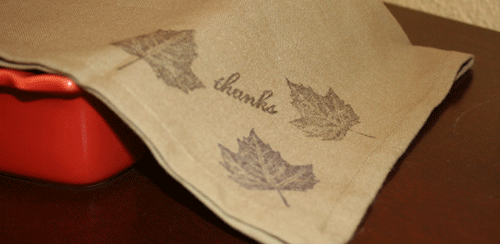
This is one of those perfect projects: Cheap, Quick, Simple, and Not Messy! Literally, a 5 minute project. As you can see some are stamped all the way around, in the corners only, or clustered around the corners. All these looks using only one stamp!
Needed:
Package of Cloth napkins
Stazon permanent ink pad
Holiday picture stamps or messages
My friend also cut stamped a leaf and cut it out in order to stamp the leaves clustered in a corner without overlapping the leaves. The paper leaf blocks the ink to keep each leaf looking crisp.
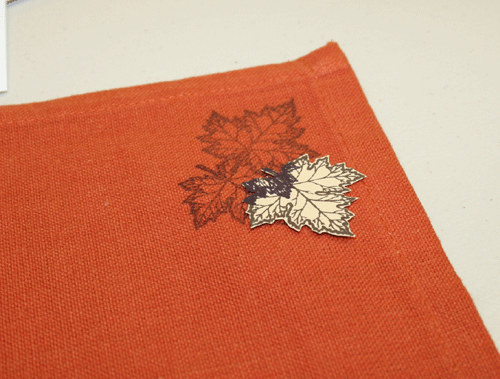
Note that I am only using Brown and Plum Stazon ink and one stamp so you can obviously be alot more creative with this idea! I am hoping to find holly leaf or star stamps to decorate for Christmas.
]]>Here are just a few on my favorite model:
First, using overalls, bandana, kids’ cowboy hat, and a party favor badge- the Cowboy!

Repeating with the overalls and bandana, a train bucket and whistle, and striped hat and jacket (that I got second hand for $1!) – the Train engineer!

Camo pants, vest, fisherman hat, toy fishing pole that came with a puzzle, a small camo backpack of mine, and I cut fish out of felt and strung through twine – the Lucky Sportsman!

Why not borrow from another holiday? Green sweatpants, a red shirt inside out with felt cut out collar (also good on green for Kermit), a red gift bag or stocking for candy, green shoes, and a dollar store elf hat (which I would pin smaller) – the Cutest Little Elf!

Or try getting use out of that suit bought just for a wedding or Easter – carry a Bible and go as a Preacher, put on a campaign button and be a Politician, a bow tie, beard, and book as a Professor, a little suitcase as a salesman!
I saw a few other inspiring ideas on the Today show last week like a:
Train Conductor costume - a dark 3-piece suit with a pocket watch chain and piece of gold braiding glued on a hat with toy train in hand.
Cheerleader or Football player - with mop heads for pom pons and colorful electrical tape for uniform stripes and numbers.
Remember it just needs to be fun, cute, and easy for the child to wear. I like to dress my child up as something he can be when he grows up since he wants to copy his dad so much anyway. I like cute and simple better than scary! So look through the kid’s dresser and pair things together you wouldn’t normally. It will be fun to dig together and get their imagination going too!
Any other ideas you want to share?
]]>
Don’t know what to do with those empty coffee canisters? Turn them into pumpkins! My mom used to do this and they make great fall decorations and you can fill them with just about anything, or give them to the kids to use for trick-or-treating. Even if you’re not a crafty person, this project is easy and quick and virtually fool-proof.
Supplies needed:
Empty metal cans
Two different shades of acrylic orange paint
Black acrylic paint
Pencil
Sponge or sponge brush
Small paint brush or small sponge
Paper plate
nail and hammer, or electric drill and bit
Craft wire or a wire coat hangar
1) You’ll first peel the packaging off the can, and wash with soapy water to remove any residue; dry completely.
2) Drill two holes (or use the nail and hammer) about an inch below the rim on opposite sides of each other to place the handle. Be careful handling the can afterwards – the holes will be sharp on the inside, so you may want to file them down a bit.

3) Take the darker color orange paint and pour a little into the paper plate, then sponge the paint over the outer surface of the can. You can brush it on first if you like and them dab it to create texture. Let the paint dry completely.

4) Take the lighter color orange paint, pour a little into the paper place, and then using the sponge dab it into both colors and sponge onto the can, creating more texture and a more saturated color. Let the paint dry completely.


5) Using your pencil, draw on the eyes, nose, and mouth, using whatever template you already have or whatever’s in your minds eye. Then fill in with the black paint (in the same manner – sponging it on or dabbing it with a paint brush). You may need to do two coats so no orange shoes through.

6) The final step is attaching your handle. If you have a wire coat hangar around you may certainly use this, but you must also have pliers or a big, strong man to help twist the wire. Since I had a coat hangar, I decided to use one, but using craft wire may be the easiest to work with. You’ll stick one end through one of the holes, and twist it at the sides to keep it in the hole. Then you’ll do it from the other side.


To protect yourself from being poked by the sharp ends, you may want to sand them down a smidge. Then place on a mantle or table and voila! A pumpkin coffee canister that can hold cookies, candies, potpourri or even your art supplies.
]]>
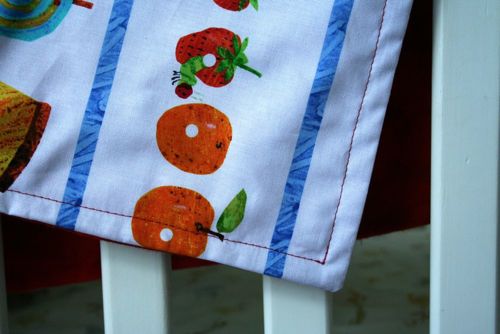
Though I love the first apron I made, I found a much quicker formula. I simply converted a kitchen towel into a full apron. This is a quick 30 minute project and who can resist with such cute prints out there!

First, Run a needle and thread in and out evenly very close to the trim and draw it to the tightness of gathering you like. I loved this towel because it had the rust colored trim on the top and bottom already.
 <
<
Then pin your ribbons (20") in place and sew over the gathering, making sure it IS wrinkled under the needle and that the fabric doesn't flatten out. I also burn the edges of the ribbon with a lighter so that is does not unravel, very lightly so you don't change the color of the ribbon.
Last, I measured 2 ribbons 28" inches long and measured where at my waist I wanted to tie the apron. Again, I burned the ends of the ribbon and pinned them into place along the back right and left edges of the towel and sewed just over the ribbon, along the original towel seam.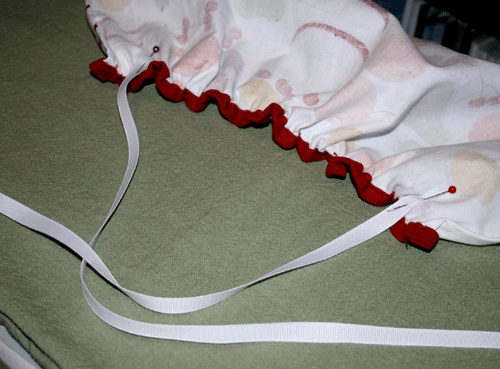
Voila! So cute and automatically comes with a matching towel! This would be a great, quick, housewarming gift!
If this fruity set is perfect for your kitchen I have a couple of sets available here!