
Digital Scrapbook Papers are not only for scrapbooking. You can use them for a a lot of different craft projects.
Where To Get Them
- Digital Scrapbook Place: You must register to gain access to their freebies page, which offers a myriad of digital papers
- Crafts Beautiful: this British DIY site provides a ton of tutorials. Every month Crafts Beautiful introduces a new set of “backing papers.”
- Shabby Princess: Here you can find gorgeous sets of papers and embellishments. I used the 2005 holiday sampler for the projects on this post
What To Do With Them
- Print on paper and make paper beads, paper boxes (Mirkwood Designs has nice templates), envelopes, stationary

- Print on fabric using either inkjet fabric sheets or, for larger pieces of fabric, have your designs printed by Spoonflower and make appliques, key chains, napkins

- Print on shrink film (Shrinky Dinks) to make tags, earrings, charm bracelets, mobiles, drink charms

- Print on iron on transfers and decorate onesies, T-shirts, did I mention napkins?

- Create cross-stitch patterns using a tool like Artopik

What do you like to do with these papers?
P.S. Thank you to Meggie Cat who inspired this post with her collection of online tools and freeware.
]]>
There are no measurements for the fabric because you will want to use up what strips or scraps that you have and make size bag you desire. You will need: measuring tape, pins, fabric, wide grosgrain ribbon, iron, & sewing machine/serger.
1. Lay out the fabric strips that you want to use. Fold it to picture what the bag will look like finished. My seam will be on a side, though it could be at the bottom, depending on your pieces. You can see one piece in taller than the other.

2. Cut ribbon the same width as fabric. Measure and cut 2 ribbon handles, either short handbag length or longer to fit over the shoulder. (Cut 1-2″ longer than you want the finished handles to turn out.) I cut red handles here but decided to do white as you can see in my finished product.

3. Lay right sides of fabric together and sandwich in the ribbon. Match up the 3 layers at the top edge, pin together, and sew across this top edge.

4. Turn fabric right side up to inspect that the 3 layers are all included in seam. Pretty already!!

5. On wrong side, press seam to one side and iron fabrics flat. Do not iron over right side of ribbon. Trust me!

6. Turn top edge down twice about 1/2″ each time and press. This will be the casing your handles will slip under.

7. Do not sew over the edge you just pressed. We will do that last. Next, sew down the other sides of the bag. You can see the pins pointed to where I am going to sew. (I am using a serger to make that enclosed edge but a regular machine seam is the same.)


8. The handles: I like to point the open, top edge toward myself. Take a ribbon handle (or whatever you want to use for a handle, fabric will work too), measure in from the edge where you want the handles placed and slip the handle in.

9. Fold the handle then toward yourself and pin. Curve the handle over and pin it the same distance from the opposite side. Flip bag over to back and repeat with second handle.


*Note: There are many ways to make and attach handles, this is just the way that I made up that I like.
10. Last step – Choose a stitch and sew across the top edge that you pressed. I like to use a wide, tight, zigzag stitch. Turn inside out and you are done.


Suggestions: Use different fabric stripes; quilt pieces together; sew several stripes of ribbon; square the bottom of the bag.
If you follow these directions and want to share what you come up with, email your picture to us by June 1 and we will post them to spread the ideas. Send name and pic to craftydaisies@gmail.com. Thanks!
]]>
Heather’s pattern is free to download and was very simple to use. Her directions and diagrams were great, and this is a great way to use up those skinny pieces of fabric left over. Check it out!
I made these to send off to our Joy and a few other friends who are melting in Mexico.


The lid comes off, and this is what is found inside:

I got the idea for this from the cricut.com messageboard, but you don’t need a Cricut to make it. What you do need is 3 pieces of 12×12 cardstock, one piece of 6×6 cardstock and matching paper and/or embellishments you want to use. Start by scoring lines on one piece of cardstock 4 inches apart, making the paper look like a tic-tac-toe board. Cut out the four corners.

On another piece of cardstock, score the lines 3.75 inches apart, and cut out the corners. Repeat with another piece of cardstock, making the lines 3.5 inches apart. You will have to trim the length of the edges as well, as much as you want. I chose to round my corners and distress the edges of the layers at this point.

To make the lid, take the 6×6 piece of cardstock and score it at 1 inch all the way around. Do a straight line clear across the side of the cardstock on each side. Cut very carefully one line on each side so that you can tuck it up under the next side and tape it. Don’t cut past the one inch score line.

Fold the sides in, and glue to secure. Now you can begin layering your cut pieces, putting the smaller ones on top of the larger ones and adhering the middle squares only. Once the box is together, you can decorate and embellish each layer as you want. I did it this way, and found that it might be easier to decorate each layer before you assemble it, but that’s a personal choice.
My box isn’t quite finished yet, I want to add some journaling in the middle of the box, and I haven’t decided how I want to decorate the outside of the box yet. But it worked up pretty fast, one evening, and it makes a unique gift.
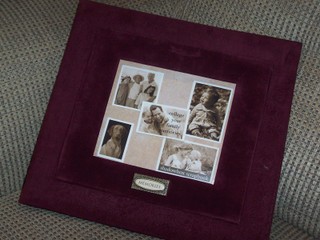
]]>Closed…it looks just like a regular scrapbook album:
Opened…its a storage secret – lots and lots of CDs:
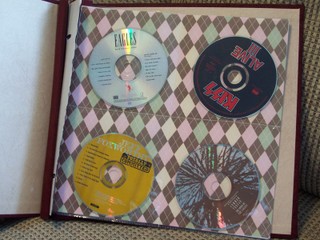
I started with an empty scrapbook album, an empty page protector and 2 pieces of scrapbook paper (for each page of CDs). I folded each of the 12×12 papers into quarters and then opened up. I put the papers into the page protector with the right sides facing out, and I sewed along the folds using my sewing machine. This separates the page into 4 pockets. I then used a ruler and a scalpel to cut about a half inch below the horizontal stitching, creating pockets to slide the CDs into. And there you have it – quick and easy CD storage that matches your decor, takes about 5 mins to make (per page) and holds 8 CDs.
This is a great project to get rid of some scrapbook paper you have laying around, as well as embellishments if you want. I chose to keep mine simple, but you could jazz the pockets up using embellishments, ribbon, colored thread…the options are endless!
]]>A lot of people I know enjoy scrapbooking. I love taking pictures, and I loved my design layout class in college, but something about scrapping didn’t appeal to me. Maybe it was because I had so many pictures, I already felt overwhelmed before I even began. People would talk about it, share layouts and what-not and while I thought they all looked fabulous, I still had no desire to do it. Until I was at Michael’s one afternoon and found a scrapbook I fell in love with.

So I bought it. And $50 in other supplies (which doesn’t buy much, but enough to get started with). And what have I done with it? Nada. That was four months ago and I still haven’t even thought about starting a page. I would think of layouts in my head, and then get overwhelmed. I know this stems from my perfectionist personality, of I have to do it 100% right the first time, perfect, or I won’t do it at all. I know I need to get over it, but then I see what other friends have done and think, “I could never show my work to anyone if it’s not right.”
So here I have a beautiful (and very empty) scrapbook, along with lots and lots of paper, and I don’t even know how to begin. I know I should stick with other crafts that I love (embroidery, painting, photography), but I keep thinking I should atleast give it a try, right? And if I don’t, anyone want some scrapping supplies?
]]>