I’m on the road again, this time visiting my parents for my dad’s 70th birthday (the Munich airport has a big toy store that’s open at 7:00 a.m. if you’re ever in need for something like that) , but I wanted to share these links with you if you are looking for projects for this weekend.
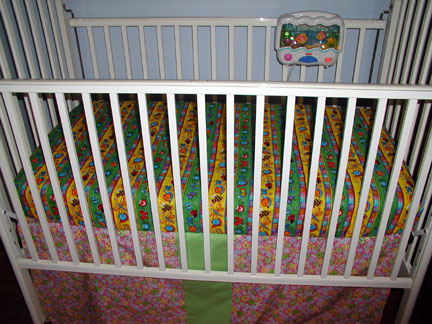
First off, Jeannie of whatthehay is sharing a tutorial on sewing your own cribsheets. She writes:
After finding out that we were pregnant with our first baby, I began the long and fun process of collecting all of the things that a new human needs to survive. First on the list? A CRIB of course! Beyond the crib (which we found at a consignment sale, along with the crib mattress) a baby needs crib sheets. Happily, Rosie has a talented grandma who was more than happy to provide her with many of the essentials of baby survival – a quilt (with strict instructions to USE it), a few totally cute outfits and 4 crib sheets.
Rosie’s Grandma is a sewing kind of lady and back when I was a kid, money was tight and so, well, she sewed. Beyond making nearly all of our clothes that weren’t hand-me-downs, she also devised a pattern for a crib sheet. Back in the day, people actually made their own sheets for their big beds, too, and she adapted this pattern from one of those patterns.
If you have a baby shower coming up, check out her crib sheet tutorial for a very useful, unique gift.
Secondly, I started another blog called craftevolution.com. It’s still in early development, but come visit to see some ideas for Halloween costumes based on basic sewing patterns and let me know what you think about the blog.


Digital Scrapbook Papers are not only for scrapbooking. You can use them for a a lot of different craft projects.
Where To Get Them
- Digital Scrapbook Place: You must register to gain access to their freebies page, which offers a myriad of digital papers
- Crafts Beautiful: this British DIY site provides a ton of tutorials. Every month Crafts Beautiful introduces a new set of “backing papers.”
- Shabby Princess: Here you can find gorgeous sets of papers and embellishments. I used the 2005 holiday sampler for the projects on this post
What To Do With Them
- Print on paper and make paper beads, paper boxes (Mirkwood Designs has nice templates), envelopes, stationary

- Print on fabric using either inkjet fabric sheets or, for larger pieces of fabric, have your designs printed by Spoonflower and make appliques, key chains, napkins

- Print on shrink film (Shrinky Dinks) to make tags, earrings, charm bracelets, mobiles, drink charms

- Print on iron on transfers and decorate onesies, T-shirts, did I mention napkins?

- Create cross-stitch patterns using a tool like Artopik

What do you like to do with these papers?
P.S. Thank you to Meggie Cat who inspired this post with her collection of online tools and freeware.
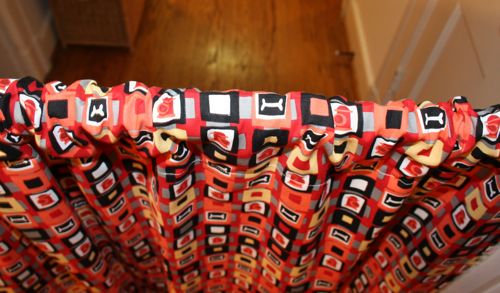
]]>I am all about- what can you make with 1 yard, 1 skein, etc. And so in a pinch for a gift I used one yard of fun fabric to make a doorway puppet show curtain.
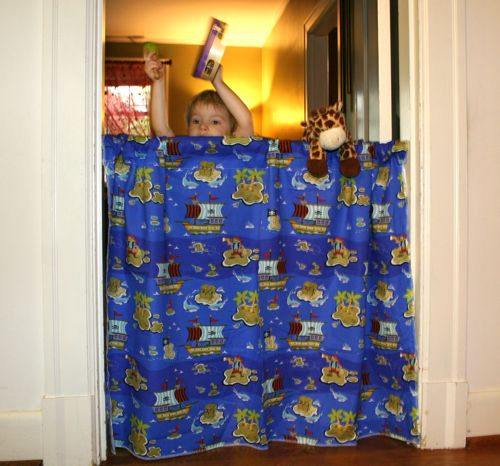
With a $4 tension rod and 1 yard of fabric we have already had hours of fun around our house playing with puppets and stuffed animals, having musical concerts, and using as a special door into my son’s room with a “doorbell” you have to ring.
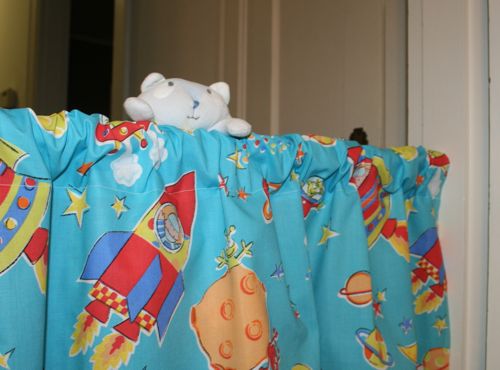
Two of the sides of fabric didn’t even need hemming because they were the finished edge off the bolt and the other 2 ends I serged and turned over and hemmed across to make a casing for the rod. I have specialized curtains too by “monogramming” with a large felt letter sewn on and sequin ribbon stripe near the top, to make it more girly. There is so much you could do to personalize this to your child’s taste, like the different fabrics shown that I have used. And with it less that 3 feet tall it is perfect for a toddler to stand behind or an adult to sit behind.
I love a 10 minute project that can really spark his imagination and turn our ordinary hallway into a fun place!
]]>
As you may have noticed by now, we are a Pokemon household. So when my daughter’s teacher specified a zippered, soft pencil case as part of the school supply list, we obviously couldn’t just buy one. What do you think about our cooperative effort?
Materials
To make this pencil case you need:

For the applique:
- an Image
- Transfer Paper
- White Fabric
- Fusible Web
- Fabric Markers
For the pouch:
- 2 10″x 6″ pieces of fabric, I used denim remnants from another upcycling project
- a Zipper
- optional: 2 9″x 5″ pieces of heavyweight fusible interfacing, 2 10″x6″ pieces of lining fabric.
Because the denim felt a little floppy, I used fusible interfacing to give it more body and added a lining.
Creating the Applique

To do it the right way, i.e. not the way I ended up doing it, cut the fusible web to approximately the size of the applique you want to make. Iron it to the left side of the white fabric. Leave the second backing of the fusible web on for now. Then transfer your image to the right side of the fabric and color it with fabric markers. Cut out your applique and set it aside.
Preparing the Fabric

If you are using fusible interfacing, follow the manufacturers instructions and iron it onto the left sides of the outer shell fabric.

Turn the fabric around. Remove the paper backing from your applique and iron it onto the right side of the fabric. Using the zigzag setting on your sewing machine, stitch all around the image. I set the width to 0.5 and the length to 2, but play around with it until you get the effect you like.
Inserting the Zipper

If you are not using a lining, switch to your zipper foot, align the right side of the zipper with the right side of the top of one of the fabric pieces and sew it together on the left side. Repeat this with the other side of the zipper and the second piece of fabric. If your zipper is longer than your fabric, just let the bottom end stick out. On the right side of the fabric sew a top stitch along both sides of the zipper.
If you are using a lining and have never done this before, take a look at Lisa’s Sewing zippers in bags tutorial at U-Handblog starting with Step 4. She has great instructions and is my crafting hero.
Here it goes:

As Lisa puts it, you make a sandwich. This is the order when the right side of your outer fabric faces up: right side up outer fabric–wrong side up zipper–wrong side up lining. (My picture ended up being the reverse of Lisa’s, so if you are looking at both tutorials, you are thoroughly confused by now.) Put the sandwich together and sew along the top edge through the lining, zipper, and outer shell fabric. If you unfold the whole thing, it should look like this:

Repeat with the other side.
Sew a top stitch alongside the zipper on the right side of the outer fabric through the fabric, zipper and lining. Repeat on the other side.
Putting It All Together
Very Important: Open the zipper at least halfway.
If you are not using a lining, put the right sides of the fabric together and on the left side of the fabric, sew the sides and the bottom of the pouch together. If you wish, you can square the bottom of the pouch using these instructions. Turn the whole thing right side out. Phew, you are done.

If you are using a lining, remember to open the zipper at least halfway. Put the right sides of the lining together and the right sides of the outer fabric. Pin the whole contraption together and leave an opening at the bottom of the lining. Start at the beginning of the opening in the lining and sew all around the side of the lining, outer fabric, other side of the lining, ending at the other end of the opening in the lining. Again, if you want to square the bottom of the fabric and lining, you can do that now following these instructions.
Then, turn the whole thing right side out through the opening in the lining. (By the way, if you didn’t keep the zipper open, you are now saying some not so very nice words.) With everything turned right side out, close the opening in the lining, stuff the lining inside the pouch, close the zipper, and you are done. Yay!
]]>

It’s 90 plus degrees and I could be sorting out summer clothes and putting winter stuff away, however, I’d rather be sewing! While attempting to deal with such mundane chores, I found a pair of Elizabeth’s jeans. While they are way to short for her, the waist still fits perfectly for my skinny child so they became the object of another refashioning exercise.
Part 1: Cutting up the Jeans

- Lay out the jeans and cut off the legs right below the crotch. This will be the top tier of the skirt.

- Open up the seam between the legs.
- Look at the top part of the jeans and measure the distance from the waist to about one inch below the zipper of the jeans. In my case that was 6.5 inches/16.5 cm.
- Mark this distance all around the tier.
- Even out the bottom of the tier by cutting along your mark.


Part 2: The Math
Calculate the Width of the Ruffles
- Decide how long you want the skirt to be and subtract the length of the jeans top tier from this number.
- Divide the remainder by the number of ruffles you wish to add for ruffles of equal width. This skirt is 16.5 inches long. 16.5 – 6.5 inches for the top tier = 10 inches. 10 inches divided by 2 ruffles = 5 inch width per ruffle.

Calculate the Length of the Ruffles
- Measure the circumference of the bottom edge of the top tier and multiply this number by two. This is the length of the second tier ruffle.
- Multiply the length of the second tier ruffle by two. This is the length of the third tier ruffle.
These calculations will give you two fairly full tiers of ruffles. If you want the skirt two be less full, make the ruffles a little shorter.
Part 3: Cut the Fabric
With these measurements, cut your ruffles. You may have to join one or more strips of fabric to get the requisite length. For example, my first ruffle had to be 50 inches long and the fabric was 45 inches wide, so I had to cut another 5 inch strip to make up the 50 inches.
Part 4: Ruffle the Ruffles
- For each ruffle, join the lengths of fabric you cut out to make a long strip.
- Use your preferred method to finish the raw edges of the strips. I sewed a zigzag stitch along the edges.
- For each ruffle, sew the long strip together to make a loop.
- Ruffle the second tier ruffle by sewing long basting stitches along the top edge of the fabric.
- Mark each quarter of the top jeans tier, e.g., front middle, left side, back middle, right side.
- Repeat this for the second tier ruffle.
- With right sides together, pin the second tier ruffle to the top jeans tier matching the quarter markings.
- Gather the fabric between the markings by pulling the top thread of the basting stitch.
- Evenly distribute the gathers.
- Sew the second tier ruffle to the top jeans tier. Repeat this process for the next ruffle(s).


Part 5: Finish the Skirt
At this point you should have attached all the ruffles.
- Hem the bottom tier.
I’m currently infatuated with bias tape hems. This skirt features homemade tape made out of matching fabric. For instructions on making this tape check out Step Four of the cashmere blanket tutorial. You could also just make a traditional double fold hem. (Fold the bottom edge to the inside and press, fold again, press and stitch.)
Dance the night away. This is the perfect party skirt.
]]>
This post continues the series of book reviews with Cute Dolls by Aranzi Aronzo. At the end of this entry you’ll find a slide show of a selection of softies exchanged during the course of last month’s softie swap.

This book provides instructions for 21 different cute dolls. The instructions are very simple and entertaining with comments such as
Bear is a slacker.
He’s always looking spaced out.
But it’s strange how relaxing his spaced-out, slacker look is.
It’s also strange how someone like him is actually an Aranzi Aronzo store manager.
Most of the patterns need to be enlarged by 125% to 150% for ultimate sizing. I scanned the pattern and enlarged it with Photoshop. You could also take the book to your local copy shop and enlarge the patterns there.
Each doll is made out of felt scraps and jersey fabric. “Jersey? Ugh, I don’t want to buy more fabric,” was my initial reaction. But then my glance fell on my Goodwill bag filled to the brim with ultra soft t-shirts from last year. So, if you have a special shirt you’d like to recycle, like Elizabeth’s Cape Cod t-shirt on the cat doll, take some shears to your clothing and create a softie. Speaking of softies, check out the softies made by the participants in our softie swap:
You can also read about them at the Flickr Crafty Daisies Softie Swap Group
]]>
I got a few new books during the last months, which means y’all will be inundated with book reviews. The first one is Sew What! Skirts by Francesca Denhartog and Carole Ann Camp.

The premise of the book is that you can create your own funky designs with their instructions and a few basic sewing skills. The 16 different styles featured in the book are variations on two patterns: the straight skirt and the A-line skirt. The writers provide straight forward instructions on how to measure and draw the necessary patterns. In addition, they explain how to finish edges, make darts, sew hems, add different kinds of waistlines, and insert zippers.
Exhibit A, my Memorial Day project, is a fairly simple A-line skirt. It’s based on the East Meets West skirt in the book except I changed the zipper around, added a lining and used bias tape for the hem.


I love this hem. It was super fast and looks very neat.
It took me about an evening to make the pattern and cut out the skirt and three hours to put the whole thing together. The waist ended up being about 1.5″ too wide. Next time I would make the pattern smaller, and the A-shape less wide, and maybe try darts for the waist.
What I like about the book is that it gives you a solid basic footing to go forth and experiment with whatever look, fabric, trim, etc. you want to work with. A Flickr search renders 530 pictures. Below is just a small selection of what I found. If you do end up getting this book, make sure to go to the publisher’s website for the errata page. There are a couple of mistakes in the book that you would want to correct before you start cutting up your fabric.

I think Storey redid its website because the errata page I downloaded two days ago disappeared. (Thank you to Meredith for noticing this.) For anyone who has an early uncorrected edition, the corrections on the pdf were as follows:
Page 65 Half Circle Wrap:
All you need is 1 length of 42″–45″ fabric (about 2 1⁄2 yards for the average person), plus 1⁄8 yard for the waistband and ties. If you are larger than average, or prefer a fuller skirt, it’s better to use fabric that is 58″–60″ wide (about 3 1⁄2 yards, plus waistband yardage).
. . .
You will need to add to the W measurement to allow
for fabric overlap in the back of the skirt. To do this, measure where your waistline will be, then add 12″ to 14″ (or the amount you want it to overlap). Divide by 3 and round up to the nearest 1⁄2″. Then make your string compass as instructed.
Page 117 Nature’s Child:
under Stuff You Need it should read:
2 lengths* of 42″–45″ fabric
3⁄4–1 yard of complementary fabric
]]>

The teacher appreciation luncheon for our school is coming up and we were in need of favors for the teachers. Back in December I saw this tutorial from Creative Outlet Designs in a Sew Mama Sew round up and suggested that we could make these lavender scented wheat sacks for the teachers. You use them as hot or cold compresses by heating up the bag in the microwave or keeping them cold in the freezer.
100 lbs of bulgur wheat

8 yards of fabric

1.5 oz of lavender oil
75 yards of ribbon
73 eyelets, cards, and plastic baggies later, they are finally done:

Thank you to Kerry, Laura, Meg, and Kirsten for supporting me in my crazy crafting endeavors.
Now I just need suggestions how to get 100 lbs of inert mass from my apartment to the school. Any ideas?
]]>
By request I wanted to do a tutorial on the Scrap Sack I posted using up scrap fabric and disguising your seam with a stripe of ribbon.

There are no measurements for the fabric because you will want to use up what strips or scraps that you have and make size bag you desire. You will need: measuring tape, pins, fabric, wide grosgrain ribbon, iron, & sewing machine/serger.
1. Lay out the fabric strips that you want to use. Fold it to picture what the bag will look like finished. My seam will be on a side, though it could be at the bottom, depending on your pieces. You can see one piece in taller than the other.

2. Cut ribbon the same width as fabric. Measure and cut 2 ribbon handles, either short handbag length or longer to fit over the shoulder. (Cut 1-2″ longer than you want the finished handles to turn out.) I cut red handles here but decided to do white as you can see in my finished product.

3. Lay right sides of fabric together and sandwich in the ribbon. Match up the 3 layers at the top edge, pin together, and sew across this top edge.

4. Turn fabric right side up to inspect that the 3 layers are all included in seam. Pretty already!!

5. On wrong side, press seam to one side and iron fabrics flat. Do not iron over right side of ribbon. Trust me!

6. Turn top edge down twice about 1/2″ each time and press. This will be the casing your handles will slip under.

7. Do not sew over the edge you just pressed. We will do that last. Next, sew down the other sides of the bag. You can see the pins pointed to where I am going to sew. (I am using a serger to make that enclosed edge but a regular machine seam is the same.)


8. The handles: I like to point the open, top edge toward myself. Take a ribbon handle (or whatever you want to use for a handle, fabric will work too), measure in from the edge where you want the handles placed and slip the handle in.

9. Fold the handle then toward yourself and pin. Curve the handle over and pin it the same distance from the opposite side. Flip bag over to back and repeat with second handle.


*Note: There are many ways to make and attach handles, this is just the way that I made up that I like.
10. Last step – Choose a stitch and sew across the top edge that you pressed. I like to use a wide, tight, zigzag stitch. Turn inside out and you are done.


Suggestions: Use different fabric stripes; quilt pieces together; sew several stripes of ribbon; square the bottom of the bag.
If you follow these directions and want to share what you come up with, email your picture to us by June 1 and we will post them to spread the ideas. Send name and pic to craftydaisies@gmail.com. Thanks!
]]>This post features the remains of my unloved jeans that I cut up for this bag. I’ve been toying with the idea of a recycled denim bag, but was trying to come up with a variation on the theme. So here it is, a reversible bag.

You can either display the jeans side and make a recycled fashion statement, or you can be more low key about your lifestyle, turn the whole thing inside out and display a cool lining.

The jeans pockets become practical places to stash away your phone, mp3 player, glass baby bottles, in other words, all those treasures you find in your jeans pockets every day. So before you send your denims off to the Goodwill store, take a good luck at them and consider what kind of reincarnation you could create with a sharp pair of shears.
]]>