
As you may have noticed by now, we are a Pokemon household. So when my daughter’s teacher specified a zippered, soft pencil case as part of the school supply list, we obviously couldn’t just buy one. What do you think about our cooperative effort?
Materials
To make this pencil case you need:

For the applique:
- an Image
- Transfer Paper
- White Fabric
- Fusible Web
- Fabric Markers
For the pouch:
- 2 10″x 6″ pieces of fabric, I used denim remnants from another upcycling project
- a Zipper
- optional: 2 9″x 5″ pieces of heavyweight fusible interfacing, 2 10″x6″ pieces of lining fabric.
Because the denim felt a little floppy, I used fusible interfacing to give it more body and added a lining.
Creating the Applique

To do it the right way, i.e. not the way I ended up doing it, cut the fusible web to approximately the size of the applique you want to make. Iron it to the left side of the white fabric. Leave the second backing of the fusible web on for now. Then transfer your image to the right side of the fabric and color it with fabric markers. Cut out your applique and set it aside.
Preparing the Fabric

If you are using fusible interfacing, follow the manufacturers instructions and iron it onto the left sides of the outer shell fabric.

Turn the fabric around. Remove the paper backing from your applique and iron it onto the right side of the fabric. Using the zigzag setting on your sewing machine, stitch all around the image. I set the width to 0.5 and the length to 2, but play around with it until you get the effect you like.
Inserting the Zipper

If you are not using a lining, switch to your zipper foot, align the right side of the zipper with the right side of the top of one of the fabric pieces and sew it together on the left side. Repeat this with the other side of the zipper and the second piece of fabric. If your zipper is longer than your fabric, just let the bottom end stick out. On the right side of the fabric sew a top stitch along both sides of the zipper.
If you are using a lining and have never done this before, take a look at Lisa’s Sewing zippers in bags tutorial at U-Handblog starting with Step 4. She has great instructions and is my crafting hero.
Here it goes:

As Lisa puts it, you make a sandwich. This is the order when the right side of your outer fabric faces up: right side up outer fabric–wrong side up zipper–wrong side up lining. (My picture ended up being the reverse of Lisa’s, so if you are looking at both tutorials, you are thoroughly confused by now.) Put the sandwich together and sew along the top edge through the lining, zipper, and outer shell fabric. If you unfold the whole thing, it should look like this:

Repeat with the other side.
Sew a top stitch alongside the zipper on the right side of the outer fabric through the fabric, zipper and lining. Repeat on the other side.
Putting It All Together
Very Important: Open the zipper at least halfway.
If you are not using a lining, put the right sides of the fabric together and on the left side of the fabric, sew the sides and the bottom of the pouch together. If you wish, you can square the bottom of the pouch using these instructions. Turn the whole thing right side out. Phew, you are done.

If you are using a lining, remember to open the zipper at least halfway. Put the right sides of the lining together and the right sides of the outer fabric. Pin the whole contraption together and leave an opening at the bottom of the lining. Start at the beginning of the opening in the lining and sew all around the side of the lining, outer fabric, other side of the lining, ending at the other end of the opening in the lining. Again, if you want to square the bottom of the fabric and lining, you can do that now following these instructions.
Then, turn the whole thing right side out through the opening in the lining. (By the way, if you didn’t keep the zipper open, you are now saying some not so very nice words.) With everything turned right side out, close the opening in the lining, stuff the lining inside the pouch, close the zipper, and you are done. Yay!
]]>
I made this little story booklet for my sisters 20th birthday which was last week and thought I should make a tutorial at the same time. This little booklet is a great gift idea for the young and old, or it can just be a little book of your illustrations or poetry. Have fun!
First of all you need to do the pages (unless you are making a blank book to draw and write in later then skip this part). I started with an A4 page of watercolour paper and divided it into 15 equal rectangles. Draw your little illustrations in pencil then paint them or colour them with your choice of paints.

Once you have done your little drawings and the paint is dry, outline them in black felt tip marker and write the poem or story in.

Once that’s all done you can cut out the pages neatly with a scalpel and ruler. Don’t cut yourself!

Now comes the fun part. Cut out some strips of paper for the binding. The pieces I used were about 8×4 cms but it really doesn’t matter what size as long as it is smaller than the actual pages. Now fold the strips of paper and glue one side of the fold to one side of a fold on another piece. Keep gluing the folded parts together until you get what looks like a mini book.

Now start gluing the back of the watercoloured pages to the mini book like in the image below. If this doesn’t make sense please let me know-I am terrible at explaining. Keep gluing each page until the book is all glued together. Remember to keep the pages in the right order you wanted and remember that some pages will be back to back.

Now that the booklet is almost done it needs a cover. I cut a piece of cardboard scrap I had lying around. Glue the last two paper strips to the cardboard. The cover is one piece of cardboard not two pieces. Once glued fold it like in the picture. You might need to hold it under some weight (such as another thick book) to help it keep its shape.

Now all you have to do is line the cover with some pretty paper. I chose this gorgeous scrapbook paper that has glittery accents on it. Line both the inside and outside of the cover.

Now you have a cute little story booklet. I tied it with pretty ribbon to give it something extra. You can print a title on the cover, use transfers or stickers or add some beads and ribbon. It’s up to you.

1. Napkin Decoupage describes different projects you can embark on using napkins and glue. It is produced by Crafts Beautiful, a U.K. based website that features a ton of different craft tutorials.
2. The second video is an introduction to working with polymer clay produced by Polymer Clay TV. You can view all their tutorials on their YouTube channel PolymerClayTV.
3. Of course, I had to include a wire wrapping tutorial. This one is by Auntie’s Beads and explains how to make a wire wrapped ring with crafting wire and some buttons. Auntie’s Beads’ website and YouTube channel currently feature 85 jewelry making related video tutorials.
4. Threadbanger produces my favorite crafting webcasts. This installment shows how to upcycle towels into a bathmat.
5. If you are looking for a craft project to complete with your kids on a rainy day, Vicki Bodwell of the Warm Biscuit Bedding Co. shows you how to make tissue paper flowers.
6. The final piece is by Crafty Daisies’ alumna Joy. I completely forgot about this video and stumbled on it on YouTube, so I thought I should include it. Here you can learn how to make polymer clay buttons.
Do you have some favorite YouTube tutorials you’d like to share?
]]>
During one of your recent summer festivities, did you pick up “your” glass and, about to take a sip, discovered that the shade of lipstick on the glass rim didn’t match yours? To avoid such a shocking social faux pas consider spending 10 minutes making some wine charms.

Materials
- 4 inch length of copper wire per wine charm
- Dowel with the same circumference you want the charm to have. I used a broomstick
- Chain-nose pliers
- Wire cutters
- Anything you want to use to embellish the charms (beads, buttons, small hardware)

With the chain-nose pliers, make a P-shaped loop at the end of the wire.

Wrap the wire around the dowel to shape a hoop.

String the embellishments on the wire. These are plastic faceted beads.

Using the pliers, first bend up the P-loop by 90 degrees. If you hold up the hoop, the loop should be parallel to the table top. Then bend the straight end of the wire up to shape a right angle.

Trim the end of the straight wire so you can comfortably close the hoop by pushing the end through the P-loop. The whole thing will look like an earring hoop.

Here are some ideas to decorate the charms. Plunder the hardware store, or your jar of lose bolts and nuts for a more edgy look, or find some cool buttons and string them on wire or thread to attach them to the hoop.
The Giveaway

Here I used ink jet shrink film to print and bake different shapes decorated with these digital papers designed by the talented Bobbi-lee. Check out her blog at tomandjasmine.wordpress.com.
You can become the proud owner of these charms by leaving a comment at the end of the tutorial. I will draw the winner on Monday, July 7.
Have a fun holiday!
]]>

It’s 90 plus degrees and I could be sorting out summer clothes and putting winter stuff away, however, I’d rather be sewing! While attempting to deal with such mundane chores, I found a pair of Elizabeth’s jeans. While they are way to short for her, the waist still fits perfectly for my skinny child so they became the object of another refashioning exercise.
Part 1: Cutting up the Jeans

- Lay out the jeans and cut off the legs right below the crotch. This will be the top tier of the skirt.

- Open up the seam between the legs.
- Look at the top part of the jeans and measure the distance from the waist to about one inch below the zipper of the jeans. In my case that was 6.5 inches/16.5 cm.
- Mark this distance all around the tier.
- Even out the bottom of the tier by cutting along your mark.


Part 2: The Math
Calculate the Width of the Ruffles
- Decide how long you want the skirt to be and subtract the length of the jeans top tier from this number.
- Divide the remainder by the number of ruffles you wish to add for ruffles of equal width. This skirt is 16.5 inches long. 16.5 – 6.5 inches for the top tier = 10 inches. 10 inches divided by 2 ruffles = 5 inch width per ruffle.

Calculate the Length of the Ruffles
- Measure the circumference of the bottom edge of the top tier and multiply this number by two. This is the length of the second tier ruffle.
- Multiply the length of the second tier ruffle by two. This is the length of the third tier ruffle.
These calculations will give you two fairly full tiers of ruffles. If you want the skirt two be less full, make the ruffles a little shorter.
Part 3: Cut the Fabric
With these measurements, cut your ruffles. You may have to join one or more strips of fabric to get the requisite length. For example, my first ruffle had to be 50 inches long and the fabric was 45 inches wide, so I had to cut another 5 inch strip to make up the 50 inches.
Part 4: Ruffle the Ruffles
- For each ruffle, join the lengths of fabric you cut out to make a long strip.
- Use your preferred method to finish the raw edges of the strips. I sewed a zigzag stitch along the edges.
- For each ruffle, sew the long strip together to make a loop.
- Ruffle the second tier ruffle by sewing long basting stitches along the top edge of the fabric.
- Mark each quarter of the top jeans tier, e.g., front middle, left side, back middle, right side.
- Repeat this for the second tier ruffle.
- With right sides together, pin the second tier ruffle to the top jeans tier matching the quarter markings.
- Gather the fabric between the markings by pulling the top thread of the basting stitch.
- Evenly distribute the gathers.
- Sew the second tier ruffle to the top jeans tier. Repeat this process for the next ruffle(s).


Part 5: Finish the Skirt
At this point you should have attached all the ruffles.
- Hem the bottom tier.
I’m currently infatuated with bias tape hems. This skirt features homemade tape made out of matching fabric. For instructions on making this tape check out Step Four of the cashmere blanket tutorial. You could also just make a traditional double fold hem. (Fold the bottom edge to the inside and press, fold again, press and stitch.)
Dance the night away. This is the perfect party skirt.
]]>
There are no measurements for the fabric because you will want to use up what strips or scraps that you have and make size bag you desire. You will need: measuring tape, pins, fabric, wide grosgrain ribbon, iron, & sewing machine/serger.
1. Lay out the fabric strips that you want to use. Fold it to picture what the bag will look like finished. My seam will be on a side, though it could be at the bottom, depending on your pieces. You can see one piece in taller than the other.

2. Cut ribbon the same width as fabric. Measure and cut 2 ribbon handles, either short handbag length or longer to fit over the shoulder. (Cut 1-2″ longer than you want the finished handles to turn out.) I cut red handles here but decided to do white as you can see in my finished product.

3. Lay right sides of fabric together and sandwich in the ribbon. Match up the 3 layers at the top edge, pin together, and sew across this top edge.

4. Turn fabric right side up to inspect that the 3 layers are all included in seam. Pretty already!!

5. On wrong side, press seam to one side and iron fabrics flat. Do not iron over right side of ribbon. Trust me!

6. Turn top edge down twice about 1/2″ each time and press. This will be the casing your handles will slip under.

7. Do not sew over the edge you just pressed. We will do that last. Next, sew down the other sides of the bag. You can see the pins pointed to where I am going to sew. (I am using a serger to make that enclosed edge but a regular machine seam is the same.)


8. The handles: I like to point the open, top edge toward myself. Take a ribbon handle (or whatever you want to use for a handle, fabric will work too), measure in from the edge where you want the handles placed and slip the handle in.

9. Fold the handle then toward yourself and pin. Curve the handle over and pin it the same distance from the opposite side. Flip bag over to back and repeat with second handle.


*Note: There are many ways to make and attach handles, this is just the way that I made up that I like.
10. Last step – Choose a stitch and sew across the top edge that you pressed. I like to use a wide, tight, zigzag stitch. Turn inside out and you are done.


Suggestions: Use different fabric stripes; quilt pieces together; sew several stripes of ribbon; square the bottom of the bag.
If you follow these directions and want to share what you come up with, email your picture to us by June 1 and we will post them to spread the ideas. Send name and pic to craftydaisies@gmail.com. Thanks!
]]>
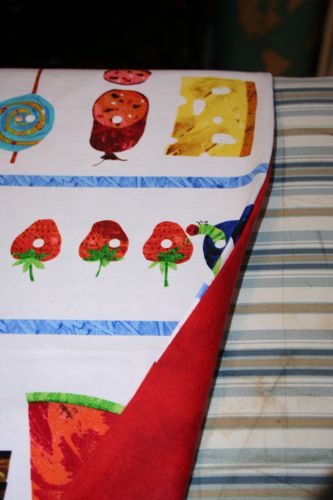
Now that I have done this once, I think I can seriously do it in half an hour (and you can too!) For the front I used 1 yard of nice cotton fabric- I love this series of prints from “The Hungry Caterpillar” books. The backing is 1 yard of lightweight cozy quilting fleece, a marbled red.
1) Line up fabrics wrong sides together and sew around 3 sides. I used a serger on all 3 sides but you could use a regular sewing machine too.

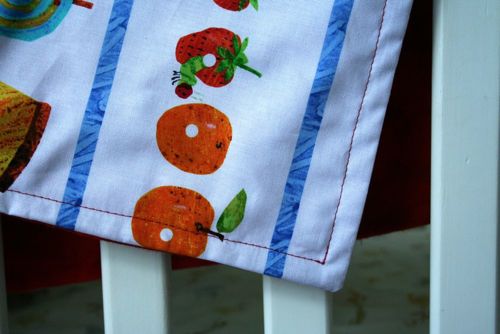
2) Turn fabric so it is right-side out and press neatly around all 3 sewn sides. Fold 4th side under and sew across the edge, starting and stopping just short of each corner.
3) Lastly, starting with the 4th edge just sewn, sew on top of the fabric around right-side edge, turning just short of each corner. This will hold the 2 pieces together. I could have also sewn across the blue stripes for added accent since this fabric is patterned this way (but before sewing around right-side edge). You could also sew a pattern on top, or around the characters on the fabric.
Very quick, easy and inexpensive! Great for summer traveling, picnics, for a crib or pack n’ play!
]]>
Remember Little House in the Big Woods by Laura Ingalls Wilder? While I was making this afghan I was reminded of all the craft projects described in that book. I thought that this would be the sort of thing that Laura’s mother would put together for her girls as a Christmas present (except it wouldn’t be cashmere, and the sweaters wouldn’t have originated in China, and [fill in the blank]).
So, these are the steps I followed to put the blanket together:
Materials
- 3 sweaters — The final product measured 42″ x 52 1/2″. You could felt the sweaters, but I wanted to maintain the light, airy feel of the original knit.
- Bias tape or scrap fabric to make your own tape
- 8 1/2″ x 8 1/2″ template to cut out the squares. (Guess why it’s that size
 )
) - Lots of thread (zigzagging takes way more thread than I had anticipated)
Step One
Cut out 30 squares. I wanted to show off some of the details of the sweaters. Consequently, I included side seams, shoulder seams, ribbing, and pockets in the squares.

Also, don’t forget that the “wrong” side may end up being the “right side.
Step Two
Lay out your design.
Step Three
Sew. Using a zigzag stitch at the widest setting, sew together strips of 6 squares each abutting the edges. You could also overlap the edges, whatever technique you prefer.

Next, put the 5 strips together by first joining the “intersections” of the squares and then sewing down the length of the strip. You now have a 5 x 6 square blanket.
Step Four
Finish the edges. Originally, I intended to blanket stitch around the whole thing. Then I watched Amy Karol’s Bias Tape tutorial, read about this nifty tool on Alicia Paulson’s blog Posie gets Cozy and decided to make my own tape.

This is a 1/2″ tape maker. They come in different sizes, but this is the only one they had at my corner store. You cut up your fabric to the requisite width, feed it through the tape maker and it comes out perfectly folded on the other side. You then fold the tape in half and iron it flat.
Next, you open up your store bought or home made tape (see Amy’s tutorial for the finer points of sewing on store bought tape) and align the edge of the tape to the edge of the blanket. Sew along the line created by the fold closest to the edge.

For instructions on how to create mitered corners, follow Alicia’s tutorial.
Once you’ve attached the binding to the edge, flip the binding over to the other side and top stitch alongside the folded edge.

That’s it.
You can add an appliqué or two if you wish or just leave it as it is.

I’ve set up a Flickr group where you can share your creations at www.flickr.com/groups/sweaterblankets/.
]]>

I love hardware stores! I like all the little doodads and tools and whatnots you never knew existed. So here is my homage to the humble hardware store, a wrapped washer.
Materials

For this pendant you need the following materials:
- 18 gage copper wire
- 3/4″ washer
- wire cutters
- round nose pliers
- chain nose pliers
- ruler
Instructions

- Cut four pieces of 5 3/4″ long wire and two pieces of 4″ long wire. Use a soft cloth to straighten the wire.
- Bundle three of the longer wires together and wrap the one remaining longer wire four times around the center of the bundle.
- Wrap each shorter wire three times about a 3/4″ to the left and the right of the bundle’s center wrap.
- Here’s the tricky part: center the washer on top of the center wrap and fit the wire bundle against the washer.
- Then secure the washer as follows: use the round nose pliers and place them in between the bottom center and the side wraps. Coax one strand of wire out of the bundle and pull it toward the center to form a sort of cage that will prevent the washer from falling out. Repeat on the other side and the back of the pendant. You should have two pulled-out strands on the front and two on the back of the pendant.
- Okay, don’t be intimidated by this picture! You’re almost there. Now on the top of the pendant, from the left and the right side, take a center wire from the bundle and tightly twist one wire around the other three times. Snip off the end of the wrapping wire only, not the stem wire.
- With the remaining stem wire shape a wrapped loop. Use the chain nose pliers to form a 90 degree angle right above the wrapped stem.
- To finish off the remaining wires, use the round nose pliers and make a small loop with one of the wire ends. Continue shaping a spiral around the loop. Once the spiral is complete, press it against the center of the washer using the chain nose pliers. Repeat this with the other wires. Use your imagination to create shapes other than spirals.


Insert the tip of the round nose pliers in the bend, bring the wire over the top of the pliers, and shape a loop. Reposition the pliers to form a complete loop and wrap the wire around the bottom of the pliers. Using the chain nose pliers, hold the loop with your dominant hand and wrap the wire around the stem covering the end of the previously snipped off wire. (If you’re hopelessly lost, refer to Wigjig’s wrapped loop instructions.)


Instead of a pendant you could also fashion some earrings. Here is the pair I completed for my 99 Earrings project.
]]>
Here’s my confession: I live vicariously through the artistic abilities of my child. I believe she has a fantastic sense of color, line, and style (not that the state of her room is any indication of her design talents).

Being the stage mother of a single child I intend to exploit her vision for this year’s holiday gifts. To put it simply, her artwork will serve as an embroidery pattern to give a humble flour sack tea towel some extraordinary flourish. Since your child is obviously equally as talented, why not give this idea a try:

Materials
Copy of the artwork
Fabric
Transfer paper
Embroidery floss
Embroidery hoop

Select the Artwork and Make a Copy
I like simple line drawings because you don’t have to fill in planes of color with your embroidery. You can copy the drawing either with a copy machine, or scan it into your computer. If you have a scanned copy, you can use a graphics program and further expand on the original art by adding other elements like lettering.

Trace the Design onto the Fabric
I’m using a dish towel, but you could also embellish a whole line of linens such as pillow cases, napkins, aprons; or clothing like a t-shirt or jeans jacket. Place the transfer paper on top of the fabric where you want your design to appear and the copy of the artwork on top of the paper. Trace the design.

Start Embroidering
Take a look at Candace’s embroidery lessons to give you some ideas of what type of stitches might work well for your design. For this towel I used satin stitch for the letters, stem stitch for the outline, seed stitch for the butterfly’s body, a rosette stem stitch combination for the butterfly’s wings,and feather stitch for the bee’s body.
Tata
That’s it.
