
Happy Halloween, Everybody!
This will be my last post for Crafty Daisies for a while, however you can still follow my crafting adventures on my other blog craftevolution.
The Crafty Daisies Book Club will continue on craftevolution. The next book is Sew Everything Workshop by Diana Rupp and we’ll meet on Wednesday, December 3rd. See you then.
Thank you to Candace, Jen, Heather, and Joy. It’s been a great year.
Simone
]]>
Lisa C.! Thank you for all your nice comments and further suggestions. I’ve never worked with memory wire before, but your ideas have made me curious. Another material to try!
 ]]>
]]>
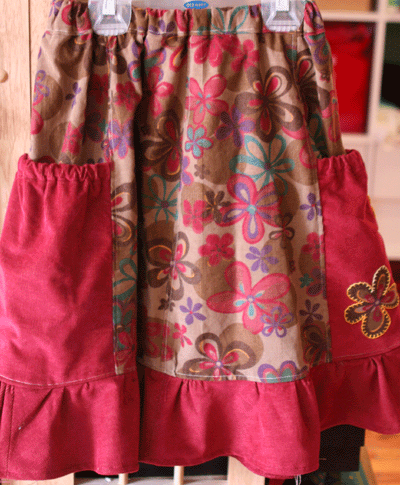
It’s 90 plus degrees and I could be sorting out summer clothes and putting winter stuff away, however, I’d rather be sewing! While attempting to deal with such mundane chores, I found a pair of Elizabeth’s jeans. While they are way to short for her, the waist still fits perfectly for my skinny child so they became the object of another refashioning exercise.
Part 1: Cutting up the Jeans

- Lay out the jeans and cut off the legs right below the crotch. This will be the top tier of the skirt.

- Open up the seam between the legs.
- Look at the top part of the jeans and measure the distance from the waist to about one inch below the zipper of the jeans. In my case that was 6.5 inches/16.5 cm.
- Mark this distance all around the tier.
- Even out the bottom of the tier by cutting along your mark.


Part 2: The Math
Calculate the Width of the Ruffles
- Decide how long you want the skirt to be and subtract the length of the jeans top tier from this number.
- Divide the remainder by the number of ruffles you wish to add for ruffles of equal width. This skirt is 16.5 inches long. 16.5 – 6.5 inches for the top tier = 10 inches. 10 inches divided by 2 ruffles = 5 inch width per ruffle.

Calculate the Length of the Ruffles
- Measure the circumference of the bottom edge of the top tier and multiply this number by two. This is the length of the second tier ruffle.
- Multiply the length of the second tier ruffle by two. This is the length of the third tier ruffle.
These calculations will give you two fairly full tiers of ruffles. If you want the skirt two be less full, make the ruffles a little shorter.
Part 3: Cut the Fabric
With these measurements, cut your ruffles. You may have to join one or more strips of fabric to get the requisite length. For example, my first ruffle had to be 50 inches long and the fabric was 45 inches wide, so I had to cut another 5 inch strip to make up the 50 inches.
Part 4: Ruffle the Ruffles
- For each ruffle, join the lengths of fabric you cut out to make a long strip.
- Use your preferred method to finish the raw edges of the strips. I sewed a zigzag stitch along the edges.
- For each ruffle, sew the long strip together to make a loop.
- Ruffle the second tier ruffle by sewing long basting stitches along the top edge of the fabric.
- Mark each quarter of the top jeans tier, e.g., front middle, left side, back middle, right side.
- Repeat this for the second tier ruffle.
- With right sides together, pin the second tier ruffle to the top jeans tier matching the quarter markings.
- Gather the fabric between the markings by pulling the top thread of the basting stitch.
- Evenly distribute the gathers.
- Sew the second tier ruffle to the top jeans tier. Repeat this process for the next ruffle(s).


Part 5: Finish the Skirt
At this point you should have attached all the ruffles.
- Hem the bottom tier.
I’m currently infatuated with bias tape hems. This skirt features homemade tape made out of matching fabric. For instructions on making this tape check out Step Four of the cashmere blanket tutorial. You could also just make a traditional double fold hem. (Fold the bottom edge to the inside and press, fold again, press and stitch.)
Dance the night away. This is the perfect party skirt.
]]>
I finally found the time to make this skirt from this pattern:
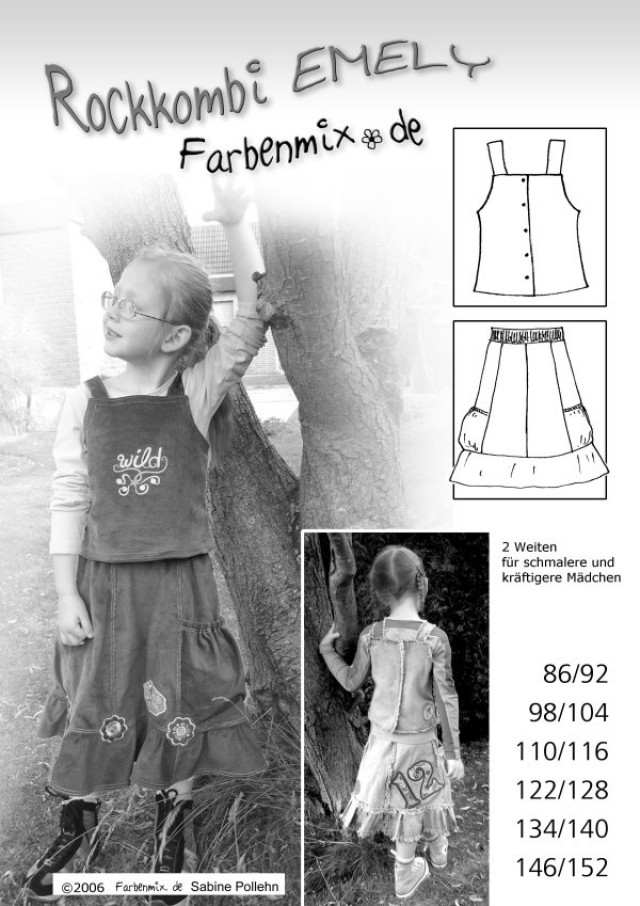
Farbenmix is a German company, thus the European sizing. Their patterns are pretty straightforward and leave you with lots of room to personalize the finished piece. You can access step-by-step, illustrated instructions in English for many of the models. They also feature examples of many variations for each pattern to inspire your inner designer. And, for all you craft fair participants and etsy shop owners, they allow you to sell your finished piece based on their pattern as long as you are selling individual items and not churning out mass produced clothing. This is a list of their retail partners including some American online shops.
P.S. No, this is not a paid endorsement, I just like their stuff. ![]()
As of 4/25/08 1:42 p.m. EST all swap slots have been taken. But don’t despair, we’ll have another one soon.
FYI, as of this morning there are three more slots left for the softie swap.
Some more tutorials:
Gecko Girl’s Cherry Amigurumi
Jhoanna’s very cute Ruby Doll
Darncat’s Pandy Bear
]]>
This year has become my ‘Year of the Bag.’ In the past, I’ve usually bought a bag a year or maybe every other year. Then Kristin La Flamme’s bag pattern
caught my eye and since then my household has been inundated with bags, purses, and pouches.

Currently, my favorite pattern is the basket bag designed by Lisa Lam on her blog U-Handblog.

It is the perfect size, amenable to countless variations and a great gift. I make mine out of felted sweaters, but you can obviously use any kind of sewable fabric. If you are thinking of pledging handmade gifting this year, this would make a fabulous present.

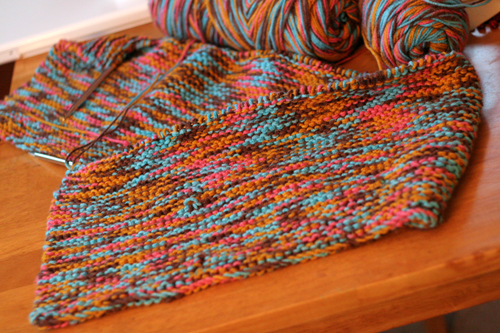
My knitting used to look like this:
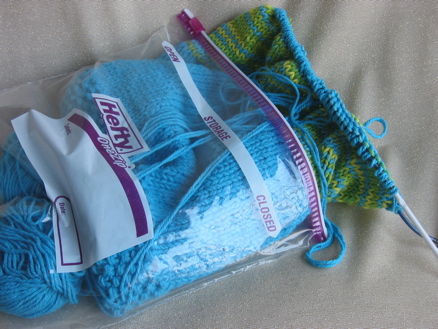
Sure I have a huge knitting bag with ALL my knitting in it, but what about taking the wip with me somewhere. Oh quick, grab a ziplock.. Sound familiar?
So I came up with this easy drawstring bag. Now I can stuff my knitting in anywhere and the drawstring keeps my yarn coming out nicely from the top. It only has one seam. It is one big piece of fabric folded over and stitched up the side. Tada.. This is a bag I’m working on for my future sister-in-law (apparently I can’t stop knitting bags – help!)
you likes?


Heather is currently working on an afghan for her husband, Mykle. He requested a really wide once because the one she made him previously was too narrow and he couldn’t wrap up in it. So this one is made to the equivalent in width of a king size blanket, which is a perfect size for him but is taking fffooorrreeevvveeerrr to make. She is alternating rows of single crochet and double crochet for a tight knit, and plans on bordering it with dark brown to finish it off.

Jen loves making this felted bag so much that she has practically memorized the pattern and currently has 2 in the making. She can’t wait to felt this – the green color is so bright and the trim is a swirl of pinks, turquoise and gold. All that’s left to do is going back to the craft store to buy more green wool. The bottom needs to be sewn together and gusseted, the straps need to be finished and sewn on, and then it will ready to wash. But then who to give it to…?
Candace is not a fan of the knitting, but when she found this yarn for cheap, she bought eight skeins of it and decided to make a baby blanket. What started as a gift for a friend who’s expecting a girl, has now turned into a blanket she will keep for herself and her future daughter (if she’s blessed with one, otherwise back into a gift it shall turn). Not only b/c the colors are so great will she keep it, but also b/c it is a slow-going project. But as all knitters know, it’s an easy pick up and put down WIP.
]]>