genericviagra

buy cheap cialis pill online lloyds pharmacy viagra cheapest without prescription farmacia online alprostadil

viagra no prescription required

cheap without prescription Cialis Super Active online meds where can i buy viagra cheap without prescription brand viagra online sildenafil online

canadian discount pharmacy

cheap without prescription Generic Levitra purchase tadalafil amoxicillin no prescription cheap without prescription pill online buy cheap generic viagra

yohimbe

Generic Viagra buy cheap cheap cialis impotence treatment cheapest without prescription buy viagra online stamina rx

buy prescriptions

buy cheap Viagra Super Active sildenafil citrate tablets soma pharmacy buy online cheap pharmacy cialis online

next day cialis

Zithromax cheap without prescription viagra sale online abortion pill online cheapest without prescription brooks pharmacy no prescription required

online pharma

buy cheap Viagra Soft viagra price comparison can i buy viagra online buy online order kamagra net pharmacy

viagra herbal

cheap without prescription Xenical discount viagra online lowest price viagra cheapest without prescription get viagra prescription online doctor

cialis generic

Levitra cheapest without prescription canadian rx canadian viagra online buy cheap canadian prescription drugs buy amoxil

Archive for January, 2007

Exploding Scrapbook Box
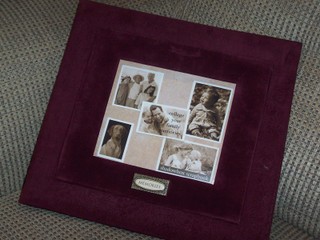
Tuesday, January 30th, 2007

Here is a great gift idea that you could make and give your loved one for Valentine’s Day. This is what the box looks like put together:

today2023.jpg

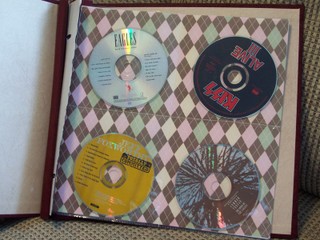
The lid comes off, and this is what is found inside:

today2028.jpg

I got the idea for this from the cricut.com messageboard, but you don’t need a Cricut to make it. What you do need is 3 pieces of 12×12 cardstock, one piece of 6×6 cardstock and matching paper and/or embellishments you want to use. Start by scoring lines on one piece of cardstock 4 inches apart, making the paper look like a tic-tac-toe board. Cut out the four corners.

today2018.jpg

On another piece of cardstock, score the lines 3.75 inches apart, and cut out the corners. Repeat with another piece of cardstock, making the lines 3.5 inches apart. You will have to trim the length of the edges as well, as much as you want. I chose to round my corners and distress the edges of the layers at this point.

today2019.jpg

To make the lid, take the 6×6 piece of cardstock and score it at 1 inch all the way around. Do a straight line clear across the side of the cardstock on each side. Cut very carefully one line on each side so that you can tuck it up under the next side and tape it. Don’t cut past the one inch score line.

today2020.jpg

Fold the sides in, and glue to secure. Now you can begin layering your cut pieces, putting the smaller ones on top of the larger ones and adhering the middle squares only. Once the box is together, you can decorate and embellish each layer as you want. I did it this way, and found that it might be easier to decorate each layer before you assemble it, but that’s a personal choice.

My box isn’t quite finished yet, I want to add some journaling in the middle of the box, and I haven’t decided how I want to decorate the outside of the box yet. But it worked up pretty fast, one evening, and it makes a unique gift.

Stencils Anonymous

Monday, January 29th, 2007

Ok, so the secret is out. I’m. addicted. to. stencils. i can’t help myself!! They are soo much fun and so easy. You can make a special personalized gift for anyone with this great idea.

I love this picture! Two of my favorite people in the world. For Christmas this year i gave my best friend Kim a T-shirt that read: Lucy *heart*’s me and a onesie that said KiKi (what Lucy will call her one day) *heart*’s me. Along with the shirts i gave her a coupon for a photo shoot of her and Lucy. We got some great shots. This was one of my favorites. you can see the shirts really well and Lucy looks like she is flying.. AHH love that kid!

stencillucykiki.jpg

The way i work my stencils is i print out what i want my stencil to say, trace it on the Freezer Paper, then cut it out with an exacto knife. Or sometimes i just draw up some silly design on the matte side of the paper & cut it out. Here’s what they looked like after i ironed on the design b4 paint. (if you are trying this, be sure to iron on another piece of Freezer Paper on the inside of the shirt, shinny sides facing each other, so your paint doesn’t bleed thru.) Then i just use any fabric paint, usually mix the glitter fabric paint in pretty much every time! I’ve said it before- love the bling :) Just peel off the stencil as soon as your done and voila!

cutout.jpg

This is one of my favorites, a onesie for a friend’s baby. Her name is Vienne. Love this font, thought it was kinda french just like her name..

vienne.jpg

The other thing i’ve enjoyed is the dye resist. Some of these onesies i dyed and then stenciled with paint. Some of them i stenciled b4 the dye, applying dye resist, as i would paint. When you put it in the dye bath that area doesn’t dye to the intensity as the rest of the garment. (i’m sure you could get the same effect by applying bleach on a colored garment) The bottom 3 are done this way. It looks super cool. Hope this inspires you to start stenciling.

stencils.jpg

First Sewing Project Completed!

Saturday, January 27th, 2007

I was going to wait and post this next week but I’m just so excited I couldn’t wait!

first-sewing-project2.jpg

While I was at JoAnn’s a few weeks ago, I found this yummy fabric that I knew would look great somewhere in the house. I hadn’t decided what I was going to do with it until I walked in the kitchen and this site stuck out like a sore thumb:

first-sewing-project1.jpg

We have limited storage space in our kitchen, so I bought this roll cart to put food in and to add to our also limited counter space. So I decided to make a skirt for it to hide the metal part, and also it’s contents. My mom came over this morning to show me how to use my machine and the first seam that I stitched I was in love with it. I can tell this is going to be a beautiful friendship.

So I worked for two hours, piecing the skirt together, then I finished the edges, added some ribbons, and there you have it – a cute covering for a metal kitchen contraption.

first-sewing-project4.jpg

first-sewing-project3.jpg

I think it turned out great and I had so much fun doing it! I can’t wait to think up more things to do with my sewing machine (and I know the possibilities are endless).

Fabric Fun

Friday, January 26th, 2007

I had previously posted that I have started sewing cloth diapers for my daughter, and since then I’ve fallen in love with them! They are easy and fast to work up, and you can make them so cute and functional. Plus, I love seeing Elizabeth wearing them, and knowing that my work is getting used :)

I went to get some more diaper flannel from our local fabric shop the other day, and I fell in love with some of the printed flannel that they had on sale. I decided that I wanted to try some diapers with a hidden waterproof layer, so I can use the fun prints on the outside. I just couldn’t resist the cats and lions:

today019.jpg

These will make some cute diapers, and they will be unisex so if our next child is a boy, he can wear them too! I also couldn’t pass up a couple of more girly prints – multi colored dots and purple hippos:

today020.jpg

But the cutest fabric I found was the monkey print…I just fell in love with it because it is so darn cute!! In fact I had to buy all that they had, just because I loved it so much! I can picture diapers with this print and a chocolate brown inside, and I just know they will turn out adorable.

today021.jpg

However, I will not be using it all up for the diapers, so I think I’ll be making a taggie for Elizabeth out of it, and then I will have so much left over. What should I make with it? Any thoughts or suggestions?

Change by day, Craft by night

Thursday, January 25th, 2007

So maybe my craft room doesn’t look like this but it works for me. My husband and i live in a 2 bedroom apartment which we love! We actually sold our house that was too much maintenance to move into a more manageable space. (I know it sounds crazy but, i’ll tell you that story another time) At the time we also had no plans of starting a family. I had the entire spare room all to my self and my crafty mess. But when we found out we were expecting i had to do some switching around. This is what i came up with.

By day it is a changing table with her goodies on it.

img_0002.jpg

and by night (or nap) it is my craft table.

img_0051.jpg

I absolutely love the tile top for all projects, especially cutting fabric. You can just get your scissors right in the groove to get a straight cut. The table is so easy to clean too. Get yourself one! My dad got this one at a yard sale. I painted it turquoise my new favorite color and looks great in Lucy’s room. What I love about this set up is it forces me to clean up when I’m done.
I use the little drawers for her things, but kept one for me, to put my sewing things in.

img_0028.jpg

Some of my fabrics i have no idea what i’m going to make with them. I used the one on top to line my diaper bag. Don’t you love the $1 bin at Walmart??
img_0045.jpg
And of course my trusty freezer paper and fabric paint. Tulip glitter one of my personal favorites. Gotta have some bling!

img_0038.jpg

And last but certainly not least my sweet knitting. This is my bag i take everywhere with me. Pictured here next to the couch where i like to knit, while i’m talking with Brian or he reads to me. I have some knitting rules i follow. I always knit while i’m with people. I’m usually working on such easy projects, that if i’m alone i just can’t bear to sit and knit by myself. I also try to finish each project before starting a new one. This is my current project, another bag for the craft fair. The first bag is peaking out. I’ll post that soon. It turned out super cool. Also, if you have never tried Denise interchangeable knitting needles you MUST! i’m hooked. I’ll never knit with anything else EVER. Just ask, Erin, Deaven or Jen. They know what i mean!

knit.jpg

Also for more ideas on setting up your craft space take a look at what whip up had to say

Tea Time

Wednesday, January 24th, 2007

teaset1.jpg

If you know me at all, you know I am not a tea set kind of gal. I was a tomboy, and at the age of 25, I’m just starting to get a little girly. But I have been in search of the perfect tea set. My great grandma had one that I remember playing with, but after she died it got lost in the clean up, never to be found again. A lot of antique tea sets I have seen are super cheesy and well, ugly. Gold-rimmed, scalloped edges – totally not my style. But when I found this on eBay last week it was pretty and reminded me of the tea set my grandma had. So I began the frantic (and blood-pressure raising) bidding. Obviously I won and I can not tell you the relief I had when I saw the green check on the screen followed by the words, “You won!”

teaset2.jpg

It arrive on Monday and I can’t stop looking at it. I think it’s one of the prettiest things I’ve ever seen. It inspired me to make some tea towels and embroider what else but tea cups and flowers on them. However, I’ve never made tea towels before. I’m just getting into sewing and learning about fabric, so I don’t even know the best material to use to make kitchen towels. I suppose I could just buy some plain white ones, but how fun is that? So dear Daisy readers, can anyone enlighten me as to what kind of material to use for tea towels?

Baby Backpack

Tuesday, January 23rd, 2007

judah-in-backpack-4.jpg 
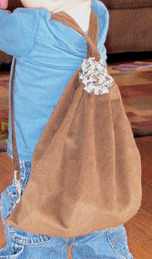
I made this bag for Candace’s son’s birthday. I am always trying to think up gifts for little boys that are not another toy, so I came up with this scaled down backpack to hold their toys. I chose corduroy for the outside of the bag which I wanted to be able to withstand a little boys’ abuse. The inside fabric is a cute print of wild animals. You could go in so many directions with this by choosing different fabrics or embellishments for a boy or girl.

1. Decide what size you want the bag to be taking into consideration the height of your child. I made this according to the length of my son’s jacket. Cut your lining fabric 2-3 inches longer than your outer fabric. I thought the corduroy might be too stiff for the drawstring so I made the top part out of the cotton print. I thought this was cute too, adding the colorful border.

2. Line up the longer and shorter piece of fabric evenly, place the right sides together of the two fabrics, and sew the seam up to the drawstring strip. Leave this open so the drawstring can be inserted. Then flip the lining fabric over, fold allowing for the width of the strap or ribbon you want to use for the drawstring/arm straps. Iron along the top edge to make a crease. Be sure to take into consideration that the lengths of the fabrics match at the bottom.

3. Line up right sides again and sew a seam along one long side. Center this seam just sewn and sew along the bottom of the bag.

backpack-inside.gif

4. Turn bag inside out. I cut the fabric at a slight angle where my drawstring opening was left unsewn and finished the holes off by sewing a blanket stitch around the edge. You could also use a button-holer to make finished holes.

backpack-front.gif

5. Measure your straps by calculating the width of your bag X 2 plus the length needed to reach from the drawstring hole to the bottom of the bag. I folded the corduroy with wrong sides together, turned the edge over, ironed my hem and sewed on top of the fabric. I ran this strap through and attached in the bottom corners with a button but this could be done in many different ways. The second bag I make like this will be much easier than this first one now that I have it figured out. I would make the strap of cotton fabric or heavy ribbon next time and perhaps embroider a name on before sewing the 2 fabrics together to personalize, but I still think it turned out cute!

judah-in-backpack-4.gif

backpack-spilling-1.gif

Quick and Easy CD Storage

Monday, January 22nd, 2007

As an avid scrapbooker, I’m always buying scrapbook albums on sale or receiving them as gifts. In the end, I always end up with lots of empty albums and I can never decide to just keep them for future layouts or use them for other things. I came up with a great idea to use a scrapbook album for CD storage, that keeps the CDs out of sight, and the scrapbook looks great sitting on a bookshelf or entertainment unit.

Closed…it looks just like a regular scrapbook album:

100_2029.jpg

Opened…its a storage secret – lots and lots of CDs:

100_2039.jpg

I started with an empty scrapbook album, an empty page protector and 2 pieces of scrapbook paper (for each page of CDs). I folded each of the 12×12 papers into quarters and then opened up. I put the papers into the page protector with the right sides facing out, and I sewed along the folds using my sewing machine. This separates the page into 4 pockets. I then used a ruler and a scalpel to cut about a half inch below the horizontal stitching, creating pockets to slide the CDs into. And there you have it – quick and easy CD storage that matches your decor, takes about 5 mins to make (per page) and holds 8 CDs.

This is a great project to get rid of some scrapbook paper you have laying around, as well as embellishments if you want. I chose to keep mine simple, but you could jazz the pockets up using embellishments, ribbon, colored thread…the options are endless!

Antique Wall Hangings

Friday, January 19th, 2007
antique-plaque.jpg

In an effort to spruce up my kitchen some, I decided to make some wall hangings. I didn’t want them to be basic and painted flat colors and look one-dimensional. So I headed to Lowe’s to check out the painting finishes they have. I found one that was just what I was looking for: crackling.

antique-plaque1.jpg

I picked up these unfinished plaques at Wal-mart for a dollar each, and used some paint that I already had. I wanted the finish product to be light, with some dark underneath, so I painted the base a coffee bean brown.

antique-plaque2.jpg

Once that dried, I applied the crackling glaze with a sponge brush, letting that dry completely before I added the top coat of off white.

antique-plaque3.jpg

As you can see, when it dries, the glaze doesn’t let the paint adhere to the entire surface, creating cracks in the paint and giving it that great antique-y finish.

antique-plaque4.jpg

Next I decided on my shape (which would happen to be a bird, go figure – hey, atleast it’s not felt!), drew it, cut it out and then traced it on the wood with a pencil.

antique-plaque5.jpg

I then painted my bird and the branches, let dry and there you go – easy and inexpensive wall hangings with that old-world feeling to it.

antique-plaque6.jpg

The supplies cost about $10 (the crackling glaze ate up $8, but it spreads thin so a little goes a long way and you’ll be using this stuff for awhile) and all together took about 30 minutes, not including drying time.

My Craft Space

Thursday, January 18th, 2007

Since crafting is my main passion, my husband and I agreed to make me a space that would be all my own. Its in the basement, so unfortunately its sometimes cold and dark, but its a space all my own, and I love it!

So here it is:

jan18015.jpg

Its not pretty, its not fancy, but its mine :) The black shelving was specially designed and made for me by my husband, and its actually pretty empty right now, I haven’t filled it back up since we moved. As you can see, I have a variety of craft supplies, including stuff for scrapbooking (paper galore!), sewing, knitting / crocheting and even just general crafts.

Of course, my first love is knitting and crochet, and this is my favorite part of my craft room, my yarn stash!!!

jan18017.jpgjan18019.jpg

I’ve actually made it a lot smaller the past while, at one point my entire black shelf was yarn only :) Its like an addiction, I can’t stop buying it. I also have a stash of fabric (all the drawers of the dresser are full of it) and a good collection of ribbon.

jan18020.jpg

My husband made the ribbon holder for me, its usually mounted on a wall but I have no where right now since the walls are unfinished. But it keeps all my ribbon in one place, and it looks good too! Eventually we are going to finish off my craft space, and make it into a small room for me. But for now, its perfect for my needs :)

jan18018.jpg

So now some of my current projects! I’m very excited about these – I’ve been sewing cloth diapers and wipes for my daughter.

jan18021.jpg
They have been so fun, and I love the colors I chose for her. I’m also working on embroidering a onesie for Elizabeth, I have to finish up the picture frames I’m working on for our living room, and I also have an afghan on the go for my husband. All that makes for a lot of work but tons of fun at the same time!!