genericviagra

buy cheap cialis pill online lloyds pharmacy viagra cheapest without prescription farmacia online alprostadil

viagra no prescription required

cheap without prescription Cialis Super Active online meds where can i buy viagra cheap without prescription brand viagra online sildenafil online

canadian discount pharmacy

cheap without prescription Generic Levitra purchase tadalafil amoxicillin no prescription cheap without prescription pill online buy cheap generic viagra

yohimbe

Generic Viagra buy cheap cheap cialis impotence treatment cheapest without prescription buy viagra online stamina rx

buy prescriptions

buy cheap Viagra Super Active sildenafil citrate tablets soma pharmacy buy online cheap pharmacy cialis online

next day cialis

Zithromax cheap without prescription viagra sale online abortion pill online cheapest without prescription brooks pharmacy no prescription required

online pharma

buy cheap Viagra Soft viagra price comparison can i buy viagra online buy online order kamagra net pharmacy

viagra herbal

cheap without prescription Xenical discount viagra online lowest price viagra cheapest without prescription get viagra prescription online doctor

cialis generic

Levitra cheapest without prescription canadian rx canadian viagra online buy cheap canadian prescription drugs buy amoxil

Archive for February, 2007

Wrapping Tiny Treasures

Wednesday, February 28th, 2007

A few years ago a friend showed me how to make my own earrings (thanks Vanessa for another addiction!). After making a million pairs I convinced my husband to let me sell them in his classroom on special occasions. I targeted the men in his classes to buy them as gifts for their girl and even provided wrapping for them! This part I found to be almost as fun and rewarding as coming up with the bead combinations. It is fun to find or make tiny wrapping just right for earrings and the ideas are everywhere once you start looking for them.

earrings4.jpg

By piercing holes with a tiny hole punch or even the earring post you can custom make anything into an earring holder. The little brown bags came with a piece of cardstock inside. The tiny white cards open and came with envelopes. Then I found sets of the little woven baskets at the dollar store. I love anything in miniature size!

earrings1.jpg

earrings2.jpg

Another fun part is decorating the wrapping. I bought this Love stamp since Love is my last name, to stamp on things I make and because I was selling these for Valentine’s Day. I love giving these miniature gifts as a small thank you or inside of another package. I am looking now for new wrapping ideas. Is there any you would like to share?

earrings3.jpg

My new machine!

Tuesday, February 27th, 2007

I’ve been wanting to take my sewing to the next level, and start sewing more professional looking items. I’m also going to venture into sewing clothes for myself, my husband and my daughter. Plus, with all the diapers I’ve been sewing lately, I wanted to make that a bit easier too.

So I splurged, and bought myself this:

b000fjxzvc01-a10fhfrjz0gjg3_sclzzzzzzz_ss500_.jpg

A new serger!! At first, I wasn’t sure if I really “needed” a serger. Its possible to sew any garment or project without one, you just have to take extra steps to ensure your raw edges don’t fray. I had also heard that the learning curve with a serger can be a steep one, especially when it comes to threading the machine or surging corners and round edges.

However, the one reason I really wanted to get the serger was that I love the look of serged fitted diapers. I think they look really cute, and I had also heard that a serged diaper comes together much faster than a turned and topstitched one.

From diaperkit.com, a comparison of serged and topstitched diapers.

serged-fitted-diaper-sm.jpg tt-fitted-diaper-sm.jpg

So after lots of debate, I decided to purchase one, and I received it on Valentine’s Day. And I must say, I got so much more than I expected with the machine. You can do decorative edges on your garments, decorative topstitching, and so much more! Plus, I love the fact that when sewing a seam, you sew it and finish the edges at the same time, saving you time. Also, serging goes so much faster than a straight sewing stitch, saving time there as well!

I’ve spent lots of time serging scrap pieces of fabric, learning curves and different methods. I’ve also threaded and rethreaded the machine numerous times, to learn how to do it correctly. This learning time I took was really beneficial, and I’ve already been able to start with projects using my serger!

I serged a fitted diaper for my daughter, and I think it turned out really well for a first attempt!

first-serged-002.jpg

Of course, the serger didn’t take away all the extra steps you need a sewing machine for, but it sure cut the time to make the diaper in about half for me!

I’m also currently working on a shirt for my husband, and I have purchase a couple of patterns to make my daughter. I also bought a pattern for shirts to make myself, but they are a bit more advanced and I will probably wait until I am more confident with my serger before trying them.

Does anyone else have a serger? Do you think its a good investment? I love mine!! :)

Stamped Notebook

Monday, February 26th, 2007

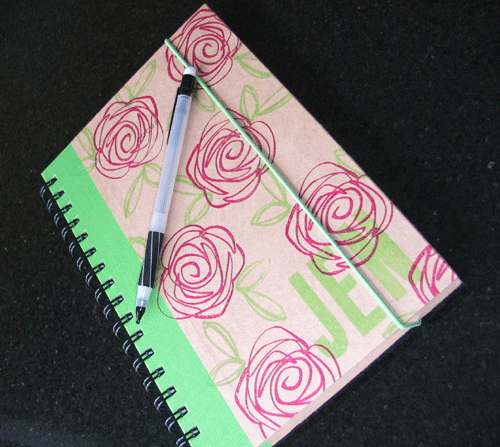
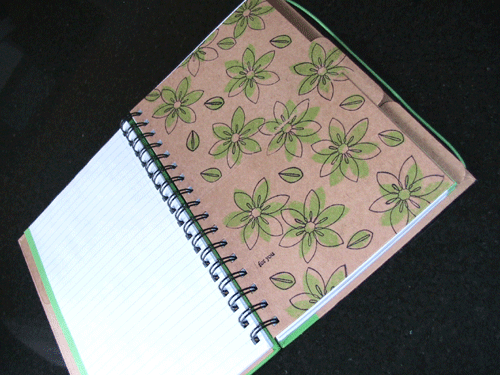
Today I wanted to show a gift my mom gave me: a beautifully stamped notebook. The cover, inside cover, dividers, and pockets are all stamped with a colorful flower theme. As you can see it is still blank inside because it’s almost too nice to be used, but I will fill it up soon when I find something worthy to fill it up with.

moms-journal-cover1.gif

And then on the inside, more surprises! Nothing that she makes is ever boring!

moms-journal-inside3.gif

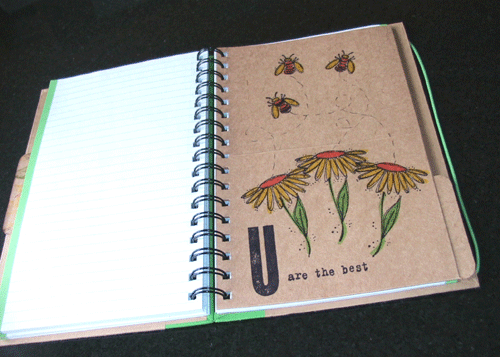
I think decorating the dividers would be great for a child’s school notebook too, for the different subjects or a theme they like.

moms-journal-inside2.gif

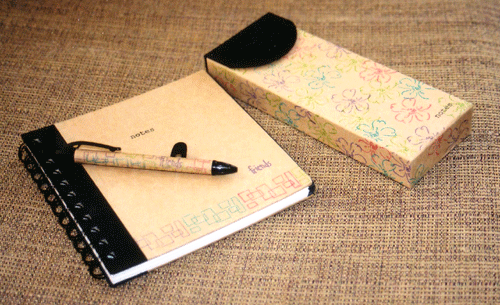
I have also stamped large and tiny pocket notebooks, pens, pencil cases, and index card boxes. Target sells a lot of these blank brown, cardboard paper products that make great gifts, so get stamping!

stamped-pencil-case2.gif

Keeping his memory alive

Saturday, February 24th, 2007

bill

Bill Dooley October 20, 1953 – February 24, 2004

” Bill Dooley was the first missionary Bruce knew: “I remember thinking, this guy is NEAT-he’s so real and personal.”

“conversations with ABWE missionary Bill Dooley inspired and motivated Beth to consider missions as God’s specific will for her life.”

I would like to introduce you to Bill Dooley, my dad. He was a missionary for 14 years in Chile and later a recruiter for the same missions agency. He encouraged many to know God and love Him. At 50 yrs old, 3 years ago today he flew away leaving us with a hole in our hearts that would never heal. He was a great man and we miss him so much.

I wanted to share with you what I have made for my family so we will always remember him and keep him near. He wore this great sport coat all the time. He looked great in it. It was his favorite. For my mom’s birthday I made this bag for her from his coat. I attached his name tag he wore while he was at conferences and a great picture of his teethy grin. Love that smile!

img_0116.jpg

I made the inside out of the shirt they got on their Alaska cruise their 25th wedding anniversary. The tie tips were a few of his favorites. The blue one he wore at our wedding when he married us. She loved the bag and it’s nice to know that a peice of him is still close to her.

inside.jpg

wedding.jpg

I really started missing him a lot when I got pregnant and wished Lucy could know him. It kills me that they won’t get to play together. So I made her this Lion. (I have a slight obsesion with lions thanks to the Chronicles of Narnia) Papa the Lion is also made from the same sport coat. Recognize the tie? same one. This is the only way I know to keep him close. When you loose a loved one won’t you do the same? Don’t throw all their things away but make something new and keep them close. It’s all we have left of them. Thanks for letting me share this with you on this very special day to me and my family.
img_0080.jpg

Featured Craft Blog: Anna Maria Horner

Thursday, February 22nd, 2007

Ok, I am so excited right now. I have been dying to tell you about Anna Maria for a long time! I am soo obsessed, addicted and crazy over her stuff. There are few blogs you really want to read every word and go back to posts and look at the pictures again and again. This blog is just like that. Watch out if you’re not careful you’ll spend hours there! I feel so privileged to tell you about this amazingly creative woman. When I get this excited I have trouble sharing my thoughts. My mind goes faster than my hands can type so bear with me here.

Thing is I totally want to be just like AM when I grow up. She has 5 kids and still finds time to craft! Be sure to take a look at her bio, for I am sure to leave something important out. Her daughter Juliana who just turned 15 is adorable. She helps her with all of her big craft projects. My favorite is the younger kids play room they designed together. I can’t wait to be able to do stuff like this with Lucy! So fun!

She is a fabric designer among other things. Take a look at her home studio. She has her own line right now called Bohemian. She just came out with a new line called Chocolate Lollipop, which will be out in April or May. I can’t wait to get my hands on it! Oh my gosh super cute!!
Chocolate Lollipop

some of her fabulous pillows. (she has made so many her husband has threatened to put them in storage!)
a pillow

loveletterpillow.jpg

Be sure to check out her great technique for making super circles. It’s so great I want to try it right now!
and a few more reasons why I love Anna Maria….
lollipopquilt.jpg

tresses.jpg

quilttop.jpg

gussiedup.jpg

Clone Yourself a Dress Form

Wednesday, February 21st, 2007

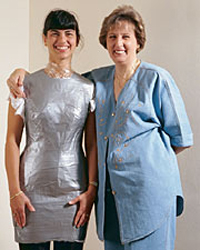
duct-tape-dress-form.jpg For those who like to make their own clothes, but can’t afford a store-made dress form, deck yourself in duct tape and you’ve got an inexpensive alternative. Threads magazine gives four easy and fun ways to create your own dress form using either papier-mâché or duct tape. They say you can complete this project in as little as two hours, using no more than $15 in materials. I’ll be trying this in the weeks to come, so check back to see my cloned dress form.

Wool Wraps and Soakers

Tuesday, February 20th, 2007

I’ve been working on wool covers for my daughter to wear with her cloth diapers. Wool has some amazing properties, it can absorb up to 40% of its weight in moisture without feeling wet, and it allows for airflow which helps prevent diaper rashes. Also, it never stinks!

I’ve been trying two different types of wool covers – wraps and soakers. The first one I made was a wrap that I completed using the Tickle Turdle online pattern.

soakers-001.jpg

I used the yarn that I had previously dyed and accented it with purple to make it a bit more “girly”. The wrap turned out okay, but I don’t really like the fit of it on Elizabeth. I think I will try to alter the pattern, making the tabs longer and changing the leg holes a bit.

The second type of wool cover that I’ve looked into is a soaker. I haven’t been able to find a pattern for a soaker in crochet that I like, so I decided to make up my own.

soakers-005.jpg

It didn’t turn out very well :) I had done the first body part in the round, and then switched to back and forth to decrease for the legs. This caused the stitches to look different from each other. I messed up when decreasing at some point, and so I ended up with an odd number to bind with an even number (at the top of the legs) which caused it to bind crooked. The legs are different as well. But now I know where I need to improve the pattern, and I will try again!

If anyone has a good link to a crochet soaker to share, I would love to see it :)

Felting Frenzy

Monday, February 19th, 2007

3-bags.gif

My fingers have been busy lately! I have become really addicted to felting, which is knitting with wool yarn and washing it to shrink it about 1/3 of its original size. I have posted several times before about the magical mytery of felting and wanted to show off the WIP from a few weeks ago that is finally finished! I can’t stop lately. As soon as I finish one I cast on another. Right now I am working on a gray bag with a pink, puple, ivory, and gray swirly border.

green-large-bag.gif

medium-brown-bag.gif

brown_orange-small-bag.gif

I have an orange bag just like the green one that I often carry and have been encouraged by friends to try and make them to sell so I am excited to try it out. (Anyone interested?)

I am so happy with how they have turned out, which I can’t always say about my work. Felting is magical!

Crochet Coffee Cozies

Friday, February 16th, 2007

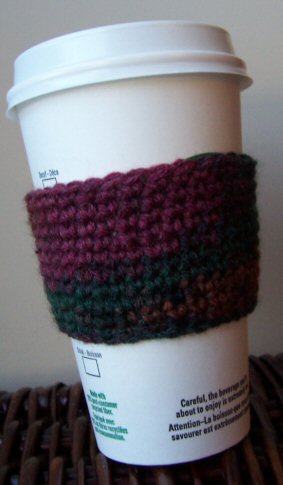
A crocheted coffee cup cozy is a great way to express yourself while doing your small bit to help the environment.

cozie-002.jpg

These are super easy to make, and make a great way to use up ends of skeins you may have laying around. To make them, I chained 35 and made sure it fit snugly around the cup (I had an empty cup from my favorite coffee joint to use for sizing), depending on the size you want or the yarn you use, you may need to chain more or less.

From there, I simply did single crochet in the round. About three rounds in, I did a round of repeat increases (2sc in one chain, 2 sc in the next two chains) so that it flared out slightly to fit the cups. Another three rounds of sc in each chain, and then I did a round of decrease (10sc, sc2tog) so that it was tighter around the cup. The rest of the cozy was single crochet and I finished when they were the width I wanted, about two and a half inches. Weave the ends in, and there you have it – a custom reusable coffee cozy.

cozie-005.jpg

These can be personalized in so many ways so you can make them to suit your personality, or the seasons, holidays – whatever you like! If you make them out of an acrylic yarn, you can simply throw them in the washer and dryer to clean, making them easy to care for. And they would make a great gift for a coffee lover :)

Knitted bags for the Cuirim Craft Fair

Thursday, February 15th, 2007

img_0024.jpg

We are getting ready for the fair coming up in April. I’ve been going crazy trying to make sure everything is in order. The idea was much funner in my head. Pulling it off is going to be a miracle. I know it will all be worth it. To chill I just sit and knit.

I came up with this knitted bag pattern that is super easy. There are two things I hate – purling and seams! If I can come up with something where I never have to purl a row or stich something up when i’m done then i’m thrilled!! That is just what I did with these bags. I used the Peaches n’ Cream cotton yarn and double stranded the solid color to make it more sturdy.

img_0045.jpg

img_0042.jpg
I started by casting on 40 stiches on a size 7 and knit in garter stitch for about 5 or 6 rows. Then I picked up the stitches around the edge ending up with a total of 90, give or take a few. At first it is too narrow to put on one circlular needle so I knit with 2 circulars as you would with double pointed needles. I knit the rest of the bag in the round. Adding the verigated yarn about half way thru and finishing up with the rest of the solid color. I made the strap by casting on 100 stiches and knit about 6 rows of garter stitch. I used some fabric I had left over from some Ikea curtains to line it and made a button with fimo. I love the way they turned out. I’m working on a green one now. So i’ll have my little collection of 3 similar ones for the fair.

img_0041.jpg

img_0044.jpg

img_0038.jpg

It’s nice to know I just used some random stuff i had around the house for this. I didn’t spend any money on this and they will sell for at least $15. What would you pay to benefit a ministry in Mexico?