genericviagra

buy cheap cialis pill online lloyds pharmacy viagra cheapest without prescription farmacia online alprostadil

viagra no prescription required

cheap without prescription Cialis Super Active online meds where can i buy viagra cheap without prescription brand viagra online sildenafil online

canadian discount pharmacy

cheap without prescription Generic Levitra purchase tadalafil amoxicillin no prescription cheap without prescription pill online buy cheap generic viagra

yohimbe

Generic Viagra buy cheap cheap cialis impotence treatment cheapest without prescription buy viagra online stamina rx

buy prescriptions

buy cheap Viagra Super Active sildenafil citrate tablets soma pharmacy buy online cheap pharmacy cialis online

next day cialis

Zithromax cheap without prescription viagra sale online abortion pill online cheapest without prescription brooks pharmacy no prescription required

online pharma

buy cheap Viagra Soft viagra price comparison can i buy viagra online buy online order kamagra net pharmacy

viagra herbal

cheap without prescription Xenical discount viagra online lowest price viagra cheapest without prescription get viagra prescription online doctor

cialis generic

Levitra cheapest without prescription canadian rx canadian viagra online buy cheap canadian prescription drugs buy amoxil

Archive for April, 2007

Flower Loom How-to

Monday, April 30th, 2007

I needed a flower loom for a crochet project I’m doing, but didn’t have one. I went to three different craft stores and no success of finding one. I could order one off the internet, but that’s more money and time than if I just made one myself. So I headed back to the craft store in search of supplies.

flower-loom1.jpg

All you’ll need is a 3/16″ wooden dowel, a package of wooden rounds, scissors/small saw, and some glue. I used hot glue for this tutorial, but you may want to use a wood glue or fast-drying epoxy, since the hot glue won’t hold up to a lot of tugging and pulling. And if you can’t find round wooden shapes, you can always use square ones, and make a circle using a compass. You’ll cut (or saw, whichever is easier) your dowell into 1 to 2-inch pieces. For a larger loom, you’ll want 10-12 pieces. First, glue four pieces to the opposite sides. You can mark the center of the circle with a pen so you place the pieces evenly.

flower-loom2.jpg

Then you’ll position the remainder of the pieces in place.

flower-loom3.jpg

You can do the same with smaller rounds, making different shape looms. For the large loom I used 12 pegs, for the medium, 8, and for the small, 6.

flower-loom4.jpg

Now you can embellish anything, using yarn, ribbon, or even twine.

flower-loom5.jpg

flower-loom6.jpg

In the heat of passion

Friday, April 27th, 2007

broken-hook.jpg

Simple Makeup Bag

Thursday, April 26th, 2007

makeupbag1.jpg

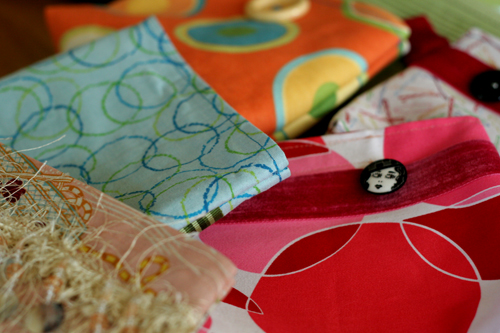
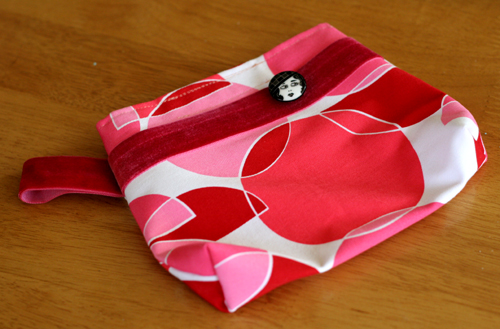
I made about a dozen of these little bags for the Craft fair. I have had fun choosing the fabrics, embellishments, and buttons and they are so quick to whip up! They are great for makeup bags or I like to put my phone, keys, and cash in it and then put it in my larger diaper bag. I cut a pattern out of a cereal box. It measured: the narrow end/ top = 6 1/2″, the wider bottom = 8 1/2″, height = 6″.

I wanted to make these bags stiff (as I asked about in a previous bag post) so I bought no-sew bond, cut it out using the pattern, and ironed it to the lining. Then you peel away the paper and iron it to the outside fabric. At this point I decide if I want to attatch a stripe of ribbon or trim. Use can use the no-sew bond to attatch this also or sew across the trim with the sewing machine. I also added in a short strap on some of the bags.

makeupbag3.jpg

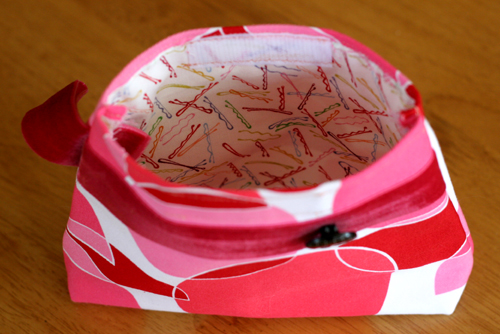
Then I cut a piece of velcro about 2″ long, folded over a 1/2″ hem, centered the velcro strip and sewed 2 lines, one across the top and botton of the velcro across the width of the bag. This works well too if you want to attatch the trim along the bottom seam for the velcro. Then I turn the bag wrong side out and sew up the sides. I cheat; I sew through the no-sew bond since my fabrics were not very thick. I like the stiffness it gives the fabric. Then I make a gussetted bottom by making a triangle horizontally at the each corner about 1″ down from the edge and sewing across this triangle horizontally. (sorry this is a little hard to describe in words)

makeupbag2.jpg

Such a quick and easy gift or I love having a girly bag inside my big, plain diaper bag!

You know you are addicted to crafts when….

Wednesday, April 25th, 2007

bottle.jpg

You paint your water bottle with nail polish.

Wild Ginger Software

Monday, April 23rd, 2007

Do you find troubles finding patterns that fit your measurements? Sometimes I find clothing patterns will fit well in one area of my body (say the chest) but then they are ill-fitting in others, such as across the shoulders. It can be frustrating to try and alter commercial patterns so that you can get a good fit.

I stumbled across some great software and I just had to share! Wild Ginger Software is custom apparel pattern drafting software that allows you to enter the measurements that you desire, and then adjusts the pattern to fit your measurements. You can then print it off, along with instructions, and sew away! The Wild Ginger PatternMaster consists of six programs that allow you to design and print patterns for your entire family, while Click&Sew patterns are digital patterns that offer limited designs, just like a commercial pattern but you can customize to your size and measurements.

I was happy to see a free program on their site, WildThings! Accessories. It was a super fast download, and there are a variety of different patterns included, from wraps and aprons to slippers and sandals :) The program is really easy to use, and I was able to print off a pattern for an apron adjusted to what I wanted in under 5 minutes.

I would definitely recommend trying the WildThings Accessories if you are interested in sewing different bags and items, and it also gives you a feel at customizing patterns :)

Cuirim Craft Fair: 1 day to go

Friday, April 20th, 2007

shirts1.jpg

With Cuirim Craft Fair happening tomorrow, we had a pow-wow last night to tag auction items, organize small details, and make screen-printed shirts.

shirts2.jpg

Joanna had offered to show us how they’re done, so with all our crisp, white tees, we watched and marveled at the process of screen-printing.

shirts3.jpg

shirts4.jpg

shirts5.jpg

shirts6.jpg

shirts7.jpg

shirts8.jpg

shirts9.jpg

And Joy, so incredibly excited about us having t-shirts for the fair:

shirts10.jpg

shirts12.jpg

We’re all so excited about the fair, and anxious to see how much money we’ll raise for the Cuirim House. We’ll definitely be posting pictures next week, so check back to see how it all turned out. And thanks again to Joanna for doing our shirts for us and letting us use your supplies!

I should have used a pattern

Thursday, April 19th, 2007

I’m doing a “diaper and a shirt” swap with the messageboard I post on. The idea is that you can embellish a T-shirt to match a diaper that you sew. My partner has a 2 month old boy, and I couldn’t find a shirt in his size, so I decided to sew one. However, I couldn’t find my pattern that has baby shirts in it, so I decided to try and create my own.

I grabbed a onesie that my daughter has outgrown, and for the fabric for the T-shirt I used an adults XL shirt I got on sale from Michaels.

crafty-001.jpg

I cut off the bottom of the onesie to make it into a shirt, and then cut along the seams to take the onesie apart. This gave me a general idea of the shapes I was looking for, and using them as reference I drew the pieces out freehand on the yellow T-shirt.

crafty-002.jpg

I sewed along happily, thinking that I was going t have an cute little shirt that would work with the diaper I was making. I am making a brown and yellow wool cover and a fitted diaper with giraffes on it, so I used brown thread on the yellow shirt so that it all matches.

Well, here is how the shirt turned out:

crafty-003.jpg

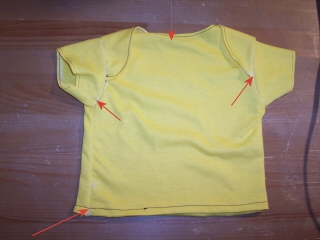
I’ve used the arrows to show the errors I made. I missed part of the neckline on the right hand side, the neckline itself is much too high and would choke the baby if they wore it. My left seam was about a half inch towards the middle of the shirt (must have made the back wider than the front) and the left arm seam doesn’t line up with the left side seam.

All in all, its not that bad considering I didn’t use a pattern. But definitely not wearable! Guess its time to search and find that pattern I have and use that :)

Quick Jean Fix

Wednesday, April 18th, 2007

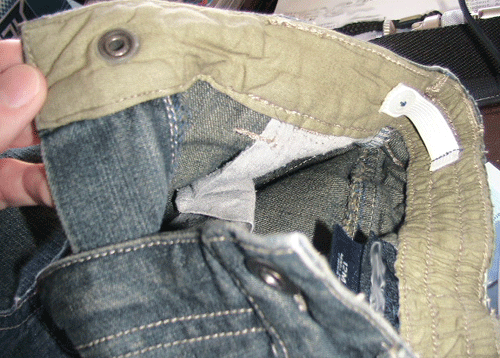
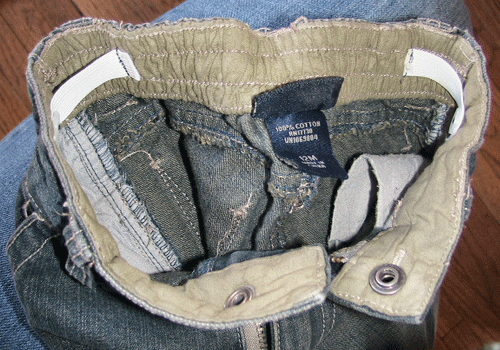
My boy has trouble keeping his pants pulled up. Well, since he is only 15 months old I am not too worried about it yet, but I would like him to be able to wear the box of new pants he has before it is too hot for pants. He is 15 mo. but barely wears 12 mo. pants because he is a skinny little guy. Even the half-elastic waistband is often not enough so I borrowed this idea usually found in clothing for fast-growing elementary and pre-teens: the inner adjustable button.

jean-fix.gif

All you need is: elastic, 2 small buttons, a seam ripper, and sewing machine or needle.

1. I cut 2 pieces of 1/2″ elastic about 2″ long. (adjust to the amount you need garment taken in)
2. I used the seam ripper to cut a slit to fit my button toward the end of each elastic piece. (this was easier than using the button holer, if it frays a little it will be okay.)
3. Line up how much you want the elastic drawn in and sew button into pants.
4. With button through your elastic hole, pull elastic to desired place and sew vertically over opposite elastic end. I did not make it adjustable with more than one button but you easily could.

jean-fix-2.gif

This literally took me about 5 minutes and I think will save me some money if I don’t have to skip a season with his pants. Any other tips for fitting thinner kids in their clothes?

So that’s how it works…

Tuesday, April 17th, 2007

I found this amazing little illustration over on Meg’s site and it’s a great way to explain how a bobbin works on a sewing machine. Actually, it’s pretty relaxing to just watch it over and over. Okay, maybe that’s just me.

Knitted Baby Rattle

Monday, April 16th, 2007

img_0007.jpg

I got the idea to knit this baby rattle for Lucy. I was so excited that it turned out ok. I had an old mitt rattle that was too tight on her hand so I took it out of the fabric and stuck it in this one.

I started with an icord by casting on 7. Then I increased as you would for a raglan sleeve on every stitch and knit in the round. I did the same thing 3 times till i ended up with like 40 stitches give or take a few. Then when I thought it was big enough I started decreasing and stuffing it before I ended up with just 10 stitches that I pulled together at the top. She loves it. Oh, I needed something hard to hold it up, so I broke a piece of a plastic hanger and stuffed it in there. It’s sorta floppy but Lucy loves it! she can hold on to it really well.

I tried to get a picture of her with it but she was just going to town. Here she is wacking her self in the head. too funny!