genericviagra

buy cheap cialis pill online lloyds pharmacy viagra cheapest without prescription farmacia online alprostadil

viagra no prescription required

cheap without prescription Cialis Super Active online meds where can i buy viagra cheap without prescription brand viagra online sildenafil online

canadian discount pharmacy

cheap without prescription Generic Levitra purchase tadalafil amoxicillin no prescription cheap without prescription pill online buy cheap generic viagra

yohimbe

Generic Viagra buy cheap cheap cialis impotence treatment cheapest without prescription buy viagra online stamina rx

buy prescriptions

buy cheap Viagra Super Active sildenafil citrate tablets soma pharmacy buy online cheap pharmacy cialis online

next day cialis

Zithromax cheap without prescription viagra sale online abortion pill online cheapest without prescription brooks pharmacy no prescription required

online pharma

buy cheap Viagra Soft viagra price comparison can i buy viagra online buy online order kamagra net pharmacy

viagra herbal

cheap without prescription Xenical discount viagra online lowest price viagra cheapest without prescription get viagra prescription online doctor

cialis generic

Levitra cheapest without prescription canadian rx canadian viagra online buy cheap canadian prescription drugs buy amoxil

Archive for May, 2007

I have found my place!

Wednesday, May 30th, 2007

In keeping with the growing success of Heather’s crochet lessons, I have to share two recent projects that I’ve completed because I’m just so stinking excited about them. For anyone that knows me knows I get bored very easily, so the fact that I am sticking with this is amazing in itself and I really do feel that I’ve found my niche in the crafting world.

I made this blanket for a good friend of mine who is due with a little boy at the end of the summer. I found this yummy yarn at Hobby Lobby and fell in love with the colors and how rustic they are. I love this blanket and I loved working on it mainly because it’s going to someone I really care about. I won’t lie and say I didn’t think about keeping it for myself because it’s really big and the perfect, most yummiest lap blanket it would make, but seeing Amanda’s face when she opened it was worth it.

amandas-blanket.jpg

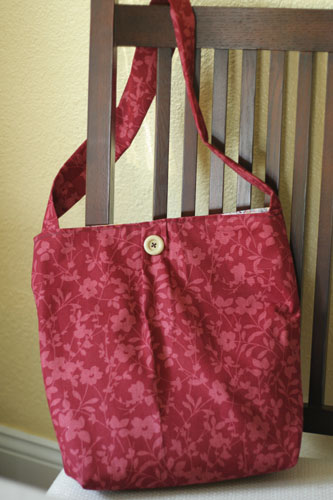
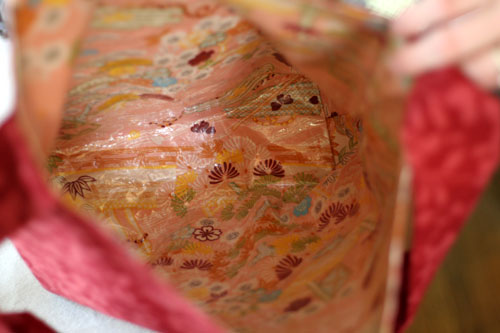
This next one is a bag I made for another good friend of mine for her birthday. The applique turned out completely different than I had imagined it would, but I still liked how it ended up. And it was another gift that as I look at this picture now I think, “I really liked that – I should’ve kept it.” It’s okay tho – I love giving gifts so it’s great that I get to give pretty things. Well…most of them are pretty anyways.

gaylyns-bag.jpg

gaylyns-bag2.jpg

That’s all I can show you for now. The next few weeks are birthdays upon graduations upon anniversaries and I am making stuff as quickly as I can, but I can’t post pics until all the beauties are handed out. I absolutely love crocheting and if it’s something you’ve been wanting to learn, check out Heather’s crochet lessons and learn finally. You may find that it may be your niche, too.

Learn to Crochet – Lesson #2

Tuesday, May 29th, 2007

See all the posts in the Crochet School…

Welcome to lesson #2! I hope that you enjoyed lesson #1 and are confident with what was taught in that lesson.

Topics to be covered in today’s lesson are:

  • How to end your square
  • Slip stitch
  • Half Double Crochet
  • Double Crochet
  • Triple Crochet
  • Crocheting in the round

To begin with, I apologize for the lack of videos. I couldn’t get my camera to turn on, no matter what I tried. I will be taking it to be looked at this week, so hopefully it will be back in time for next week’s lesson. For this week, I took a ton of pictures using my new camera (that doesn’t have video, go figure :) ). The picture quality isn’t the best, I’m still trying to get used to all the functions of the new camera, plus I was taking these in my dingy basement office, so not a lot of light at all. But it is still pretty clear what to do, and again any questions feel free to comment with them, or ask them on the Flickr group.

And for my lefties ;) Here is a great link that will help you with holding your hook and how to make each of the stitches that we will learn today. I hope it helps you out!

Alright, let’s get started with Lesson #2!

How to end your square

I forgot to go over this last week. When you get to the end of your square, make one more chain. Take out your hook, and cut the middle of the loop. You can then pull the piece attached to your skein out, and pull the other cut end to tighten. Hope that makes sense!
Slip Stitch

The slip stitch is used to join work, bind off stitches or carry yarn over to a different working position without adding height.

Begin with a regular chain:

chain.jpg

Slip your hook through the chain, under one loop.

slip-stitch-1.jpg
Wrap the yarn around the hook one (also know as “yarn over” or “yo”).

slip-stitch-2.jpg

Pull the yarn through the loop, giving you two loops on your hook.

slip-stitch-3.jpg

Pull the loop on the left through the hook on the right, leaving a single loop on your hook.

slip-stitch-4.jpg

That’s it! Slip stitch is really easy, and its a stitch you will likely see in the majority of your crochet patterns.

Half Double Crochet

The half double crochet is between a single crochet and a double crochet in height.
As usual, we will start this stitch with a chain

chain.jpg

Yarn over and slip your hook through the third chain from the hook (the two chains you skip will become your first hdc for the row)

dc-and-hdc-2.jpg

Yarn over

dc-and-hdc-3.jpg

Pull the yarn through the chain, giving you three loops on your hook.

dc-and-hdc-4.jpg

Yarn over, and pull the yarn through all three loops on the hook
hdc-6.jpg

This is what a row of half double crochet will look like

hdc-finished.jpg

Double Crochet

The double crochet is about twice the height of a single crochet, and one of the most popular crochet stitches.

Start with your foundation chain

chain.jpg

Yarn over and slip your hook into the fourth chain from the hook (the three chains that are missed count as the first double crochet for the row)
dc-and-hdc-2.jpg

Yarn over

dc-and-hdc-3.jpg

And draw the yarn through the chain, giving you three loops on your hookdc-and-hdc-4.jpg

Yarn over, and pull the yarn through the first two loops on the hook. This will give you two loops remaining on your hook.

hdc-5.jpg
Yarn over again, and pull the yarn through the last two loops on the hook

hdc-6.jpg

Clear as mud? This is what your double crochet will look like as a finished row

dc-finished.jpg

Triple (aka Treble) Crochet

A triple crochet is even taller than a double crochet, nearly 3 times the height of single crochet.

Starting with your foundation chain, yarn over your hook twice

tcr-1.jpg

Slip your hook through the fifth chain from the hook (the four skipped chains become the first triple crochet of the row). This gives you four loops on your hook.

tcr-2.jpg

Yarn over

tcr-3.jpg

And pull the yarn through the chain, giving four loops on your hook.tcr-4.jpg
Yarn over, giving you five loops on your hooktcr-5.jpg
Pull the yarn through the first two loops on the hook, leaving 3 loops

tcr-6.jpg

Yarn over, giving 4 loops on the hook

tcr-7.jpg

Pull the yarn through the first two loops on the hook, leaving 2 loops

tcr-8.jpg

Yarn over once again, giving three loops

tcr-9.jpg

Pull the first loop (yarn from yo) through the last two loops on the hook, completing your triple crochet

tcr-10.jpg

Here is what a row of triple crochet will look like

tcr-finished.jpg

So now you’ve learned the basic and most common stitches of crochet – slip stitch, single crochet, half double crochet, double crochet and single crochet. Most of the patterns will be made up of a variety of these stitches.

Crocheting in the round

Crocheting in the round is very common for afghan squares and hats, to name a couple of groups of patterns.

To begin, you have to create a center ring. The center ring is the foundation for crocheting in the round, just like the foundation chain when you are working in rows. To make a crochet ring, simple crochet a number of chains (the exact number varies depending on the pattern)

round-1.jpg

Then you will join the last chain to the first chain using a slip stitch. Slip your hook through the last chain (the first chain you made, beside the slip knot)

round-2.jpg

Yarn over

round-3.jpg

And pull the yarn through both loops on the hook

round-4.jpg

After you make the center ring, you are ready for the first round. You’ll start off by making the number of turning chains corresponding to the stitch you are using. For example, I will be working with double crochets in these photos, so the number of turning chains will be three. Another way to determine the number of turning chains is that it will be equal to the number of chains you skip when you are starting a row (ie sc is 1 chain, hdc is 2 chains etc)

For double crochet, chain 3

round-5.jpg

The double crochet is worked the same as in a row, but instead of working through the chain, you are going to work around it.

Pass your hook through the center of the ring

round-6.jpg

Yarn over

round-7.jpg

And pull the yarn through the ring

round-8.jpg

Complete your stitch, in this case the double crochet (yarn over, pull yarn through 2 loops on hook, yarn over and pull through the last two loops on the hook)

round-10.jpg

You will work your stitches around the ring, until you reach the number required by the pattern. You will then identify the top of the turning chain (in this example, the turning chain was 3, so you will identify the third chain from the ring before you started doing the double crochets, identified by the arrow)

round-11.jpg

Slip your hook through the chain

round-12.jpg

Yarn over

round-13.jpg

And pull through both loops on the hook (making a slip stitch) to close off the round

round-14.jpg

Occasionally you will work your stitches into the chain, but the majority of the time you will work them around the ring, as I’ve shown.

When you are working in the round, you will not be turning your work (unless the pattern calls for it). You simply crochet in the round, end the round by making a slip stitch through the turning chain, and then continue working in the same direction.

Patterns

I will be giving you three patterns for the week, so that you can get used to all the stitches and working them together. I recommend doing them in the order I list, from easiest to more difficult.
Each pattern has a photo so you know what your finished square should look like, and I will be doing these as well so again if you have any questions don’t be afraid to ask! Don’t be intimidated by the pattern, remember to write it out in plain language if you think that will help.

Again, you may want to make 2 of each pattern, so that your lapghan is a bit bigger in the end :)
Pattern 1: Pretty Pebbles Square

Pattern 2: Basic Granny Square Don’t worry about changing colors yet, that’s a later lesson! Just work this pattern in one color.

Pattern 3: Wheel In Valleys


Good luck, and most importantly, have fun!! :)

Crafty Daisies Crochet Flickr Group

Monday, May 28th, 2007

I started a Flickr group to share your photos, discuss the lessons and ask any questions you may have!

Come join!

Polymer Clay Pens

Monday, May 28th, 2007

I have found so many fun things to do with my polymer clay this was my first try at a pen for Candace on her birthday.
img_0084.jpg

I always knew that this stuff would be a good time but didn’t think it would be this fun! You basically construct everything as you normally would, bake at the same time and degree that the instructions say, just be careful when touching the pen tip after baking as it will be quite hot.

img_0083.jpg

Then thanks to Joanna’s tips on making canes in different colors I came up with this. It makes me so happy to write with it.
img_0044.jpg

Learn to Crochet – Lesson #1

Tuesday, May 22nd, 2007

See all the posts in the Crochet School…

Today’s lesson will be a summary of the basics to get you started with crochet. The topics I will be covering are:

Common Terms and Abbreviations
How to read a pattern
Gauge swatches
Basics: Chain, single crochet
Turning your work

Got your supplies? Great!!! Let’s get started :)

Common Terms and Abbreviations

This is a list of common terms and abbreviations that you will come across when reading crochet patterns. Learning these terms and abbreviations is a huge step towards reading a pattern.

beg: begin(ning)
ch: chain
dc: double crochet
dec: decrease
est: established
hdc half double crochet
inc: increase
lp(s): loop(s)
rep: repeat
rev sc: reverse single crochet
rnd: round
RS: right side
sc: single crochet
sl st: slip stitch
sp(s): space(s)
st(s): stitch(es)
tog: together
tr: treble crochet
WS: wrong side

Often there will be different / new abbreviations that will come up on a new pattern. More times than not, the author of the pattern will define and describe the abbreviations at the beginning of the pattern.

I recommend printing off a copy of the common abbreviations to have beside you for quick reference as you are learning.

How to read a pattern

First things first: Reading crochet patterns takes practice, so don’t be discouraged if you don’t understand all of the patterns you would like to crochet the first time you read it. The patterns are full of symbols and abbreviations, but once you learn to figure out what is meant, it will all become really clear.

I will start by writing a line of a pattern as you may see it:

Row 1: With size H hook, ch 15, sc in 2nd ch from hook and in each ch across, turn (14sc)
In plain language, this means:

Row 1: With a size H crochet hook, chain 15 chains. Work a single crochet into the second chain from the hook and in each of the chains until the end of the row. Turn your work. (You will work a total of 14 single crochets for this row)

As you can see, the abbreviations are used to shorten the patterns and make things more streamlined. I find it helps to read an entire pattern from start to finish, and write the pattern out in plain language if you need to. Make sure you have a good understanding of what you are going to do before you start your project, it will save you lots of stress and frustration.

Other symbols you will see in a pattern are:

* : repeat the instructions following the single asterisk as directed

For example, the pattern may say: …..*2sc, ch1, rep from * across. This means you will work 2sc, ch1, 2sc, ch1, 2sc, ch1… until you reach the end of the row.

[ ] = work instructions within brackets as many times as directed
( ) = work directions in parentheses as many times as directed

For example, the pattern may say: ….(2sc, ch1) five times (or….[2sc, ch1] five times). This means you will work 2sc, ch1 five different times. So the total amount you would work would be 2sc, ch1, 2sc, ch1, 2sc, ch1, 2sc, ch1, 2sc, ch1. Clear as mud? :)

I found a great resource for reading crochet patterns, and it explains things so much better than I ever could. Check it out at Annie’s Attic

Gauge Swatches

Gauge is the term that is used to define the proper tension you should work so that your finished project becomes the right intended size. The hook size listed in the pattern is just the size used by the designer to work at the proper gauge, however you may need to change hook size in order to work at the given gauge, depending on if you tend to crochet tighter or looser than the designer. It is especially important to work to the proper gauge when making garments – anything that you want to fit properly. Gauge is not so important with things like blankets or scarves, things that don’t require a specific finished size.

Gauge is usually defined in the pattern by a ratio of stitches and rows to a given measurement such as 16 stitches and 14 rows in single crochet = 4″. This means that if you do 14 rows consisting of 16 single crochet, your completed square should measure 4″ x 4″.

Work a swatch of the yarn you are going to use in the stitch pattern of the piece you are making (ie if your pattern is all single crochet, you will make a swatch in single crochet. If your pattern is a shell stitch, you will work a swatch in the shell stitch). Then count the number of stitches and rows in the measurement given in the pattern. If you find that your swatch has more stitches and rows than the gauge, you are working too tightly so change to a larger hook and try again. If you have fewer stitches and rows in the area, you are working too loosely and should try a smaller hook. You may have to change your hook a few times before reaching the correct gauge. Sort of a pain, but worth it if you want garments to fit properly.

Gauge wont be really important for these lessons, as we are simply making squares for a lapghan. But it is a good thing to know :)

Slip Knot, Chain, and Single Crochet

How to make a slip knot:

Chain:

Single Crochet:

Turn your work by flipping it over. Once turned, your working yarn and tail will now be on your right hand side, as will your hook.

turned.jpg

When you are working your single crochet onto another row of single crochet (rather than onto a chain), you will want to make sure that you are inserting your hook under the two loops at the top of the single crochet.

two-loops.jpg

If you don’t work under the two loops, you will end up with a ribbed effect.

When you get to the end of the row, don’t forget to work a single crochet into the turning chain (the chain that you made at the beginning of the last row). If you don’t remember to do this, you will get a decreasing effect at the end of the row and it will begin to slope.

The arrow shows where the turning chain will be located:

turning-chain.jpg

Insert your hook into the chain:

into-last-chain.jpg

And work your single crochet into the chain. This is what the completed row will look like:

finished-row.jpg

It looks a bit crooked, bit it will even out after you work a few rows.

PHEW.

That was a lot to take in, wasn’t it? We will finish off with the pattern for your first square, a simple square of single crochet. Its a simple pattern, and will take some measuring on your part :)
SQUARE #1

We are going to aim for 7″ squares. This will make for a good sized afghan in the end.

Chain 25.

Row 1: Sc in 2nd ch from hook and in each ch across. Turn.(24 sc)

Row 2: Ch 1. Sc in second sc from hook and each sc across. Turn. (24 sc)

Row 3: Ch 1. Sc in second sc from hook and each sc across. Be sure to sc into the turning chain (the chain made at the beginning of the previous row). Turn (24 sc).

Repeat row 3 until your square is 7″ high x 7″ wide.

Check your square’s width after a couple of rows…that was based on my crochet tension, yours may be different and you may have to change hooks.

Good Luck! You may post comments with questions, however I am back at work full time and probably wont be able to answer each one individually (I will try!) I will post a FAQ on the weekend with common questions and answers.

Sorry about the video quality – I only have a video camera on my cheapie cell phone :) I hope it still makes sense, and that you understand what I was showing. Please let me know in the comments – if the videos aren’t helpful I’ll just do a ton of pictures for the next lesson :)

From His Garage to your Studio

Monday, May 21st, 2007

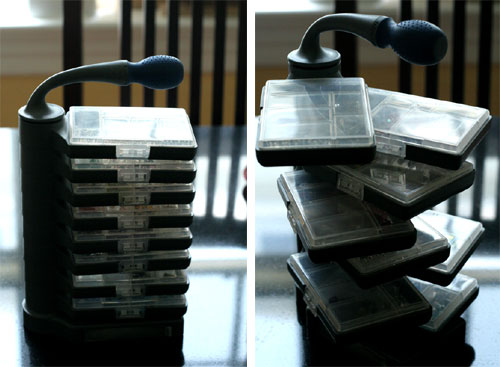
Many of the organizational tools that I have keeping my craft space sane have been swiped from my husband’s woodshop. This first organizer is perfect for beads/headpins/clasps for jewelry beading. For only $10 from a home improvement store, it came full of bolts and screws, which my husband cleaned out, and left me plenty of space for my beads. It is great because each of the clear trays is divided for different size beads and comes out of the gray holder so I can pass them around the table and lay them out when friends are over making jewelry. As you can see at the top is a screw driver handle that comes out and the screw driver heads are in a pull out tray at the bottom. My favorite parts about this are that I can securely carry my beads wherever I go and it narrowly stores them on my shelf. I use it all the time!

garage5.jpg

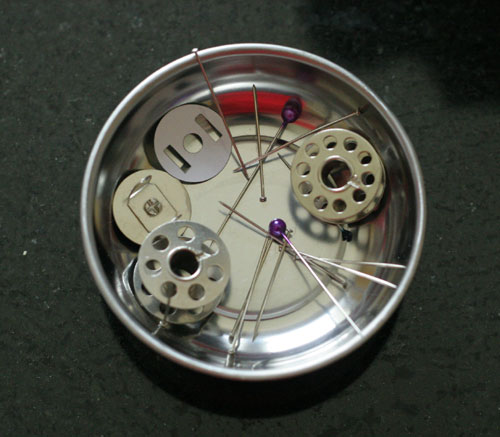
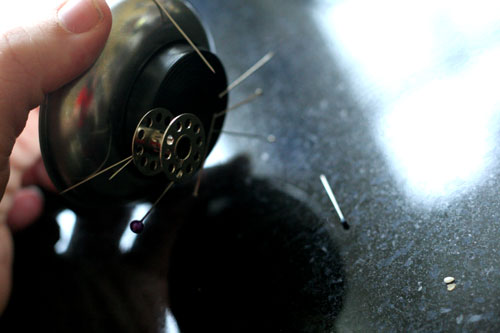
Below are mini magnetic dishes, about 3″ across. My husband brought me home a box of 4 of these dishes from a tool store. They are wide which is great to toss my pins in as I sew without having to precisely stick them in a pin cushion. The black bottom is also magnetic so you can even hang it vertically from a metal cabinet. My favorite part about this is that since the bottom is magnetic if you drop pins on the floor you can just hold this wide magnet over it and gather them up. I hate picking up pins! (I hate nail maintenance more!)

garage3.jpg

garage4.jpg

I have toyed with the idea of making an animal or shaped stuffie to set the dish in for decoration, but haven’t yet. Any ideas?

P.S. Check out his shop while thinking about your craft organizational needs. I know my husband is proud when he sees me putting his ideas to good use.

Swap!

Friday, May 18th, 2007

tea-towel-swap-button.jpg

Since we all had a blast doing the first swap, we’ve decided to another one sooner than expected! This swap will be easier and best of all, inexpensive.

In this swap, you will take a tea towel and decorate it with whatever tickles your fancy. You can do stencil, embroidery, applique, beading, whatever you want. You’ll place it in a padded envelope to send, so total it should cost you no more than $5, especially using things you already have. The sign up will start today, May 18, and the item needs to be sent by June 1.

We’re doing sign up a little differently this time, so if you’re interested just leave us a comment in this post. This swap is also limited to the first 20 people who sign up, so if want in, hurry and comment. **Comments have been disabled since our 20 slots are filled. If you missed out, have no fear we will be doing many more swaps in the coming months so keep checking back!

Learn to Crochet!

Tuesday, May 15th, 2007

Thank you all so much for your response to the idea of classes for learning to knit and crochet. Due to the demand, I will offer classes for both yarn arts, starting with crochet. Each class will run for 12 weeks on Tuesdays, which I think will be a good length of time for learning the basics :) I will answer questions as well, I think that I might make one post on the weekend answering questions rather than answering them individually throughout the week, just to save on time for me, but that depends on the anxiousness of the question ;)

As I stated before, each week we will discuss a new technique or stitch, and then there will be a pattern at the end that will allow you to use your techniques just learned. The patterns will be for afghan squares. The idea will be that you can make up a couple of the squares each week, and then when we get to the later lessons you will finish off the squares, seam them together and then you will have a lapghan to show off! The last lesson will be a show and tell lesson, where I will post pictures of everyone’s afghans that they made :)

To start, I suggest getting a couple of hooks, size G (6, 4.00 mm) and H (8, 5.00 mm), some yarn needles, a tape measure, and some acrylic yarn. I say acrylic yarn because it seems to be the best yarn for learning with, as well as it is super easy to care for (throw it in the washer / dryer). I suggest Red Heart Super Saver yarn, its cheap and comes in lots of colors! You will probably want to grab a few different colors, that way you can make your squares different colors for a fun lapghan! You can make them coordinating or just mix it up, its totally up to you!

Everyone who signs up, completes the lessons, and sends me a picture of their completed lapghan with feedback on the lessons will be entered into a draw, and I will randomly choose a winner. The prize will be a box of goodies to help you expand your crocheting skills!

crochetlogo.jpg

Lesson 1

Terms and Abbreviations
How to read a pattern
Gauge swatches
Basics: Chain, slip stitch and single crochet
Turn

Lesson 2

Half double crochet, double crochet and triple crochet

Lesson 3

  • Shell stitch
  • Popcorn stitch
  • V stitch
  • Puff stitch
  • Bullion Stitch

Lesson 4

Increasing and decreasing

Lesson 5

How to create ribbing (2 different methods)

Lesson 6

Cables

Lesson 7

Tunisian crochet

Lesson 8

Changing colors in crochet

Lesson 9

Weaving in ends, blocking

Lesson 10

Joining / seaming

Lesson 11

Finishing techniques (crab stitch, ruffles)

Lesson 12

Show and Tell

Disclaimer: The lessons are just a general outline of what to expect, and may change from week to week depending on the questions / feedback I may receive!

The lessons will start next Tuesday!!

ETA I removed the note to sign up, since it isn’t necessary and I don’t want to confuse anyone!

Vinyl Lining

Monday, May 14th, 2007

I previously posted about going nuts with the no-sew bond to make my bags stiffer, and thus was eager to try the roll hanging next to it on the rack at the fabric store: iron-on vinyl. My first attempt was on a bag for a swap partner who likes to carry her groceries home in her own bags.

vinylbag1.jpg

I ironed the vinyl to the entire piece I had cut out for a large bag lining, then sewed the bag together. I thought it might be good for carrying home cold groceries so the moisture wouldn’t soak through the fabric bag. (Let me know swap buddy if you have found this to be a good idea.) This might work well also for lining diaper bags since I know I have spent much time cleaning up spilled juice or a busted hand sanitizer bottle from the bottom of the bag. It is easy to iron on and the result is waterproof and very shiny!

vinylbag2.jpg

I thought I had a brilliant idea to make diaper changing pads; cut a square, iron on my vinyl and serge the ends, but the vinyl cannot be machine washed, so obviously that won’t work. But I must find something else! What have you used iron-on vinyl for? Any ideas that have worked well for you or things I could try? (I have 2 yards of it left!!)

Artists & Crafters

Friday, May 11th, 2007

I have a friend Amy who is a beading genius. I’m sure there is some official name for these people that make incredible creations by stringing beads together. I’m going to call her this for now. Here’s some of her stuff she was finishing up for the Cuirim Craft Fair. She’s a genius I’m telling you!

img_0004.jpg

She spends hours on this stuff.

I swear there is a difference between “artists” like her & my friend Joanna and “crafters” like me and my girlz. I mean, Amy and Joanna actually feel their work. When they finish something it is like they have given a piece of their soul. Not me I just try it out and if it works I’m like, cool! Then I try something else. I love that there are different ways to craft. It’s not that I feel less than them or anything they are just a different breed. I’m just thrilled to see art like theirs. That they spend any time with “crafters” like us is just a gift.

img_0011.jpg

I stenciled this then gave it to Amy. She spent hours beading it for me before we made it into a bag. Here’s the way the bag turned out. Sweet work Amy – thanks so much!! Brian and Kirsten are going to love it. We are going to give them this bag with the fat check we made from the Cuirim Craft Fair in it.

img_0073.jpg