genericviagra

buy cheap cialis pill online lloyds pharmacy viagra cheapest without prescription farmacia online alprostadil

viagra no prescription required

cheap without prescription Cialis Super Active online meds where can i buy viagra cheap without prescription brand viagra online sildenafil online

canadian discount pharmacy

cheap without prescription Generic Levitra purchase tadalafil amoxicillin no prescription cheap without prescription pill online buy cheap generic viagra

yohimbe

Generic Viagra buy cheap cheap cialis impotence treatment cheapest without prescription buy viagra online stamina rx

buy prescriptions

buy cheap Viagra Super Active sildenafil citrate tablets soma pharmacy buy online cheap pharmacy cialis online

next day cialis

Zithromax cheap without prescription viagra sale online abortion pill online cheapest without prescription brooks pharmacy no prescription required

online pharma

buy cheap Viagra Soft viagra price comparison can i buy viagra online buy online order kamagra net pharmacy

viagra herbal

cheap without prescription Xenical discount viagra online lowest price viagra cheapest without prescription get viagra prescription online doctor

cialis generic

Levitra cheapest without prescription canadian rx canadian viagra online buy cheap canadian prescription drugs buy amoxil

Archive for June, 2007

My first granny square

Friday, June 29th, 2007

I’ve been dying to jump on the granny bandwagon. I mean, look at all these pictures? How can a crocheter not be inspired? This picture is what completely inspired me to get started – the colors, the shape, the way it all fits together – gah, I’m swooning!

But where to find a great tutorial on how to go about making a granny square? First place I looked was on our very own site with our very own Heather (if you haven’t done this yet and want to learn, Heather’s instructions are very clear, even for a knucklehead like me). I did great creating the ring and adding the first row. But after that, I was getting really frustrated mainly because the pattern wasn’t making any sense. So I found a different pattern – the same square, different instructions and those were just as bad. I finally (finally, after almost two hours and a hissy fit later) found a video tutorial for how to make a granny square and the visual catapulted me to my first finished granny square. Behold!

first-granny.jpg

It looks a little unpolished, but after all the frustration I was just glad I was done. Normally I just give up when it gets really tough and I can’t seem to get it, but I just love crocheting so much, I knew I had to power through and I did. I would love to do one incorporating other colors, but ya know, I just don’t know if I’m ready. Someone please tell me it’s easy?

Make your own paper

Thursday, June 28th, 2007

Hello. My name is Joanna and I’m a paper addict. I hoard paper of all kinds. I do not discriminate against any texture, type or color. I love it all and never knowing when I might need it for a project, I keep it all. When I can no longer keep track of all the scraps, I know I must do what any self-respecting paper addict must do – make more paper! Here’s how I go about it.

First, gather your supplies:

  • ~ Paper scraps with a matte finish (newspaper, tissue paper, construction paper or junk mail but try to avoid the glossy ads)
  • ~ Several towels you don’t mind getting dirty
  • ~ Blender
  • ~ Deckle (this is what you use to strain the pulp, more on that later)
  • ~ Container large enough to fit your deckle (my deckle makes a letter sized sheet of paper so I have found a large plastic storage bin works for me)
  • ~ Sponge
  • ~ Iron (optional)

To begin, you have to make your pulp:

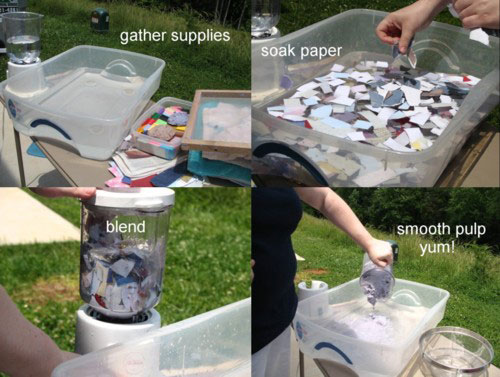
1. Fill your plastic container with several inches of water. You need enough to submerge the deckle completely.

2. Tear your papers into small pieces about 1 inch square and add to the water.

3. Let soak until all of your pieces are completely wet. Any dry pieces will not break up entirely and will leave specks in your finished product. This can be desirable so feel free to vary your soaking times until you get the look you want.

4. With the blender 2/3 full of water, add your soaked pieces of paper and blend until smooth. This also varies the look of the finished product so feel to play with your blending times. Just remember that the smoother the pulp, the smoother the finished product.

5. Return processed pulp back to the plastic storage bin, stir to evenly distribute.
cd_jm_tutorial-1.jpg

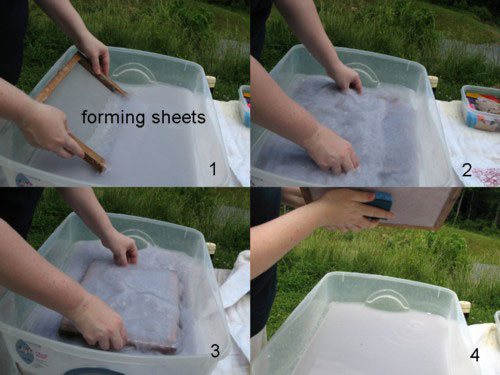
Next, you need to form the sheets. The shape of your deckle will determine the shape of your paper. I purchased mine at my local craft store but you can also make your own by using window screen stapled to a wood frame. I have never tried this so let me know how it turns out if you do!

1. Hold your deckle at an angle as you slide it into the pulp mixture. I go straight to the bottom of the container.

2. Swish it around while it’s submerged. This ensures an even layer of pulp covers the deckle.

3. Keeping the deckle horizontal, remove it from the water and let it begin draining. At this point you can move the pulp around if you need to.

4. Using the sponge, wipe across the screen side of the deckle to remove excess water. Take care how much you tilt the deckle as the pulp can still slide around.

5. I set my deckle on the side of the container to drain while I get the next step set up.
cd_jm_tutorial-1-1.jpg

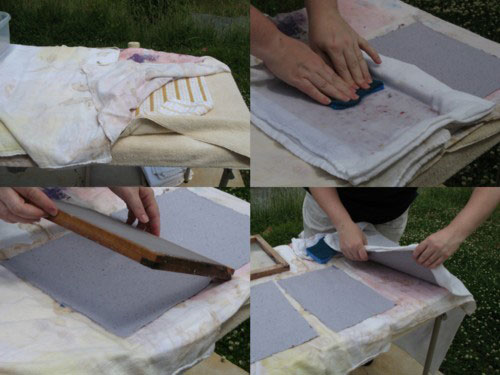
The next step is called couching (pronounced cooching)

1. Place a layer of towels on your surface.

2. Place the deckle screen side down onto the towels.

3. Lay another towel over top of the formed sheet (will be against the pulp) and press with your hands and the sponge to remove additional water.

4. Turn out sheet onto first layer of towels. Sheet should be dry enough to just fall off the deckle. If not, flip and press again. If this makes you nervous, leave the towel on the pulp and turn out the sheet onto it.

5. Layer sheets between towels and press to remove additional water.

6. Remove sheets and lay flat to dry.
cd_jm_tutorial-2-1.jpg

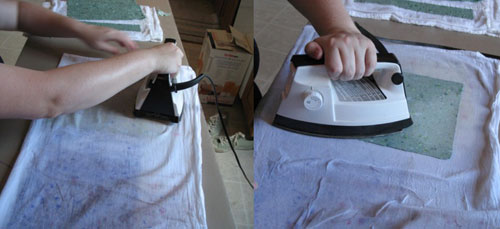
The last step is drying the sheets with an iron (which is optional). I like to iron my sheets dry not only because I’m horribly impatient but because the iron gives the paper a smooth finish.

1. With iron on high, start ironing the wet sheet while still sandwiched in between a towel.

2. Iron until towel starts to feel dry (enjoy the steamy facial in the process!)

3. Pull back top layer of towel and iron sheet itself. When the iron skips right across the sheet you’ll know it’s ready to be ironed directly. It will stick and pull the pulp if it’s not ready.

4. Iron until sheet is crisp and dry.
cd_jm_tutorial-3.jpg

A note about colors:

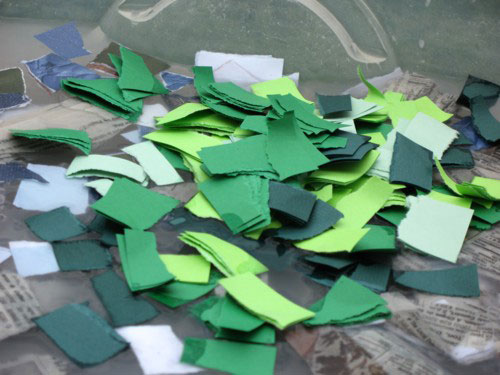
The pulp will always be a few shades darker than the finished product. I like to use solid colored cardstock or tissue paper color the pulp. Since it’s heavier, the cardstock adds a nice speckle to the finished paper. Take care when using strong colors as the dyes can stain clothing.
cd_jm_tutorial-4.jpg

Clean up:

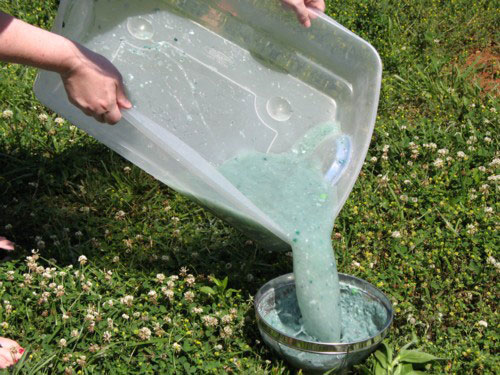
I like to do this outside because I make a mess whenever I do anything crafty. Since I’m already outside, I just dump the any left over pulp mixture in the yard when I’m finished (the pulp hangs around for a bit so choose an out of the way place for this). If you’re inside, strain the mixture before dumping it down the drain. Even outside, sometimes I will still strain it to save the unused pulp, especially if I liked the color. Once strained, press the pulp to remove as much water as possible and then let dry. The resulting chunk can be broken up and added to your next batch or add some white glue and sculpt with it!
cd_jm_tutorial-5.jpg

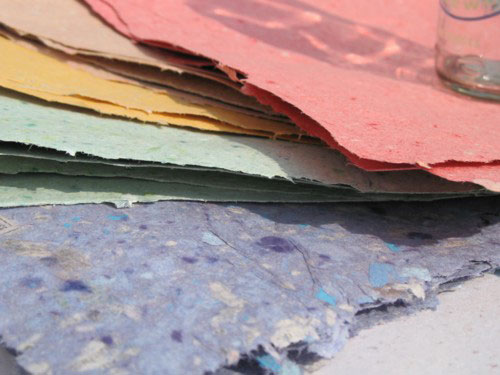
Here’s a sample of a few different textures and colors I’ve made recently. I simply varied the weight of the paper and how long it was processed in the blender.
cd_jm_tutorial-6.jpg

Learn To Crochet – Lesson #6

Tuesday, June 26th, 2007

See all the posts in the Crochet School…

After reviewing what I had for this week, I realized its not really a lesson, but more like a week to practice some stitches together to make a new pattern – cables.

Here is the pattern for the square.
It gives a slightly smaller square, so after you bind off you might want to work sc around the edges to make it 7″.

This week will be an easy week, take this week to finish up and catch up with all the previous lessons, learn cables, and next week we will get into Tunisian crochet. If you have a special Tunisian hook, great! If not, no worries, I will teach you a trick that makes any hook a Tunisian hook ;)

Back to my love

Friday, June 22nd, 2007
craftcorner2.jpg

My poor, neglected craft corner. I haven’t sat down at it in over three weeks and I’m about to pitch a fit. The hubby and I have been working our fingers off trying to spruce up the outside of our house. So while I wanted to be doing stuff like this, I was transforming this:

housebefore.jpg

to this:

houseafter.jpg

While we love the way the house looks, it’s not completely done but done enough to where I can busy my hands crocheting instead of painting. But now I’ve got so many ideas – seriously, it feels like a storm is brewing over my head – of things I want to make, I don’t even know where to begin and just trying to decide takes most of my energy that I would need to do it. So, any of you crafters out there who feel like you’ve got too many ideas stuck in the noggin’ too, how do you organize them quickly and easily so you can begin to complete them?

Inspiration to Bake

Wednesday, June 20th, 2007

apron4.jpg

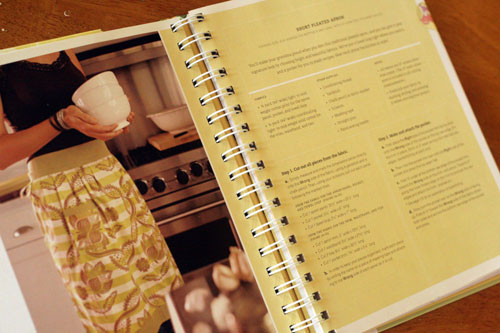
I fell in love with a pattern for an old-fashioned apron from Amy Butler’s “In Stitches” book. But let me tell you it was not as easy as it looks. What I thought was going to be a hour project turned into one that lasted on and off from late afternoon to midnight! But I am very pleased with what I learned and with the outcome. I am only an intermediate sewer and have never followed a pattern from start to finish so that was my first accomplishment. But I also learned to: fold the trim over evenly with the fabric to get the most height out of my trim, measure my pleats (instead of sewing random ones), and do this tricky wrong sided sewing that overturned to show a finished waistband. So check out it out if you are interested in sharpening these skills. The book’s directions and diagrams were pretty clear and I can’t wait to make another, which should go much faster!

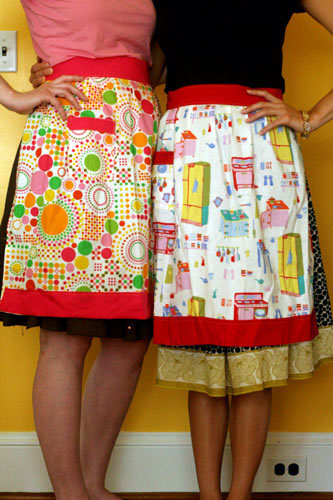
apron1.jpg

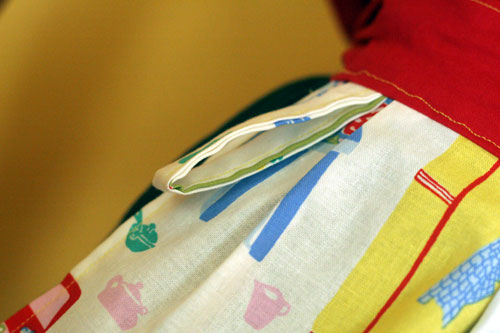
My cousin Roxannah (who is a novice at sewing but still turned out a rockin’ apron) and I were pretty tired but excited about the finished product that we twirled around to show off! Please notice the towel loop above the pocket and the pleated front!

apron3.jpg

Notice, please, we spent all night sewing these aprons! Then woke up early to bake for breakfast of course! Grandma would be so proud!

Learn to Crochet – Lesson #5

Tuesday, June 19th, 2007

See all the posts in the Crochet School…

First of all, I apologize for not getting another pattern up last week. It was a crazy week for me, and in all honesty I forgot.

This week, we are going to learn about ribbing.

Ribbing is often used as a stretchy edging for clothing items, such as waistbands of pants (for babies / children) or the edge of a sweater. It is also used to create a bit of dimension in your projects.

Before we can learn about ribbing, there are two stitches that we must learn, front post double crochet (FPDC) and back post double crochet (BPDC). Front and back post stitches can be made from any type of basic crochet stitch, but are most often created with double or treble crochet stitches. Front post stitches will make a raised effect, while back post stitches will cause a recessed effect.

Here is an excellent video describing both stitches at nexstitch.com.

Another popular application for a combination of front and back post stitches is a basket weave pattern, where a series front and back posts are a carefully arranged to create a basket-like effect.

Another way to create ribbing is to work in only one of the loops on the top of the stitch. If you can recall, in previous lessons I’ve taught that when you are working your stitches into the row below, you will slip your hook under both loops of the stitch:

two-loops.jpg

Look here to see how to work into only the front or back loops. By working all stitches into the front loops or back loops only, you will get a ribbed effect.

Patterns

FPDC and BPDC #1: Nooks & Crannies This square doesn’t have ribbing, but it does allow you to practice your FPDC and BPDC. There is a new stitch introduced (double treble) but I am sure you will be able to figure it out no problem :)

Ribbing Method #2: Ribbed Dishcloth This pattern says to use cotton, you can use your acrylic yarn :) And the finished size stated on the pattern is 7.5″ x 7″. I would just repeat the rows until you reach a length of 7″, then bind off.

Basketweave: Basketweave Dishcloth This is another great pattern to practice your FPDC and BPDC, and also gives you an idea of what the basketweave pattern looks like. The final size isn’t stated in the pattern, so I am not sure it it will be 7″, it will probably be pretty close (most dishcloths are in my experience). Also, you can use worsted weight acrylic instead of cotton yarn.

If you are feeling up to it, and want to try ribbing with FPDC, then try this easy slipper pattern! Not a requirement for the lessons, but I wanted to put it out there if you finish early this week :D

Fabric Glue Art

Thursday, June 14th, 2007

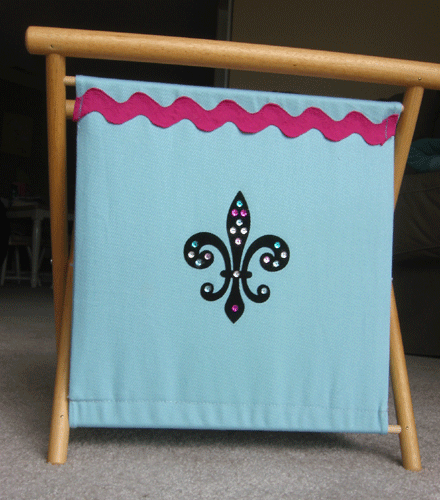
For our sweet Joy’s birthday I wanted to give her something that fit with her knitting addiction but for Joy anything plain just won’t do. So I was anxious to try out adding bling with fabric glue.

joys-knitting-basket-front1.gif

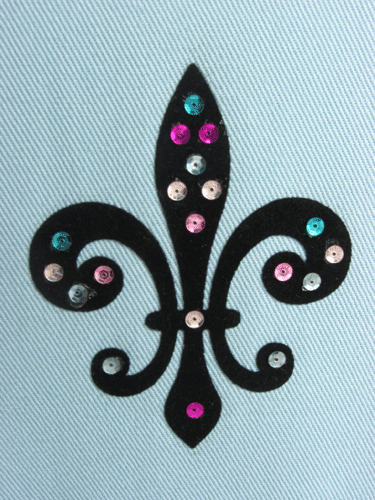
At the craft store I loaded up on huge pink rick-rack, multi-colored sequins, a velvety iron-on fleur d’ lis patch and fabric glue. I added on the patch and was glad to be able to add to the border of this knitting basket without having to take the basket and its lining apart. I simply turned under the ends of the ric-rack and sewed it vertically, then glued it, on the front and back. Then the fun part- arranging the sequin color order over the black patch. The only problem with the fabric glue was that it was a little stringy when you lifted it away from the fabric, just like using a glue gun. But when the sequins were all in place I just scraped away any excess dry glue with a pin.

joys-knitting-basket-detai.gif

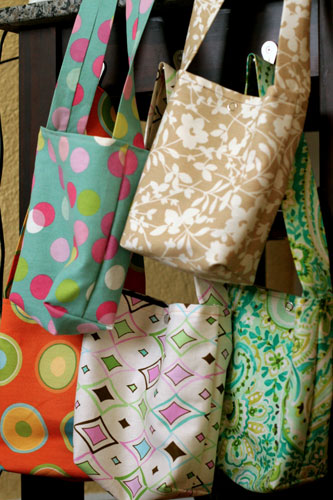
It was done in no time and I am looking around now at what else I can glue bling to! The first project will be to decorate the tan knitting basket I bought for myself, then maybe to add color to floral bags I have made on the flowers, then the cat bowl, and my husbands’ briefcase…

Learn to Crochet – Lesson #4

Tuesday, June 12th, 2007

See all the posts in the Crochet School…

This week’s lesson will be a shorter lesson, with two important things learned:

- increasing
- decreasing

Alas, I believe my camera with video has bit the dust :( Its not worth getting fixed, and its not in the budget to get a new one for now. So I will use the videos from nexstitch and photos to explain things from now on.

Increasing

To increase when you are working with a piece that is solid (ie all sc, dc, hdc etc), you increase by simply working one or more stitches into a single stitch.

Here is a great page outline all your basic increases from Crochet Cabana.

Increases done with a special stitch (ie shell stitch) will be explained in the pattern that they are required, and so I wont go into them here :)

Decreasing

Decreasing is actually quite easy once you get the hang of it. Basically, you will start each stitch as normal (yo the number of times required, then insert your hook into the stitch, yo and pull through) but you don’t complete the stitch. You then start to work another stitch into the next stitch and complete it by pulling your yarn through all the loops on the hook. Yeah, I know….that doesn’t make much sense at all :D (Its early and I haven’t had coffee yet ;) )
Check out the decreasing page on Crochet Cabana for a much better explination.

Patterns

I couldn’t find any patterns online for decreasing / increasing and squares, but I have one in mind and I will try to draft it and write it down by the end of the week for you :)

Until then, try this easy pattern for a wrist pouch – it contains increases, and should only take you a few hours to complete. Plus its a bit of a break from squares! A note on the pattern, once you start working the sides, you have two choices. You can sc each round, and complete each round by sl st to the beginning chain, chain 1 and start a new row. Or you can simply crochet round and round, like a spiral. The first method will give you an obvious seam, the second method wont. It is up to you :)

If you would rather do squares, here are a couple more to help you work on previous skills taught.

Heart Sampler Square

Spring Breeze
Have fun and happy hooking!!

Bridesmaids’ Bags

Friday, June 8th, 2007

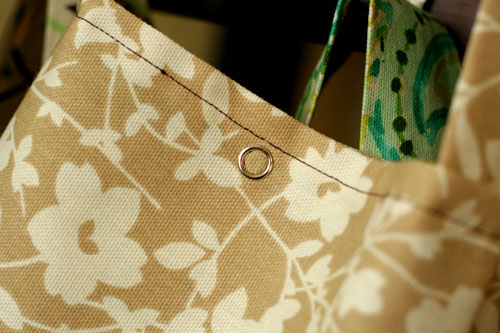
I have been excitedly working on a project recently, and for a good cause – a friends’ wedding. She asked me to make a small handbag like I had posted previously for each of the girls in her bridal party that she would fill with gifts. The bride shopped with me at the fabric store and we picked out a main fabric and lining to suit each of her close friends. We only needed a 1/4 yard of each, so this turned out to be a pretty inexpensive gift per person. I added a pocket for the first time and snaps that are easily hammered into place. I hope they enjoy them- the time on my part and the careful selection of the fabric on the bride’s part.

bridesmaidbag2.jpg

After shopping for fabric she and I also came back to my house and made different earrings for each of the bridesmaids to match their dresses. I love feeling like a vital part of someone’s special day!

bridesmaidbag1.jpg

So my encouragement this week is that your craft can also be a good excuse to spend time with people. Too easily we craft nerds can hide in our studio or craft corner and shut the world out so we can “work” but it can also be a fun opportunity to teach someone about your passion or talk while you craft. Don’t be afraid to let people into your creative world! Also, get creative with what can be made for bridesmaids gifts. My sewing isn’t totally professional but I think my little bags were a practical, cute idea for these gifts. Do you have any alternative gift ideas to share?

Off to Mexico

Thursday, June 7th, 2007

nogales.jpg

I can’t believe it’s almost time!! Brian, Lucy and I are leaving for Nogales Monday morning. This is a picture from the Cuirim House where we’ll be staying. I am nervous, excited, scared, anxious and thrilled among other things. We will be gone for 51 days but who is counting??

The suitcases are out and filling up. Lucy’s laundry is done and her bag is almost packed. I just got this itch to sew and do more poly clay before I leave. I sorta feel like I did before I had Lucy. Like I needed to try EVERYTHING, cause when she got here I wouldn’t be able to do anything. So I should do it all now! I’m really trying to pace myself but my crafty side is taking over. I just can’t stop. Brian, can I please make some Fimo stuff tonight??

I made her this sheet/blanket from this super soft fabric. It’s really light weight and it will be nice for Mexico cause it’s so hot there. She looks like Mary in a Christmas play..
img_0019.jpg

And i’ve been trying my hand at some Polymer clay techniques. I even had a “poly party” and I’m doing another one before I leave. I’m slightly obsessed. Here’s what we came up with before we baked them.
polymer.jpg

God provided all of the funds we needed for travel and we are so thankful. I put up an Etsy shop with my Cuirim Craft Fair left overs. What ever sells will go toward the rest of our time there. If you would like to order something, my mom is going to be shipping it since I’ll have no internet in Nogales. This will be quite the adventure. I’ll post more clay, knitting and sewing goodies when I get back. I just wanted to say good-bye for the summer. May your summer be filled with crafty goodness and excitement. Keep us in your thoughts and prayers. If you’d like to see more Mexico pictures go here.