genericviagra

buy cheap cialis pill online lloyds pharmacy viagra cheapest without prescription farmacia online alprostadil

viagra no prescription required

cheap without prescription Cialis Super Active online meds where can i buy viagra cheap without prescription brand viagra online sildenafil online

canadian discount pharmacy

cheap without prescription Generic Levitra purchase tadalafil amoxicillin no prescription cheap without prescription pill online buy cheap generic viagra

yohimbe

Generic Viagra buy cheap cheap cialis impotence treatment cheapest without prescription buy viagra online stamina rx

buy prescriptions

buy cheap Viagra Super Active sildenafil citrate tablets soma pharmacy buy online cheap pharmacy cialis online

next day cialis

Zithromax cheap without prescription viagra sale online abortion pill online cheapest without prescription brooks pharmacy no prescription required

online pharma

buy cheap Viagra Soft viagra price comparison can i buy viagra online buy online order kamagra net pharmacy

viagra herbal

cheap without prescription Xenical discount viagra online lowest price viagra cheapest without prescription get viagra prescription online doctor

cialis generic

Levitra cheapest without prescription canadian rx canadian viagra online buy cheap canadian prescription drugs buy amoxil

Archive for August, 2007

Turning fingerless gloves to mittens?

Friday, August 31st, 2007

I need help!

I recently decided that I wanted to knit a pair of fingerless gloves for myself, following the Fetching pattern from Knitty.com. I knitted the first one up using Malabrigo yarn (a yummy, super soft merino wool) and I love how it turned out:

However, I don’t like the fit at all :( My fingers feel too bare and they feel awkward. So I guess fingerless gloves aren’t for me. But I really love how they look and I want to make them into mittens.

Does anyone know how I can do that? I have never made mittens before, and wouldn’t know where to start!!!

Embroidery: Lesson 3

Wednesday, August 29th, 2007

I’m so glad everyone is still enjoying the lessons and following along. I am getting some beautiful photo’s of completed Lesson 2 assignments, and those are included at the end of the post. Leanne emailed me and asked if I could show how I knot my thread and secure it on the needle. I just do a basic knot twice, and then snip off any extra

embroidery42.jpg

After threading my needle, I leave about two inches hanging and folded-over, and it stays secure in my hands as I stitch

embroidery51.jpg

Does that make sense? If not, just let me know and I will clarify. Okay, onto Lesson 3!

Stitch # 7 Scallop Chain

This stitch is a continuation from last week’s lazy daisy and chain stitch and gives a pretty, scalloped finish to a border or as a design filler. You basically create your chain by coming up at point A and down at point B, but again do not pull your thread all the way through. You will leave a small amount to make loop, and will hold it down with the tip of you finger while you bring your need up at the middle of the loop at point C. You’ll then bring it down just on the opposite side of the thread at point D (all of this just like the lazy daisy).

embroidery62.jpg

embroidery72.jpg

embroidery82.jpg

You will then bring your needle up at point E just beside point B and do the exact same thing as you did with the first chain and continue until you achieve the length you need.

embroidery92.jpg

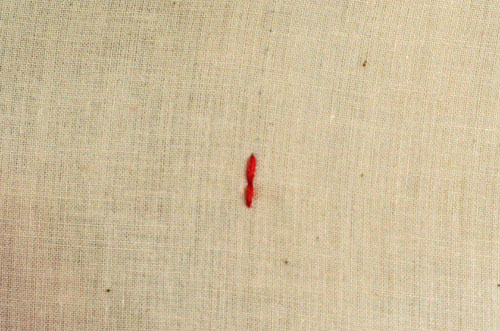
Stitch #8 Satin Stitch

This stitch is great when you want to fill an area and give it color and depth and just as you imagined it would be, it’s easy! You are doing one stitch over and over and in the same direction. You will bring your needle up at A and down B (in these pictures working left to right).

embroidery110.jpg
embroidery22.jpg

You’ll continue doing this, bringing up at C (directly below A) and down at D (directly below B), working down and left to right, until the entire the area is filled.

embroidery32.jpg

Lesson 3 Homework:

Continue practicing all of the stitches used in the school so far, incorporating these two new ones as well in this weeks pattern. I would love to see some finished products so if you feel so inclined, email them to me at [email protected]. Below are some finished homework assignments from last week and they look so great – thanks for sharing them ladies!

from Caley

caleyhomework.jpg

from Lynn

lynnhomework.jpg

from Lauren

renhomework.jpg

from Cristina

christinahomework.jpg

from Denise

denisehomework.jpg

from Shawna

shawnahomework.jpg
If you sent me a finished homework assignment and I didn’t upload it, try sending it again – some of them got dumped into my spam and I’m pretty sure I got them all, but I don’t want to leave anyone out!

Sewing Machine Covers

Tuesday, August 28th, 2007

I have never shared with you pictures of my “studio” because until recently I didn’t really have one. But recently I got a great desk from my favorite antique store to put in the corner off of our living room. A permanent, beautiful desk that doesn’t fold up to be put away! Now that I am all organized with my shelves of baskets and matching bins I really want to work to keep it an attractive corner of our house. But as much as I love my sewing machine I don’t want to look at it all the time. So I made this pattern for a sewing machine cover.

black-cover1.gif

I made it reversible and heat bonded the two fabrics together so it would stand stiff. Then sewed bias tape around to edge it.
The reversed side:

black-cover-pink-side.gif

The sides tie with ribbon.

black-cover3.gif

open-black-cover.gif

It was fairly easy to make and I love to look over and see fabric that I like rather than just my machine. If you are interested you can buy my machine covers here.

This second cover is made with four panels to cover all sides of the machine and has a handy opening for the machine handle. It has pleated corners and a stripe of velvet trim. This is also available at my etsy store, and look for more colors. I was pleased with these covers which did not take much fabric, and make me smile when I walk by. Here you can get a slight glimpse of my new sewing table! The cover really finished it!

machine-cover-1.gif

cover-detail.jpg


The embroidery school is post-poned until tomorrow, so if you’re following that, please check back tomorrow morning for Lesson 3.

How to Square Bags

Friday, August 24th, 2007

I had been asked by several to explain what I meant by the term “gussetting” in several of my former projects. It’s one of those techniques that is difficult to describe in words but is really easy to do! I promise if you try this quick tutorial it will change the way you sew, especially the way you make bags!

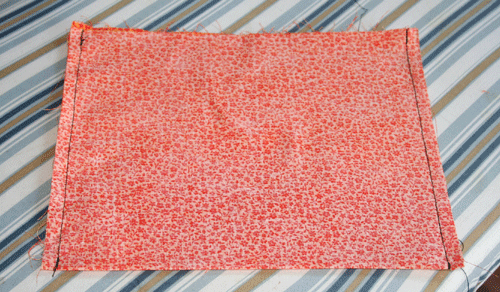
1. For my example I made a small pouch by folding my fabric in the middle (right sides together) to make the bottom of my bag, and sewing up the right and left sides.

square-1.gif

2. Then at one of the corners I put my hand inside of the bag in order to flatten it in the opposite direction.

square-2.gif

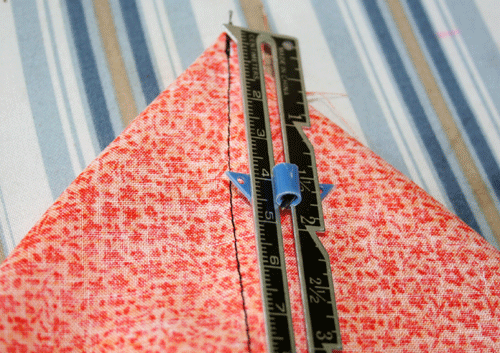
3. Now you are looking at the end of your bag and it should look like a triangle. Center your seam between the other 2 sides of the triangle and measure down from the peak the measurement of half the width you want the bottom to be when finished. Not hard math- 1 1/2″ if you want a 3″ wide bottom…it will depend on the size of your bag.

square-3.gif

4. Using ruler, mark with pencil or chalk a vertical line across your “triangle”. This the line that you sew your seam across.

square-4.gif

5. Repeat for the right and left sides of the bag. This is also how you could make ears on hats for kids, but by sewing on the right side of the fabric.

square-5.gif

6. When you turn the bag inside out it will have 2 square sides. Cover cardboard and add to the bottom to make your bag sturdy. This same technique can also be used on knitted bags, which is were I first learned to gusset.

square-6.gif

Shamelessly pimping our stuff

Thursday, August 23rd, 2007

Two out of four of us have finally decided to start selling some of our wares and caught the etsy-bug. And while we want to say that we appreciate you guys even checking out our stuff, we of course appreciate you purchasing something or giving us any feedback on our shops.

So if you want to see what Candace, Heather, Jen and Joy are up to when they’re not posting here, check out their links and spread some crafty love.

Embroidery: Lesson 2

Tuesday, August 21st, 2007

Thanks for all the great feedback! I’m glad everyone is understanding the directions and enjoying the lessons. One thing I didn’t clarify last week is when I talk about point A, B, C, D, etc. This just means the points at which the needle and thread passes through the fabric. Does that make sense? Now it’s time to move on to lesson 2.

Stitch #4 Stem Stitch

This is another great outlining stitch, particularly when you need to stitch a stem (ha) or a rope or string. It’s very easy and can be done quickly.

First you make a stitch (doesn’t matter if you’re moving up or down, or side to side, just bring it up at A and down at B). Then you’ll bring it up (point C) directly above or beside where you put point B in and bring it down in the middle and to the side of your first stitch for point D. This is almost like the back split stitch, except you’re not splitting the stitch, you’re pushing the stitch a little to the side and planting your stitch.

embroidery16.jpg

embroidery21.jpg

embroidery31.jpg

Then you just continue on your path and voila! A stem stitch.

embroidery41.jpg

embroidery61.jpg

Stitch #5 Detatched Chain Stitch

This stitch is also know as the petal stitch or lazy daisy, and it’s fun because it’s easy and it’s pretty. This is the stitch you’ll use to make flowers, leaves, tears, and raindrops. Also changing one part of the stitch turns it into a different one, which we’ll cover at the end.

First you’ll bring your stitch up at A and down at B (directly beside A) but don’t pull your thread all the way through.

embroidery141.jpg

You’ll leave some of the thread to make a loop, and once you get the amount you need, you’ll hold the loop down with the tip of your finger, while you then bring the needle up just below the center part of the loop at C.

embroidery151.jpg

Then you’ll bring your needle and thread up and then back down just above point C and complete the stitch at D. (I moved the loop down a little so you could see where to put your needle in)

embroidery161.jpg

embroidery171.jpg

If you want your chain to be a longer and thinner one (when making a leaf, per se) then feel free to tug a little harder on the string at point D to draw it taut. But if you want a soft, round effect, pull gently at D.

Stitch #6 Chain Stitch

Altering the detached chain slightly can give you the chain stitch. You’ll complete everything the same, except instead of putting your need down for point D directly above point C, you’ll move it to the side slightly. As you pull your thread through, the same thing goes as don’t pull the thread all the way through.

embroidery181.jpg

embroidery19.jpg

You’ll hold the loop with the tip of your finger so you can bring the needle back up at E, and back down at F, directly beside E. Continue until you’ve achieved the length of chain you need.

embroidery20.jpg

Stitch #7 French Knot

I used to dread this stitch until I was taught how to do it correctly and now it’s a breeze. This stitch is perfect for finer details in stitching, and when bunched together can have a really cool effect (like the lei on Kiki).

Start by bringing your thread up at A. Then you’re going to hold the string tight between your pointer finger and thumb, and face the needle point away from the fabric (I do appologize that I am left handed – if this confuses you, let me know and I’ll flip the picture).

embroidery71.jpg

Then you’ll wrap the needle 2 to 3 times around the thread (twice will give it a small knot, 3 a bigger, and anything larger than 3 is bordering on becoming a bullion) – for this picture, I did it three times.

embroidery81.jpg

Then place it directly beside where you made point A. Do not put it into the same point as A. Some people say that’s the correct way to do it, but I find it’s much easier this way and you won’t lose your stitch by going back down through the same hole.

embroidery91.jpg

Continue to hold the thread taut while you’ll pull it through at point B – that’s your key for this to be successful.

embroidery101.jpg

Once all the way through you have a cute and easy french knot.

embroidery111.jpg

Your thread may get hung up and not go all the way through, so gently tug on it to pull the remainder through. As easy as this stitch can be, it takes some practice, so practice it before you try it on a project.

Lesson 2 Homework

I’ve attached a PDF of an image that you will embroider using one or all seven of the stitches I showed you. click here to download and stitch all of the image, or just certain parts. Since I can’t send every one of you following this an iron-on transfer, you can do what I do when transferring an image – I trace the image onto an index card (from the computer monitor), run over it with a black marker so it’s darker, place it under my fabric and then trace it again onto my fabric with my disappearing ink pen. I do this because I don’t have a printer at home, but if you do, skip that first step and just print it out, place under your fabric and trace. I would love to see some finished projects when you’re done so please email them to candace[at]craftydaisies[dot]com. And as always, if you have any questions please feel free to let me know. Can’t wait to see how you all do!

ETA: For those who had problems downloading the PDF, refresh your page and try again, it should be working now.

I need serious help

Monday, August 20th, 2007

Not professional – well, not yet atleast, but I’m headed in that direction – but any one who has crocheted a ripple blanket before, particularly the “Soft Waves” pattern from Jan Eaton’s ripple book, if you could help me I would be forever grateful. Seriously. I can not figure this thing out and it’s driving me bananas. I feel like I’m taking crazy pills!

Heather and I deduced that maybe the pattern is wrong, since the hills and valleys aren’t lining up and after a few ripples, the next few become one even ripple (since, according to the pattern and counting, I’m increasing on the valley and decreasing on the hill). So if there is anyone out there who could help me, I can not tell you how grateful I will be. I’ll send you some yarn or hooks or something as a thank you. Leave me a comment with your email address and let’s start the crusade to save my sanity!

UPDATE: This is me, sitting in the corner with a dunce hat on :( A couple things to remember when working a pattern: 1) it helps to write it out, step by step, and check them off as you complete them until you get the hang of it. And 2) Don’t watch TV while trying to do a pattern for the first time. No matter how much you tell people, and yourself, that you can multitask. It probably will jack up your project. So thanks to all who helped, and an additional thanks to Jennifer for clarifying a few other things that would’ve been future problems had I even gotten that far!

Are you a Hyena?

Friday, August 17th, 2007

If you are looking for handmade items, that are earth friendly, then you should head on over to Hyenacart! This site is a collection of individually owned stores run by WAHMs (work at home moms) and others wanting to sell their crafted wares.

There is something for everyone there, ranging from cloth diapers and clothing for your babies, to clothes and jewelry for mama. Plus paper crafts, candles, patterns – and so much more! This is where I host my store Baby Blossoms, and for those who want to sell their items, it is very affordable and you only have to pay a single monthly fee, not a fee every time you sell something.

This is my favorite place to shop online! Oh, and the customers there are affectionately referred to as “hyenas”, hence my post title ;)

I just wanted to share my favorite new shop there – Wired Up Designs! Its a brand new shop that sells sewing patterns, and let me tell you, the patterns are amazing! There is a pattern for cloth grocery bags for all you eco-women, as well as a pattern for a beautiful purse and wallet set. Plus patterns for a soaker / skirty for your babe, as well as a diaper bag. Plus, the bonus is that if you wanted to sell what you sew from these patterns, you can! I stumbled on this site, and I love it! I bought the patterns, and I can’t wait to sew myself a Lovely Lady!

I didn’t mean for this to be a spammy post, not at all! I was just so excited about Hyenacart and my new find – I just had to share!!!

Just One Skein

Wednesday, August 15th, 2007

orange-skein-and-judah.gif

I received this cute orange speckled yarn in a swap and am looking for a pattern that calls for only one skein. Does any one have suggestions for one skein wonders?
(Knitting only please, I’m not quite a crocheter yet!)

It is: 100% cotton mercerized, 100 grams, 140 yards

Embroidery: Lesson 1

Tuesday, August 14th, 2007

Thanks to everyone who expressed interest in learning how to embroider. This school will last six weeks, and we’ll go over all the basics of materials used and most common stitches. For those who know a lot about this know that there are over 400 embroidery stitches, so needless to say we won’t be covering every one of those. But we will be learning the ones you’ll see (and use) most, and in doing so it will also be giving you the confidence to continue learning them if you choose to do so. Anyone who sends me a finished embroidery project at the end of the school will recieve a goodie box full of embroidering fun. So without further ado, lesson 1.

What is it and Why do it?

Embroidery is the art or handicraft of decorating fabric or other materials with designs stitched in strands of thread or yarn using a needle. My grandmother taught me how to embroider when I was about seven years old, and I would often watch her hand-stitch designs on the many quilts she completed. There really is something beautiful, unique and romantic about embroidering by hand, so while you can have a machine stitch something up for you beautifully, if you have the time (and the patience) and are willing to give it a go, you really should try it.

General tools needed and used

Embroidery can be an inexpensive craft to learn, but so are most things. You can certainly get caught up in the cool new gadgets that are out there, but the only things you really need are material to stitch, a hoop, a needle, a pair of scissors, and embroidery floss. Depending on what you already have, you will only spend about $10 to get started.

Needle: Any needle that will accomodate your thread will do. In our lessons, we’ll be using 6-stranded embroidery floss, so a basic embroidery needle will be fine.

Hoop: This can be a cheap wooden hoop, or a heavier plastic. And it’s actually two hoops: one side is adjustable, the other is not. You will stretch your fabric across one piece and secure with the other, tightening or loosening it if neccessary. You don’t need to work with a hoop (and in some instances it will be almost impossible to use one) but I assure you it will make it so much easier to stitch, and it will keep your stitches from puckering up.

Scissors: Again, any that you already have should be fine. However having a small pair of embroidering scissors on hand that will help you cut easier and with more precision when you need to snip around stitches.

Embroidery Floss: The easiest floss to work with is 100% cotton, colorfast (meaning it won’t bleed when you wash it), and is six-stranded. You can buy this at any craft store anywhere from $.20 to $.40 a skein. You can also find it in almost any color, giving you another reason to love embroidering.

Material: I am a firm believer in you can stitch on just about everything…just be prepared for a fight at times. For this course, however, I suggest using any kind of 100% cotton fabric that does not have a tight weave (i.e. linen, flour sacks, tea towels, pique, and muslin, which I highly recommend since it is easy to work with and is very inexpensive). You’ll want to wash your fabric first, and iron it if necessary. If you have any scrap fabric lying around, you most certainly can use it, esp. for practicing and save the nicer pieces for projects you want to display.

Water-soluble or vanishing ink pens: You’ll find these in the quilting department of any craft store, and while they can be harder to use on some fabrics, they can be your best friend when you can’t find a pattern you like. You can draw on the fabric and depending on which you get, you just remove the ink with a wet washcloth, or wait 24-36 hours for the ink to disappear. They aren’t that expensive, so while this is an optional tool, I recommend it if you have some original designs in mind but don’t trust yourself to stitching free-hand.

Optional Items:

Thimble: These things drive me bananas, so you will not see me using one. However some people insist on them, so I’m just putting this out there that you might want to try using one. If your finger does get sore from pushing and pulling the needle and a metal or porcelain thimble doesn’t work for you, you can always try a rubber one, which feels a little more natural and comfortable to use.

Needle threader: You can get a pack of these for around a dollar at most fabric and craft stores and they can be incredibly useful. It does exactly what it says: it’s threads your needle by sticking a bendable “eye” of the threader through the eye of the needle. The threader “eye” is large enough so you just slip your thread through it and pull it back through the eye of the needle and voila! A threaded needle. I tend to get overzelous and excited when starting a new project and end up breaking them, so it’s just a step I like to skip. However, if this is the part you hate the most, then by all means invest in some of these beauties and skip the frustration all together.

Fusable interfacing: Honestly, I never use this stuff. I tried once and it just irritated me so badly, but truth be told I’ve never been taught how to correctly use it. I do know that it has a purpose (to smooth out your project, make it sturdier, and prevent knots from unraveling), but I also know it’s more trouble than it’s worth (over time will stain the fabric, become brittle and break off, and will pucker at certain places in your work). So why include this if I’m not going to even talk about it or suggest you use it? Good point, I don’t know. I just didn’t want anyone who believes that this stuff is the holy of holies to think ill of me that I didn’t mention it. And on that note, if anyone wants to make an argument for why this stuff should be used, please let me know and we’ll put it in this section.

Now it’s time to begin!

1) Position your fabric within the hoop. You’ll need to seperate the pieces and lay the piece that does not have the adjustable part on it on your work space. Place your piece of fabric overtop, then place the other piece of the hoop over it and push down on it so it stretches the fabric over the bottom piece, much like the head of a drum. You can tighten or loosen the top piece as much as possible, and you’ll want to pull the fabric taut so it creates a smooth, even work space.

2) Cut your thread to 12″ or 13″. This may not seem like much, but you can always use more when you run out, and working in smaller increments will keep your thread from tangling and will keep you from raising your arm high above your head to pull all the thread through the material.

3) Thread your needle. You can use a needle threader or you can do the spit-and-flatten technique (not an actual technical term, but it’s pretty self explanatory) – lick the end of the thread and flatten it with your fingers (to stick all the strands together), thread your needle, then knot the other end. Doesn’t have to be any fancy knot, just something large enough not to pass through the material and small enough so it won’t create a large bump under your fabric.

Now it’s time to stitch!

The stitches we will be covering today are super easy and three of the most basic stitches you’ll see in embroidery. Please forgive the coloring of the photo’s – I took them at the worst part of the day, in a room with bright yellow walls, so if they’re blown out or miscolored on your monitor, please let me know and I’ll try to fix them.

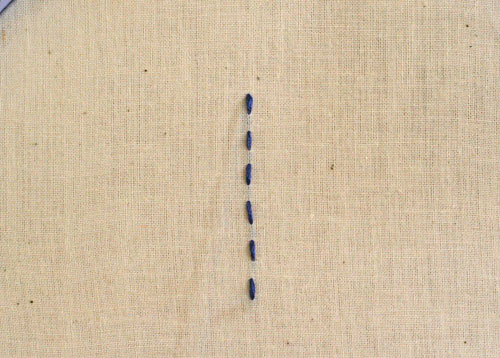
Stitch #1 Running Stitch

This is the easiest stitch to complete. You can use it to outline items or run along an edge, and there are two ways you can do it.

First, you bring your needle up through the material at point A and then back down through at B. You do this again (coming up at C, down at D), however you’re leaving a space in between each stitch, creating a dotted-line effect.

embroidery1.jpg

embroidery2.jpg

embroidery3.jpg

The back side will look exactly as the front
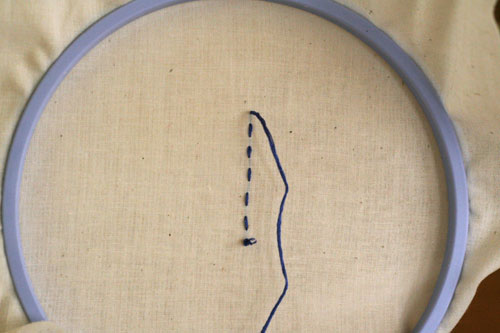
embroidery4.jpg

The other way to complete this is to gather your material and run the needle through in one seamless motion.
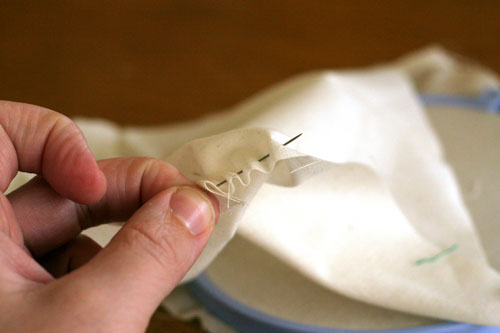
embroidery5.jpg

embroidery6.jpg

If you’re new to embroidery and unsure of yourself, you’ll probably be most comfortable with the first way. However, if you’re feeling adventurous or are more confident in your stitching, or want to create something that looks a little uneven but unique, then the second technique is the way to go.

Stitch #2 Back Stitch

This stitch is my personal favorite. Not only because it is quick and easy, but because it looks great (and clean) any way you use it. It’s also a great stitch to complete lettering with. The one thing to remember with this stitch is you’re almost working backwards, in a sense.

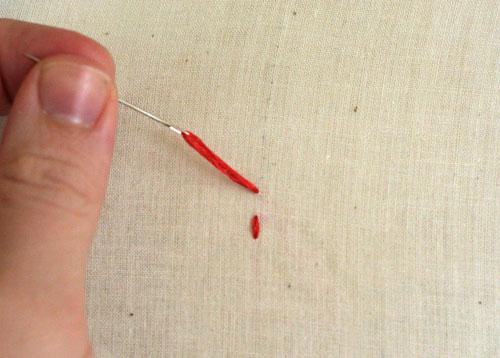
First you’ll bring your needle and thread up through the material, but at point B instead of A
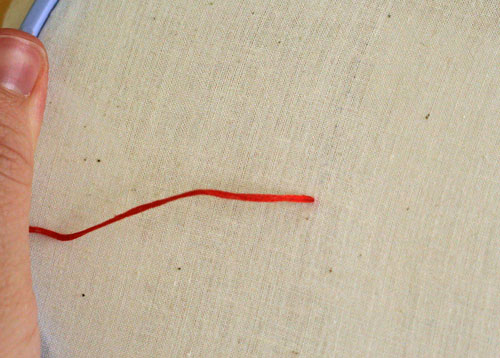
embroidery7.jpg

Then you’ll bring it back down through, but in the opposite direction you’re wishing to go (hense the backwards part I was talking about), putting it at point A.
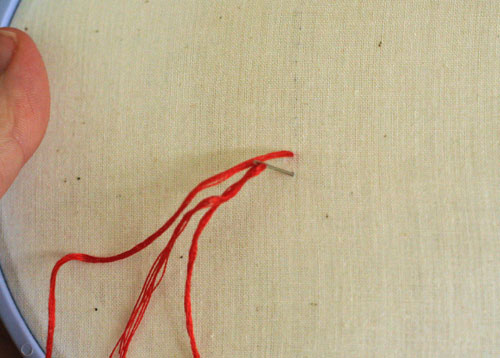
embroidery8.jpg

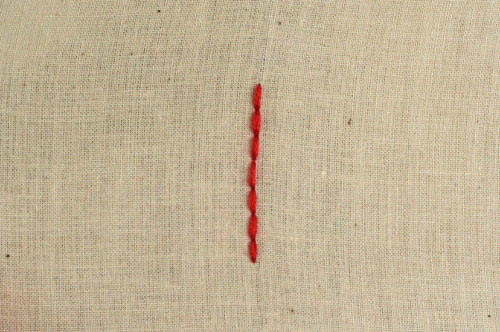
You’ll then keep going in that direction or bringing your needle up at point C, then back through at B, then up at point D then back through at C, etc. etc.
embroidery9.jpg

embroidery10.jpg

embroidery11.jpg

By the end you’ll have a seamless looking line and your stitches will connect beautifully.
embroidery12.jpg

Stitch #3 Split Stitch

This stitch is easy and a decorative finish when you want something a little more punchy than the running or back stitch.

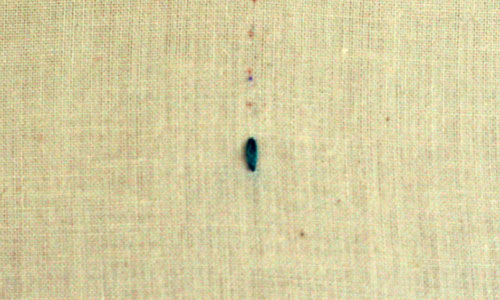
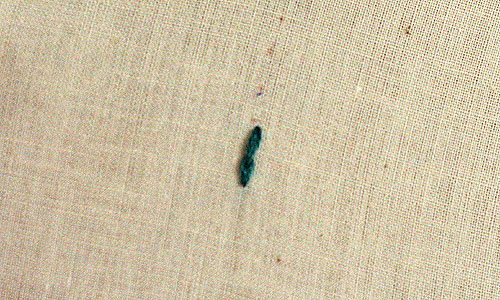
You’ll bring your needle up through your material at A and back through at B (like a regular stitch).
embroidery13.jpg

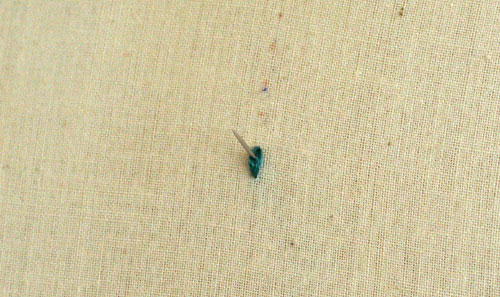
Next you’re going to split the stitch in the center (at C), so you’re splitting the threads evenly (or as evenly as you can)
embroidery14.jpg

Then you’ll bring it back down at the desired point (D).
embroidery15.jpg

You’ll continue splitting each stitch, until it looks like this

embroidery18.jpg

One thing to remember about this stitch, is it’s easy for your thread to get tangled on the underside while you’re splitting the stitch. So this is very important that you work a little slower, and don’t use too long of thread.

You can also work this stitch a little differently, like the backstitch (calling it the split backstitch), by bringing up your thread at C and then splitting the stitch on the way down (from the top side of the frabric as opposed to the underside). Either way is fine, it just depends on which you’re more comfortable with.

My photo’s for this stitch are a little blurry, so hopefully this diagram will explain it where my picture lacks detail

split-diagram.jpg

If you’ve hung on through all that jibber jabber that’s great! I can promise you the next lessons won’t be so wordy, we just had to get the intro out of the way. If at anytime you have any questions or think I need to clarify a little more, you can leave a comment or feel free to email me at [email protected].

Homework for Lesson 1:

If you have any scrap material, you’ll want to use it for practice this week. Draw a circle, a square, and any other shapes that you want on your material of choice and practice each stitch. If you haven’t gotten your pens yet or choose not to, you can use a regular pen or pencil, or do them free-hand. If you’re feeling confident enough, try stitching other images and letters using these stitches. It may sound simple enough – and it is – but like you’ve heard before, practice does make perfect. Next week we’ll go over three new stitches and I will have a PDF you can download and transfer onto your material to complete.