genericviagra

buy cheap cialis pill online lloyds pharmacy viagra cheapest without prescription farmacia online alprostadil

viagra no prescription required

cheap without prescription Cialis Super Active online meds where can i buy viagra cheap without prescription brand viagra online sildenafil online

canadian discount pharmacy

cheap without prescription Generic Levitra purchase tadalafil amoxicillin no prescription cheap without prescription pill online buy cheap generic viagra

yohimbe

Generic Viagra buy cheap cheap cialis impotence treatment cheapest without prescription buy viagra online stamina rx

buy prescriptions

buy cheap Viagra Super Active sildenafil citrate tablets soma pharmacy buy online cheap pharmacy cialis online

next day cialis

Zithromax cheap without prescription viagra sale online abortion pill online cheapest without prescription brooks pharmacy no prescription required

online pharma

buy cheap Viagra Soft viagra price comparison can i buy viagra online buy online order kamagra net pharmacy

viagra herbal

cheap without prescription Xenical discount viagra online lowest price viagra cheapest without prescription get viagra prescription online doctor

cialis generic

Levitra cheapest without prescription canadian rx canadian viagra online buy cheap canadian prescription drugs buy amoxil

Archive for March, 2008

This ‘n That

Saturday, March 29th, 2008

mosaic3178784web.gif

Here are a couple of projects and works-in-progress currently pending at my household:

Cashmere Sweater Blanket

img_8996web.gif

This is for my grandmother for her 90th birthday. Her birthday is on March 31th. Do you think I can finish and ship it by then?

Stenciled Baby Top

img_9003web.gif

I’ve been wanting to follow Joy’s stenciling instructions for a year now. Here’s the perfect project: a tiny little shirt for my friend Vanessa who is due in April.

img_8992web.gif

My daughter became inspired by the whole process, although she deemed the color choices lacking, she did manage to pull together a cool design.

Another Vest

img_9013web.gif

There was a time when I actually finished an entire adult sweater, usually for the boy friend de jour. Then I started making children’s sweaters, again with collars and full length sleeves. Now I can’t even be bothered to start on sleeves and Elizabeth did not want a collar, which leaves me with another vest.

Elizabeth picked the colors and decided she liked stripes. I thought stripes alone were boring and went through some knitting books to try some new patterns. Now she has a stripy sampler just in time for spring.

So, what are you working on?

It’s a Wrap

Thursday, March 20th, 2008

img_8933web.gif

I love hardware stores! I like all the little doodads and tools and whatnots you never knew existed. So here is my homage to the humble hardware store, a wrapped washer.

Materials

img_8881web.gif


For this pendant you need the following materials:

  • 18 gage copper wire
  • 3/4″ washer
  • wire cutters
  • round nose pliers
  • chain nose pliers
  • ruler


Instructions

img_8909web.gif

  1. Cut four pieces of 5 3/4″ long wire and two pieces of 4″ long wire. Use a soft cloth to straighten the wire.
  2.  

    img_8910web.gif

  3. Bundle three of the longer wires together and wrap the one remaining longer wire four times around the center of the bundle.
  4. img_8911.gif

  5. Wrap each shorter wire three times about a 3/4″ to the left and the right of the bundle’s center wrap.
  6. img_8913web.gif

  7. Here’s the tricky part: center the washer on top of the center wrap and fit the wire bundle against the washer.
  8. Then secure the washer as follows: use the round nose pliers and place them in between the bottom center and the side wraps. Coax one strand of wire out of the bundle and pull it toward the center to form a sort of cage that will prevent the washer from falling out. Repeat on the other side and the back of the pendant. You should have two pulled-out strands on the front and two on the back of the pendant.
  9. img_8914web.gif

  10. Okay, don’t be intimidated by this picture! You’re almost there. Now on the top of the pendant, from the left and the right side, take a center wire from the bundle and tightly twist one wire around the other three times. Snip off the end of the wrapping wire only, not the stem wire.
  11. With the remaining stem wire shape a wrapped loop. Use the chain nose pliers to form a 90 degree angle right above the wrapped stem.
  12. img_8915web.gif

    Insert the tip of the round nose pliers in the bend, bring the wire over the top of the pliers, and shape a loop. Reposition the pliers to form a complete loop and wrap the wire around the bottom of the pliers. Using the chain nose pliers, hold the loop with your dominant hand and wrap the wire around the stem covering the end of the previously snipped off wire. (If you’re hopelessly lost, refer to Wigjig’s wrapped loop instructions.)

    img_8916web.gif

  13. To finish off the remaining wires, use the round nose pliers and make a small loop with one of the wire ends. Continue shaping a spiral around the loop. Once the spiral is complete, press it against the center of the washer using the chain nose pliers. Repeat this with the other wires. Use your imagination to create shapes other than spirals.
  14. img_8922web.gif

Instead of a pendant you could also fashion some earrings. Here is the pair I completed for my 99 Earrings project.

Tea Towel Apron II

Thursday, March 13th, 2008

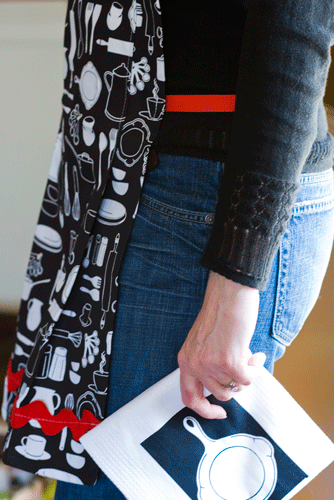
This really cute towel screamed Apron to me and it was so easy to make!

apron-1-cd.gif

This towel set came folded in thirds so I used the pleats to narrow this towel to better fit as an apron. I made a 2″ overlap from the pleat on the right and left and pinned the neck strap within the pleats. Then sewed across the top, securing the neck straps. Next I measured 15″ down from the top and sewed down the pleats. This left it to flair like a skirt a little at the bottom.

apron-side-cd.gif

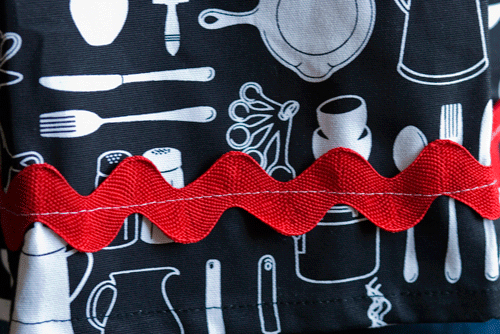
I tucked the ric rac ends under on the back side and sewed down the middle of the ric rac on the front. This would be such an easy way to make any color combination to match any kitchen.

apron-detail-cd.gif

I used grosgrain ribbon for the waist ties. I burned the ends slightly so that they wouldn’t fray and just sewed on the back side along the edge seam higher than where the sewn pleat ended. Super quick and easy!

This apron can be found at my shop in black and red.

Variations in E Major

Tuesday, March 11th, 2008

img_8837_test.jpg

Yes, Easter is upon us and with it our family tradition of dyeing eggs to decorate the house. We generally use blown out eggs.

easter.jpg

My mother hangs them in the Forsythia trees in her garden. Eggs are quite hardy. On a recent visit last year’s eggs were still swaying in the breeze. I like to incorporate them into a wreath and hang the wreath on our front door.

This year, I wanted to try something new, so here we go:

Marbleized Eggs

Initially, I wanted to use the float-egg-on-glue-covered-with-paint method to marbleize the eggs. If someone is successful with that project, please let me know. Instead I used two different techniques:

img_8837_pink.jpgMethod 1: Nail Polish and Water

The pink and white egg was created with nail polish and water.

img_8830_500.jpg

Fill a bowl with a couple of inches of water and add a few drops of nail polish on the water. The polish will swim on the surface and create a thin film.

img_8831_500.jpg

String the blown out egg on a wire and carefully skim the egg over the surface. The polish film will cling to the egg and create this marbleized pattern.

img_8837_yellow.jpgMethod 2: Egg Dye, Oil, and Water

This was easy. The yellow and purple egg acquired its shading with this method. First we dyed our usual batch of eggs with commercial Easter egg dye. This particular egg became a nice shade of yellow. When we were done, I added a tablespoon of vegetable oil to the purple dye and rolled the yellow egg around in that concoction. The oil prevented the dye from clinging to the egg creating a marbled pattern.

Papermache Eggs

img_8837_paper.jpg

For these eggs we used white glue and tissue paper for the yellow chick egg and newspaper for the wanna-be avantgarde egg.

img_8813_500.jpg

Tear up your paper into specific shapes like my daughter did to create the chick, or just little pieces like I did with the newspaper.

img_8814_250.jpg

Use your brush to apply a little glue to the egg. Position your paper on the egg and then brush glue on top of the paper. Continue until the egg is covered to your liking.

img_8818_250.jpg


Once your egg is done, you can rest it on some pins pushed into the egg carton to dry.

img_8821_250.jpg

How do you like to decorate your eggs?