genericviagra

buy cheap cialis pill online lloyds pharmacy viagra cheapest without prescription farmacia online alprostadil

viagra no prescription required

cheap without prescription Cialis Super Active online meds where can i buy viagra cheap without prescription brand viagra online sildenafil online

canadian discount pharmacy

cheap without prescription Generic Levitra purchase tadalafil amoxicillin no prescription cheap without prescription pill online buy cheap generic viagra

yohimbe

Generic Viagra buy cheap cheap cialis impotence treatment cheapest without prescription buy viagra online stamina rx

buy prescriptions

buy cheap Viagra Super Active sildenafil citrate tablets soma pharmacy buy online cheap pharmacy cialis online

next day cialis

Zithromax cheap without prescription viagra sale online abortion pill online cheapest without prescription brooks pharmacy no prescription required

online pharma

buy cheap Viagra Soft viagra price comparison can i buy viagra online buy online order kamagra net pharmacy

viagra herbal

cheap without prescription Xenical discount viagra online lowest price viagra cheapest without prescription get viagra prescription online doctor

cialis generic

Levitra cheapest without prescription canadian rx canadian viagra online buy cheap canadian prescription drugs buy amoxil

Archive for May, 2008

Book Review: Sew What! Skirts

Thursday, May 29th, 2008


I got a few new books during the last months, which means y’all will be inundated with book reviews. The first one is Sew What! Skirts by Francesca Denhartog and Carole Ann Camp.

sew-what.jpg

The premise of the book is that you can create your own funky designs with their instructions and a few basic sewing skills. The 16 different styles featured in the book are variations on two patterns: the straight skirt and the A-line skirt. The writers provide straight forward instructions on how to measure and draw the necessary patterns. In addition, they explain how to finish edges, make darts, sew hems, add different kinds of waistlines, and insert zippers.

Exhibit A, my Memorial Day project, is a fairly simple A-line skirt. It’s based on the East Meets West skirt in the book except I changed the zipper around, added a lining and used bias tape for the hem.

skirt_1.jpg

bias_tape.jpg
I love this hem. It was super fast and looks very neat.

It took me about an evening to make the pattern and cut out the skirt and three hours to put the whole thing together. The waist ended up being about 1.5″ too wide. Next time I would make the pattern smaller, and the A-shape less wide, and maybe try darts for the waist.

What I like about the book is that it gives you a solid basic footing to go forth and experiment with whatever look, fabric, trim, etc. you want to work with. A Flickr search renders 530 pictures. Below is just a small selection of what I found. If you do end up getting this book, make sure to go to the publisher’s website for the errata page. There are a couple of mistakes in the book that you would want to correct before you start cutting up your fabric.

skirt-mosaicsmall.jpg

I think Storey redid its website because the errata page I downloaded two days ago disappeared. (Thank you to Meredith for noticing this.) For anyone who has an early uncorrected edition, the corrections on the pdf were as follows:

Page 65 Half Circle Wrap:
All you need is 1 length of 42″–45″ fabric (about 2 1⁄2 yards for the average person), plus 1⁄8 yard for the waistband and ties. If you are larger than average, or prefer a fuller skirt, it’s better to use fabric that is 58″–60″ wide (about 3 1⁄2 yards, plus waistband yardage).
. . .
You will need to add to the W measurement to allow
for fabric overlap in the back of the skirt. To do this, measure where your waistline will be, then add 12″ to 14″ (or the amount you want it to overlap). Divide by 3 and round up to the nearest 1⁄2″. Then make your string compass as instructed.

Page 117 Nature’s Child:
under Stuff You Need it should read:
2 lengths* of 42″–45″ fabric
3⁄4–1 yard of complementary fabric


BooBoo Bags

Saturday, May 24th, 2008

baggie_1.jpg


The teacher appreciation luncheon for our school is coming up and we were in need of favors for the teachers. Back in December I saw this tutorial from Creative Outlet Designs in a Sew Mama Sew round up and suggested that we could make these lavender scented wheat sacks for the teachers. You use them as hot or cold compresses by heating up the bag in the microwave or keeping them cold in the freezer.

100 lbs of bulgur wheat

baggie_21.jpg

8 yards of fabric

baggie_3.jpg

1.5 oz of lavender oil

75 yards of ribbon

73 eyelets, cards, and plastic baggies later, they are finally done:

baggie_5.jpg

Thank you to Kerry, Laura, Meg, and Kirsten for supporting me in my crazy crafting endeavors.

Now I just need suggestions how to get 100 lbs of inert mass from my apartment to the school. Any ideas?


Scrap Sack Tutorial

Sunday, May 18th, 2008

By request I wanted to do a tutorial on the Scrap Sack I posted using up scrap fabric and disguising your seam with a stripe of ribbon.

img_2210.jpg

There are no measurements for the fabric because you will want to use up what strips or scraps that you have and make size bag you desire. You will need: measuring tape, pins, fabric, wide grosgrain ribbon, iron, & sewing machine/serger.

1. Lay out the fabric strips that you want to use. Fold it to picture what the bag will look like finished. My seam will be on a side, though it could be at the bottom, depending on your pieces. You can see one piece in taller than the other.

img_2190.jpg

2. Cut ribbon the same width as fabric. Measure and cut 2 ribbon handles, either short handbag length or longer to fit over the shoulder. (Cut 1-2″ longer than you want the finished handles to turn out.) I cut red handles here but decided to do white as you can see in my finished product.

img_2191.jpg

3. Lay right sides of fabric together and sandwich in the ribbon. Match up the 3 layers at the top edge, pin together, and sew across this top edge.

img_2192.jpg

4. Turn fabric right side up to inspect that the 3 layers are all included in seam. Pretty already!!

img_2193.jpg

5. On wrong side, press seam to one side and iron fabrics flat. Do not iron over right side of ribbon. Trust me!

img_2194.jpg

6. Turn top edge down twice about 1/2″ each time and press. This will be the casing your handles will slip under.

img_2195.jpg

7. Do not sew over the edge you just pressed. We will do that last. Next, sew down the other sides of the bag. You can see the pins pointed to where I am going to sew. (I am using a serger to make that enclosed edge but a regular machine seam is the same.)

img_2197.jpg

img_2200.jpg

8. The handles: I like to point the open, top edge toward myself. Take a ribbon handle (or whatever you want to use for a handle, fabric will work too), measure in from the edge where you want the handles placed and slip the handle in.

img_2202.jpg

9. Fold the handle then toward yourself and pin. Curve the handle over and pin it the same distance from the opposite side. Flip bag over to back and repeat with second handle.

img_2203.jpg

img_2204.jpg

*Note: There are many ways to make and attach handles, this is just the way that I made up that I like.

10. Last step – Choose a stitch and sew across the top edge that you pressed. I like to use a wide, tight, zigzag stitch. Turn inside out and you are done.

img_2206.jpg

img_2212.jpg

Suggestions: Use different fabric stripes; quilt pieces together; sew several stripes of ribbon; square the bottom of the bag.

If you follow these directions and want to share what you come up with, email your picture to us by June 1 and we will post them to spread the ideas. Send name and pic to [email protected]. Thanks!

Softie Swap Deadline Is Coming Up

Thursday, May 15th, 2008

softie-swap.gif


Just a quick reminder, if you are participating in the softie swap, your creations need to be mailed by May 21.

Practical Denim

Tuesday, May 13th, 2008

This post features the remains of my unloved jeans that I cut up for this bag. I’ve been toying with the idea of a recycled denim bag, but was trying to come up with a variation on the theme. So here it is, a reversible bag.

jeansbag1.gif

You can either display the jeans side and make a recycled fashion statement, or you can be more low key about your lifestyle, turn the whole thing inside out and display a cool lining.

jeansbag2.gif

The jeans pockets become practical places to stash away your phone, mp3 player, glass baby bottles, in other words, all those treasures you find in your jeans pockets every day. So before you send your denims off to the Goodwill store, take a good luck at them and consider what kind of reincarnation you could create with a sharp pair of shears.

All Tied Up With A Bow

Wednesday, May 7th, 2008

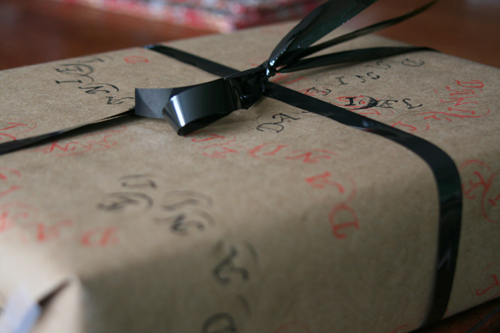
img_9183web.jpg

As my handiwork attests I’m a terrible stamper. I never seem to be able to avoid getting the rim of the stamp onto the paper, the ink doesn’t distribute evenly, I could go on and on. Any hints on how this is done would be greatly appreciated. However, as a concept piece and for a birthday present for a seven-year-old, I think this works: I cut out a piece of brown wrapping paper to fit the present, and then proceeded to stamp Daniel’s name all over it. For recycling purposes a brown paper bag would work equally well, but for some reason they only do plastic in NYC.

While stamping the D-A-N was still a very Zen experience, by the time I got to the I-E-L part, I was ready to pack it up. Fortunately he didn’t have a lengthy name like Balthazar. (That would have been Elizabeth’s name if my husband had had his druthers and she had been a boy.)

The bow used to be part of an exercise video tape. I got that idea from Danny Seo.

Note to self: Don’t try to remove the ribbon from the tape case five minutes before you have to leave for the party.