Archive for the 'Baby' Category

Quick Fix

Monday, March 19th, 2007

I have been feeling kinda poopy lately. Brian and I have been getting over a mean cold. It is so hard to be creative when you are feeling bad. I wanted to make something quick just to prove to myself that I’m still a crafting genius. Just something to make me feel better. Ah ha! Glam it up! Of course! What could be more fantastic and more importantly, FAST! I just needed a quick fix. Found this at Michaels for a $1 yippee! You just iron it on. Sweet!
img_0067.jpg

Ahhh Delight. I still have it in me, and my baby’s got bling :)

img_0095.jpg

Now as long as she doesn’t chew it off we’re good. tee hee.

The “Ok” Diaper Bag Set

Thursday, March 15th, 2007

Before Lucy was born I was a sewing mad woman. Things have *ahem* slowed down since then. The desire is still there, just no time. One of the things I HAD to finish before she came was a diaper bag. I put this little ensemble together for our diapering needs. A diaper bag, a changing pad and little bag for my stuff. The changing pad was a towel that I died to match the fabric and quilted it sorta. If you can call that quilting- adding some batting to the back and sewing fabric on the other side. I love it when she’s on it cause it seems so comfy, but it’s too big and takes up most of my space. I’m also afraid to wash it cause the color might bleed into the fabric.
img_0117.jpg

The bag has tons of pockets, I like that but it’s a little too floppy. I made it from some left over ikea curtains we used for our craft room at church and some floral fabric I found at Walmart. I also made the straps so I could remove them and just slip the bag into another bag and still have all the great pockets. Yeah that didn’t work so well. Again, too floppy. darn. Oh, the detail on the pocket is from an old shiny head band I had. You know me, gotta have my bling!
img_0121.jpg

The little pouch for my things is the only thing I’m really in love with. I carry it with me everywhere. I even made a little side pocket for my “business” cards. Brian made me some Bloom cards so I could give out my number when I met a new crafting friend. I also love the bead on the side. It just gives it a little vintage somethin’. I am already designing a new bag in my mind with some Anna Maria Horner fabric that will be bigger and better! We’ll see when I’ll actually get to that…
img_0123.jpg

Keeping his memory alive

Saturday, February 24th, 2007

bill

Bill Dooley October 20, 1953 – February 24, 2004

” Bill Dooley was the first missionary Bruce knew: “I remember thinking, this guy is NEAT-he’s so real and personal.”

“conversations with ABWE missionary Bill Dooley inspired and motivated Beth to consider missions as God’s specific will for her life.”

I would like to introduce you to Bill Dooley, my dad. He was a missionary for 14 years in Chile and later a recruiter for the same missions agency. He encouraged many to know God and love Him. At 50 yrs old, 3 years ago today he flew away leaving us with a hole in our hearts that would never heal. He was a great man and we miss him so much.

I wanted to share with you what I have made for my family so we will always remember him and keep him near. He wore this great sport coat all the time. He looked great in it. It was his favorite. For my mom’s birthday I made this bag for her from his coat. I attached his name tag he wore while he was at conferences and a great picture of his teethy grin. Love that smile!

img_0116.jpg

I made the inside out of the shirt they got on their Alaska cruise their 25th wedding anniversary. The tie tips were a few of his favorites. The blue one he wore at our wedding when he married us. She loved the bag and it’s nice to know that a peice of him is still close to her.

inside.jpg

wedding.jpg

I really started missing him a lot when I got pregnant and wished Lucy could know him. It kills me that they won’t get to play together. So I made her this Lion. (I have a slight obsesion with lions thanks to the Chronicles of Narnia) Papa the Lion is also made from the same sport coat. Recognize the tie? same one. This is the only way I know to keep him close. When you loose a loved one won’t you do the same? Don’t throw all their things away but make something new and keep them close. It’s all we have left of them. Thanks for letting me share this with you on this very special day to me and my family.
img_0080.jpg

Wool Wraps and Soakers

Tuesday, February 20th, 2007

I’ve been working on wool covers for my daughter to wear with her cloth diapers. Wool has some amazing properties, it can absorb up to 40% of its weight in moisture without feeling wet, and it allows for airflow which helps prevent diaper rashes. Also, it never stinks!

I’ve been trying two different types of wool covers - wraps and soakers. The first one I made was a wrap that I completed using the Tickle Turdle online pattern.

soakers-001.jpg

I used the yarn that I had previously dyed and accented it with purple to make it a bit more “girly”. The wrap turned out okay, but I don’t really like the fit of it on Elizabeth. I think I will try to alter the pattern, making the tabs longer and changing the leg holes a bit.

The second type of wool cover that I’ve looked into is a soaker. I haven’t been able to find a pattern for a soaker in crochet that I like, so I decided to make up my own.

soakers-005.jpg

It didn’t turn out very well :) I had done the first body part in the round, and then switched to back and forth to decrease for the legs. This caused the stitches to look different from each other. I messed up when decreasing at some point, and so I ended up with an odd number to bind with an even number (at the top of the legs) which caused it to bind crooked. The legs are different as well. But now I know where I need to improve the pattern, and I will try again!

If anyone has a good link to a crochet soaker to share, I would love to see it :)

Capes for my Heroes

Wednesday, February 14th, 2007
judah-in-cape.gif

For Valentine’s Day my husband and I decided to make each other a gift. I am anxious to see what he comes up with, while I decided to make him one of the things on his “list” that he can enjoy while playing with our son: Superman. We want to fill a chest with costumes for playing dress-up, so I made 2 versions of this cape that would hopefully make Clark Kent proud.

I bought red 1/4″ bias tape and 2 yards of red satin, measured the length to about the bottom of the seat of their pants.

Small Child: 18″L x 16″W
Adult: 40″L x 28″W

1. I like to iron my hems rather than pinning so I started with the sides, turned over twice about 1/4″ and ironed them down. Then I hemmed the sides and did the same with the bottom.

2. At the top I ran a thread through near the edge and pulled it in to gather. Then I sewed across my gathering. Be sure to keep your finger near the sewing needle so you can press down the fabric where it gathers.

gather-for-cape.gif

3. Next, I used 1/4″ red bias tape to create the tie. Open the tape, center it across your fabric, and tuck in the newly gathered top seam. Then sew all the way across the bias tape. It shouldn’t unravel but you can also tuck in and sew the ends of the tie.

sew-binding-on-cape.gif

I think this would be really cute with a contrasting color of bias tape around all of the edges. I can’t wait to see them play!

Stencils Anonymous

Monday, January 29th, 2007

Ok, so the secret is out. I’m. addicted. to. stencils. i can’t help myself!! They are soo much fun and so easy. You can make a special personalized gift for anyone with this great idea.

I love this picture! Two of my favorite people in the world. For Christmas this year i gave my best friend Kim a T-shirt that read: Lucy *heart*’s me and a onesie that said KiKi (what Lucy will call her one day) *heart*’s me. Along with the shirts i gave her a coupon for a photo shoot of her and Lucy. We got some great shots. This was one of my favorites. you can see the shirts really well and Lucy looks like she is flying.. AHH love that kid!

stencillucykiki.jpg

The way i work my stencils is i print out what i want my stencil to say, trace it on the Freezer Paper, then cut it out with an exacto knife. Or sometimes i just draw up some silly design on the matte side of the paper & cut it out. Here’s what they looked like after i ironed on the design b4 paint. (if you are trying this, be sure to iron on another piece of Freezer Paper on the inside of the shirt, shinny sides facing each other, so your paint doesn’t bleed thru.) Then i just use any fabric paint, usually mix the glitter fabric paint in pretty much every time! I’ve said it before- love the bling :) Just peel off the stencil as soon as your done and voila!

cutout.jpg

This is one of my favorites, a onesie for a friend’s baby. Her name is Vienne. Love this font, thought it was kinda french just like her name..

vienne.jpg

The other thing i’ve enjoyed is the dye resist. Some of these onesies i dyed and then stenciled with paint. Some of them i stenciled b4 the dye, applying dye resist, as i would paint. When you put it in the dye bath that area doesn’t dye to the intensity as the rest of the garment. (i’m sure you could get the same effect by applying bleach on a colored garment) The bottom 3 are done this way. It looks super cool. Hope this inspires you to start stenciling.

stencils.jpg

Change by day, Craft by night

Thursday, January 25th, 2007

So maybe my craft room doesn’t look like this but it works for me. My husband and i live in a 2 bedroom apartment which we love! We actually sold our house that was too much maintenance to move into a more manageable space. (I know it sounds crazy but, i’ll tell you that story another time) At the time we also had no plans of starting a family. I had the entire spare room all to my self and my crafty mess. But when we found out we were expecting i had to do some switching around. This is what i came up with.

By day it is a changing table with her goodies on it.

img_0002.jpg

and by night (or nap) it is my craft table.

img_0051.jpg

I absolutely love the tile top for all projects, especially cutting fabric. You can just get your scissors right in the groove to get a straight cut. The table is so easy to clean too. Get yourself one! My dad got this one at a yard sale. I painted it turquoise my new favorite color and looks great in Lucy’s room. What I love about this set up is it forces me to clean up when I’m done.
I use the little drawers for her things, but kept one for me, to put my sewing things in.

img_0028.jpg

Some of my fabrics i have no idea what i’m going to make with them. I used the one on top to line my diaper bag. Don’t you love the $1 bin at Walmart??
img_0045.jpg
And of course my trusty freezer paper and fabric paint. Tulip glitter one of my personal favorites. Gotta have some bling!

img_0038.jpg

And last but certainly not least my sweet knitting. This is my bag i take everywhere with me. Pictured here next to the couch where i like to knit, while i’m talking with Brian or he reads to me. I have some knitting rules i follow. I always knit while i’m with people. I’m usually working on such easy projects, that if i’m alone i just can’t bear to sit and knit by myself. I also try to finish each project before starting a new one. This is my current project, another bag for the craft fair. The first bag is peaking out. I’ll post that soon. It turned out super cool. Also, if you have never tried Denise interchangeable knitting needles you MUST! i’m hooked. I’ll never knit with anything else EVER. Just ask, Erin, Deaven or Jen. They know what i mean!

knit.jpg

Also for more ideas on setting up your craft space take a look at what whip up had to say

Baby Backpack

Tuesday, January 23rd, 2007

judah-in-backpack-4.jpg 
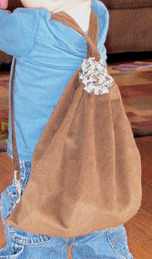
I made this bag for Candace’s son’s birthday. I am always trying to think up gifts for little boys that are not another toy, so I came up with this scaled down backpack to hold their toys. I chose corduroy for the outside of the bag which I wanted to be able to withstand a little boys’ abuse. The inside fabric is a cute print of wild animals. You could go in so many directions with this by choosing different fabrics or embellishments for a boy or girl.

1. Decide what size you want the bag to be taking into consideration the height of your child. I made this according to the length of my son’s jacket. Cut your lining fabric 2-3 inches longer than your outer fabric. I thought the corduroy might be too stiff for the drawstring so I made the top part out of the cotton print. I thought this was cute too, adding the colorful border.

2. Line up the longer and shorter piece of fabric evenly, place the right sides together of the two fabrics, and sew the seam up to the drawstring strip. Leave this open so the drawstring can be inserted. Then flip the lining fabric over, fold allowing for the width of the strap or ribbon you want to use for the drawstring/arm straps. Iron along the top edge to make a crease. Be sure to take into consideration that the lengths of the fabrics match at the bottom.

3. Line up right sides again and sew a seam along one long side. Center this seam just sewn and sew along the bottom of the bag.

backpack-inside.gif

4. Turn bag inside out. I cut the fabric at a slight angle where my drawstring opening was left unsewn and finished the holes off by sewing a blanket stitch around the edge. You could also use a button-holer to make finished holes.

backpack-front.gif

5. Measure your straps by calculating the width of your bag X 2 plus the length needed to reach from the drawstring hole to the bottom of the bag. I folded the corduroy with wrong sides together, turned the edge over, ironed my hem and sewed on top of the fabric. I ran this strap through and attached in the bottom corners with a button but this could be done in many different ways. The second bag I make like this will be much easier than this first one now that I have it figured out. I would make the strap of cotton fabric or heavy ribbon next time and perhaps embroider a name on before sewing the 2 fabrics together to personalize, but I still think it turned out cute!

judah-in-backpack-4.gif

backpack-spilling-1.gif

Taggies

Wednesday, January 17th, 2007

I enjoy making this simple and inexpensive baby gift for the dozen showers I attend each year. I stole the idea from a costlier version in a local store. Inevitably, instead of enjoying his teddy bear’s cute face, my son turns the bear upside down and clings to the label. So I decided to indulge him with a small blankie of only labels.

1. I choose 2 fabrics of different texture, honestly with the mom’s taste in mind, since little one can’t say yet. I like flannel, corduroy, fleece, bright prints in fabrics that can take many washings. Or I like to pick a theme that would go with the family, like my son has a “Let’s Build It” taggie covered with tools in honor of my carpentry-skilled husband. Once you have stock-piled some fun fabrics and ribbon, the cost will feel next to nothing, literally like $1-2. The discount section of your fabric store is a great place to look.

taggie-fabric-stack-2.gif

taggie-ribbon.gif

2. Cut a 12 inch square out of your 2 fabrics. I made a cardboard template that I just lay down and draw the lines with a pencil for cutting.

3. Choose your ribbons and cut out in different lengths, usually 3-5″. Fold over to picture how long you want the ribbons to stick out. Line up right sides of fabric together. Fold the ribbon in half and tuck the folded end inside the 2 fabrics. I stagger the lengths a little and vary the width and texture of ribbon around the fabric.

taggie-all-pinned.gif

4. I leave one corner unpinned where I sew a long, wide ribbon, for a handle, caddy-corner after the other sides are sewn. Sew the other 3 sides up to the handle corner, removing each pin as you get to it and making sure the ribbons are straight.

5. Turn the fabric inside out, tuck in the 4th corner, insert the final ribbon and sew on top of the fabric. You can also embroider the child’s name to personalize it, or I usually sew a large, colorful button on top -just something else for them to play with.
This is a great way to use up any scrap fabric and scrap ribbon from other projects!

taggie-all-done.gif

OTHER EXAMPLES:
lucy-taggie-folded.gif

judahs-taggie.gif

Quick and Easy Felt Appliqués

Tuesday, January 9th, 2007

I have really been into using felt lately. It’s like the wonder material - you can make so much with it, it’s inexpensive and so easy to use. I had bought some little boys shirts for cheap ($3 at Walmart, and they are nice, too) and decided to use them to stitch some felt applique’s on. So I decided on a catepillar and a lion. Once I cut out the shapes I needed in the colors I wanted, I added any embellishments (like eyes, mouths, ears, etc) and then just secured them on the shirt using a blanket stitch.

catepillar.jpg

I finished up with a few other accents and voila - cute (and boyish) felt applique shirts. Each one cost approx $4 and about an hour to make from start to finish.

lion1.jpg

lion2.jpg