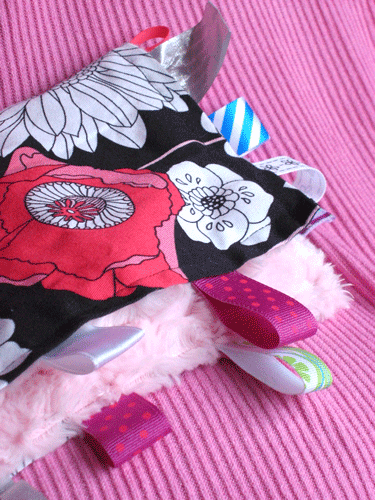
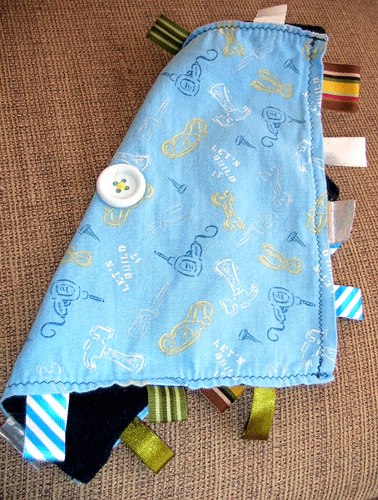
genericviagra

buy cheap cialis pill online lloyds pharmacy viagra cheapest without prescription farmacia online alprostadil

viagra no prescription required

cheap without prescription Cialis Super Active online meds where can i buy viagra cheap without prescription brand viagra online sildenafil online

canadian discount pharmacy

cheap without prescription Generic Levitra purchase tadalafil amoxicillin no prescription cheap without prescription pill online buy cheap generic viagra

yohimbe

Generic Viagra buy cheap cheap cialis impotence treatment cheapest without prescription buy viagra online stamina rx

buy prescriptions

buy cheap Viagra Super Active sildenafil citrate tablets soma pharmacy buy online cheap pharmacy cialis online

next day cialis

Zithromax cheap without prescription viagra sale online abortion pill online cheapest without prescription brooks pharmacy no prescription required

online pharma

buy cheap Viagra Soft viagra price comparison can i buy viagra online buy online order kamagra net pharmacy

viagra herbal

cheap without prescription Xenical discount viagra online lowest price viagra cheapest without prescription get viagra prescription online doctor

cialis generic

Levitra cheapest without prescription canadian rx canadian viagra online buy cheap canadian prescription drugs buy amoxil

Archive for the 'Baby' Category

Taggies

Wednesday, January 17th, 2007

I enjoy making this simple and inexpensive baby gift for the dozen showers I attend each year. I stole the idea from a costlier version in a local store. Inevitably, instead of enjoying his teddy bear’s cute face, my son turns the bear upside down and clings to the label. So I decided to indulge him with a small blankie of only labels.

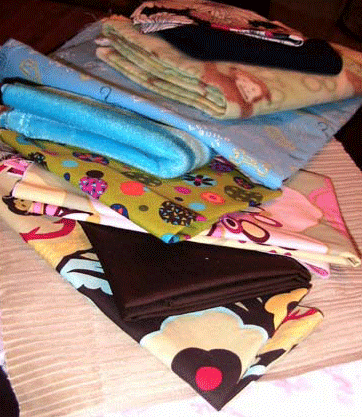
1. I choose 2 fabrics of different texture, honestly with the mom’s taste in mind, since little one can’t say yet. I like flannel, corduroy, fleece, bright prints in fabrics that can take many washings. Or I like to pick a theme that would go with the family, like my son has a “Let’s Build It” taggie covered with tools in honor of my carpentry-skilled husband. Once you have stock-piled some fun fabrics and ribbon, the cost will feel next to nothing, literally like $1-2. The discount section of your fabric store is a great place to look.

taggie-fabric-stack-2.gif

taggie-ribbon.gif

2. Cut a 12 inch square out of your 2 fabrics. I made a cardboard template that I just lay down and draw the lines with a pencil for cutting.

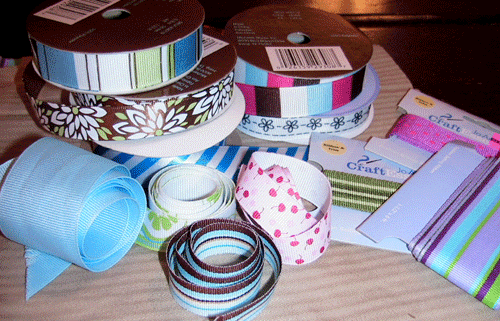
3. Choose your ribbons and cut out in different lengths, usually 3-5″. Fold over to picture how long you want the ribbons to stick out. Line up right sides of fabric together. Fold the ribbon in half and tuck the folded end inside the 2 fabrics. I stagger the lengths a little and vary the width and texture of ribbon around the fabric.

taggie-all-pinned.gif

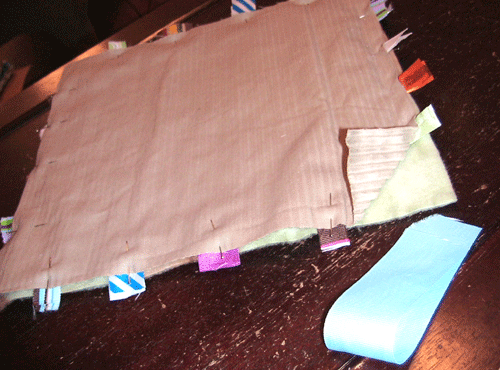
4. I leave one corner unpinned where I sew a long, wide ribbon, for a handle, caddy-corner after the other sides are sewn. Sew the other 3 sides up to the handle corner, removing each pin as you get to it and making sure the ribbons are straight.

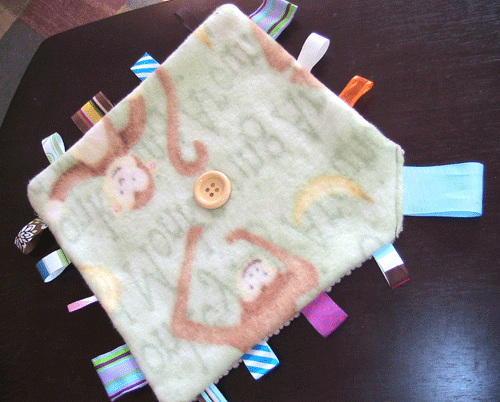
5. Turn the fabric inside out, tuck in the 4th corner, insert the final ribbon and sew on top of the fabric. You can also embroider the child’s name to personalize it, or I usually sew a large, colorful button on top -just something else for them to play with.
This is a great way to use up any scrap fabric and scrap ribbon from other projects!

taggie-all-done.gif

OTHER EXAMPLES:
lucy-taggie-folded.gif

judahs-taggie.gif

Quick and Easy Felt Appliqués

Tuesday, January 9th, 2007

I have really been into using felt lately. It’s like the wonder material – you can make so much with it, it’s inexpensive and so easy to use. I had bought some little boys shirts for cheap ($3 at Walmart, and they are nice, too) and decided to use them to stitch some felt applique’s on. So I decided on a catepillar and a lion. Once I cut out the shapes I needed in the colors I wanted, I added any embellishments (like eyes, mouths, ears, etc) and then just secured them on the shirt using a blanket stitch.

catepillar.jpg

I finished up with a few other accents and voila – cute (and boyish) felt applique shirts. Each one cost approx $4 and about an hour to make from start to finish.

lion1.jpg

lion2.jpg

Kara’s Sweater

Saturday, January 6th, 2007

kara.jpg

I have been working on a sweater for my niece Kara. I started it approximately 10 days before Christmas. I had picked up a pattern to make a sweater for Lucy and I wanted to see how hard it was and decided to make one for Kara too.

I had some yarn left from the blanket I made Lucy. My mom brought me some yarn from Chile when she returned from one of her trips and the skein was huge! This whole sweater was knit with 1 skein. It was a thin yarn tho, like for socks and I don’t enjoy knitting on tiny needles. So I put 3 strands together (using 3 skeins) to make it closer to worsted weight. I used the pattern for a 6 mos old.

This sweater is knit from the top down. Starting with the neck line I just continued increasing for the raglan sleeves, then divided the stitches for the sleeves and put them on a stitch holder. Continuing with the body switching to smaller needles when you do the edge. Instructions called for 1×1 rib but I prefer the seed stitch. It just gives it a polished look.

To complete the sleeves I picked up the stitches in the arm hole and the rest of the live stitches, doing a ssk decrease to form the sleeves finishing with seed stitch. The neck was also done in seed stitch after I picked up the stitches. The bands in the front were difficult cause I had chosen seed and the instructions were for rib. I had a hard time knowing how many stitches to pick up. The first time I didn’t pick up enough and the bands were gathered in the front. The second time I picked up too many.. I left it alone. It was Christmas Eve and she’ll never know. Hopefully it will shrink a little in the wash so it will be fine.

I added a fun little fromjoy tag I stenciled on some fabric tape. My sister-in-law loved it and it fit her so well!! yay!

kara2.jpg

Easy Baby Scarf

Monday, January 1st, 2007

december-22-114.jpg Winters get really cold here, so I made up a quick pattern for a baby scarf that would be functional and cute. It is super easy and can be made in an evening.

I used Bernat Softee Baby (sport weight) and a G hook. I didn’t do a gauge because I don’t think that’s important with scarves :)

Chain 15.

Row 1: Single crochet in 2nd chain from hook, sc in each chain to end, turn.

Row 2: Ch 1, sc in 2nd sc from hook, *skip 1 sc, sc in next sc*, repeat from * to * until end of row. Turn.

Row 3: Ch 1, sc in 2nd sc from hook and each sc to end of row. Turn.

Repeat rows 2 and 3 until scarf is the length you want, I made Elizabeth’s 24″ long.

Finish with a row of reverse sc around the edge of the scarf.

Have fun making one tonight!!

Freezer Paper Stencil

Thursday, December 28th, 2006

As I was frantically finishing up all of my Christmas projects I got the brilliant idea to make a onesie for Lucy, for my husband Brian. He is a big Mac fan so I wanted to make it special. I’ve been addicted recently to freezer paper stenciling. It is so easy and fast that you can make a special gift in a pinch. First I had to find letters to trace. I wanted my onesie to say “Daddys Girl” I actually found all the letters I needed on the book – Womanly Art of Breastfeeding – funny!! Since I made this, I discovered a way to get any font I want on Word and print just the outline of the letters so I’m not wasting ink.

Then I found a package that had the apple symbol on it and traced everything on my freezer paper. An exacto knife on a cutting mat works best for cutting your stencil. Then I ironed it on using a dry iron, no steam, and ironed another piece on the the back of the stencil so the paint doesn’t bleed thru.

img_0120.jpg

My favorite part is painting. You can use any kind of fabric paint or even acrylic paint works too. I mix in some fabric paint when I’m using acrylic. I’m obsessed with sparkles lately so i have the glitter fabric paint that i add to pretty much every color. You have to peal the stencil off very carefully as soon as you are done so it dries evenly.

It turned out soo cute. I love it!

img_0137.jpg

Baby Mobile

Thursday, December 21st, 2006

mobil2.jpg I’ve been learning a lot lately about Montessori for infants. I am excited to make my daughter’s room a fun place for her to grow and learn. In the book Montessori from the start, you are encouraged to begin with mobiles to help babies learn focus in their eyes. I have been wanting to make one for Lucy for a while. I used a floral design ring of some sort, I found it at Michaels. It is a flat ring of particle board with holes drilled in it. I decided I wanted to use ribbon and beads to hang the objects so I made my own beads using fimo and hung christmas balls from the ribbon. In the book it recomends using metalic objects to begin then moving to other ones she can bat at once she learns that she can hit things with her hands. Lucy loves looking at it for now. We mounted it on the wall with a hook for hanging plants so i can change the mobiles as she gets older.