Archive for the 'Bargain-crafting' Category

Recycling Plastic Bags

Wednesday, July 18th, 2007

Mr. McGuire:I want to say one word to you. Just one word.
Benjamin: Yes, sir.
Mr. McGuire: Are you listening?
Benjamin: Yes, I am.
Mr. McGuire: Plastics.

–The Graduate

My name is Simone, and lately I’ve become completely obsessed with plastic shopping bags. I think it started when I couldn’t stuff another bag into the bottom of my holder without pushing fifteen more out of the top. On the other hand, I also could not bring myself to toss them because, after all, they were perfectly good bags. I then stumbled upon crocheting strips of plastic into, you guessed it, another bag. Since one tote-sized, crocheted bag takes at least 30 to 50 shopping bags, this project did make a dent into my collection.
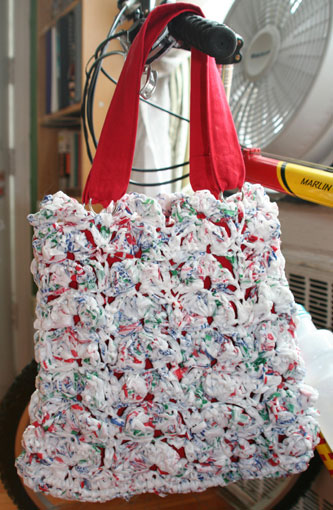
tote-bag-2.jpg

Oft cited My Recycled Bags.com provides excellent instructions on how to prepare recycled plastic yarn from shopping bags and shares some crochet patterns for this kind of yarn. Once you have a ball of plastic “yarn,” you can also mix it with other materials. For example, I made this bag by alternately crocheting rounds of plastic yarn and yarn made out of denim strips.

round-purse.jpg

I think it would be kind of fun to follow the Daisies’ crochet instructions, make different kinds of plastic squares, and sew them all together into. . . a bag. (If anyone can come up with something else to crochet besides a bag, please let me know. A rain poncho perhaps?)

Recently, I saw a posting about fusing plastic bags to make a plastic fabric. That inspired me to make plastic beads out of fused plastic bags.

beads.jpg

You use the same technique you would apply to making paper beads, i.e. cut a triangle out of the “fabric” and roll it up from the broad to the narrow end. You may encounter more resistance from the plastic than you would from paper. I first roll up a bead without applying glue. I then unfurl the bead, apply the glue (Uhu Mosaic) and roll it up again. Like paper beads, you can leave the bead like that or apply a layer of lacquer.
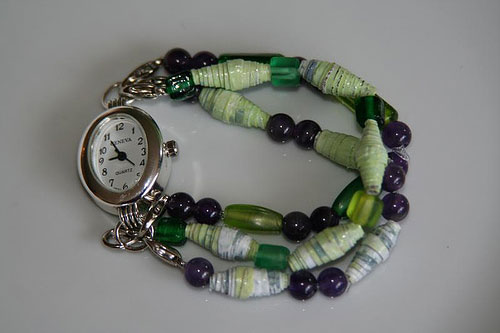
watch.jpg

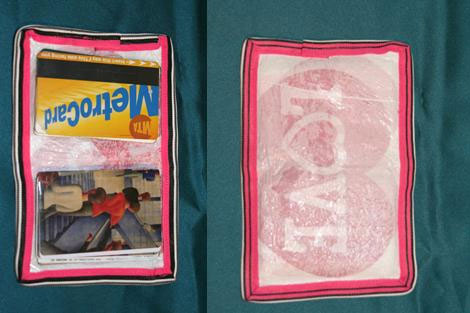
Lastly, I decided to make a wallet out of two ‘I Love NY’ bags and a white trashbag without any print on it.
wallet.jpg

* I fused the three bags together and cut out a 6 1/2″ x 4 3/8″ rectangle.
* I then cut out two 4 3/8″ x 2 5/8″ rectangles out of clear vinyl left over from some bedding packaging that I had saved for just such an occasion. These will become the inside pockets on the left and the right side of the wallet.
* I then basted the pockets to the left and the right of the rectangle with a glue gun to keep everything in place.
* To finish it off, I trimmed the wallet with a 31″ long piece of 7/8 inch ribbon. The ribbon is folded in half and sewed on around the wallet through the fused plastic and the vinyl with a top stitch.

Start to finish the whole project took me a little over an hour. You could add a velcro closure to the wallet to keep everything in place, if you don’t stuff it with as many random pieces of plastic as I tend to do.

Now I’m worried that New York will encourage businesses to cease the use of plastic bags. In that case, where will I get my raw materials? Have fun with plastic. Let me know if you have any other ideas of what to do with this stuff.

Placemat Purse

Wednesday, July 11th, 2007

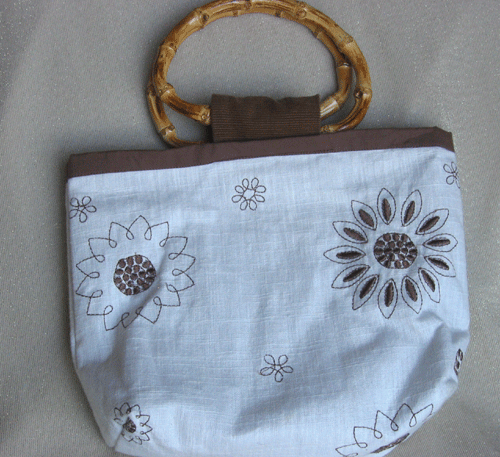
I have been wanting to try this for a while- taking a cute fabric placemat and turning it into a purse. My first one must have been pretty successful since I sold it to a friend at the craft fair before the doors opened and it was so easy to make!

placemat-bag-1.gif

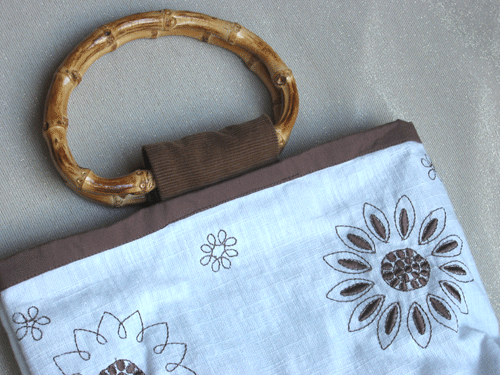
Shopping for a placemat is the first fun part. At most places you can buy them individually and usually for only a few dollars. I have even seen some cute placemats at the dollar store. The first one I made had a white background, brown trim, and brown flowers embroidered on it. All I did was turn it with right sides together and sew up the sides, gusset the bottom, and added handles. I had gotten several pairs of wooden and bamboo handles at the craft store for about $3. I found brown corduroy fabric to match and sewed a piece about 6″ long to the inside of the bag on the front and back, slipping the handle inside the corduroy piece and folding it over before sewing. The placemat was sturdy and had a solid brown fabric on the back so I did not need to add a lining. The only thing I wish I had done differently was to sew the handles a little closer to the bag or make a wider handle strap so the handles would not feel too loose in the strap.

placemat-bag-kim-1.gif

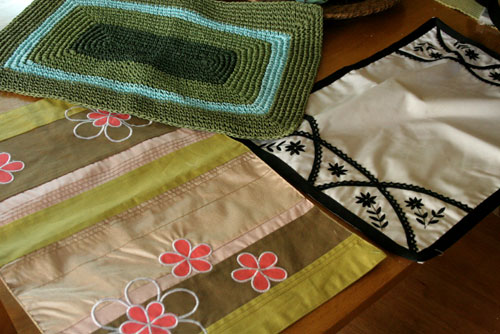
These are a few of the other placemats that I have bought to try out. I am working now on making a paper crocheted placemat into a purse, which I think will look great for summer. (After Heather’s tutorials I may even be able to do the crocheting myself one of these days too!) I will post it as soon as I am done!

before-placemats.jpg

Thrifted Notions

Thursday, July 5th, 2007

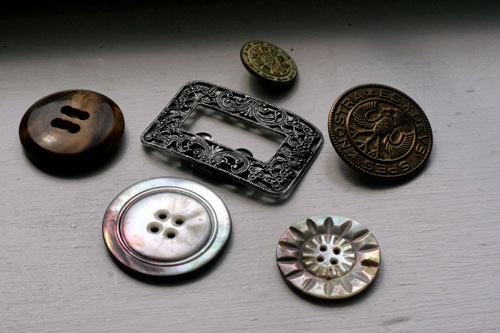
I just wanted to share with you some of my lucky finds at the antique stores lately. “Antiqueing” has pretty much become a hobby for my husband and me. He spends an hour scrounging in the basement looking at cabinets and tools while I make small talk with the shop owner, look for the resident kitty or fish with my son, or scour the jewelry counter! These are some of the vintage buttons and shoe buckles that I found recently to use on my bags. I love large buttons, and shell, mother of pearl, brass or wooden ones make great embellishment. Old strands of beads or plastic belts are also great finds for making earrings.

jens-notions.jpg

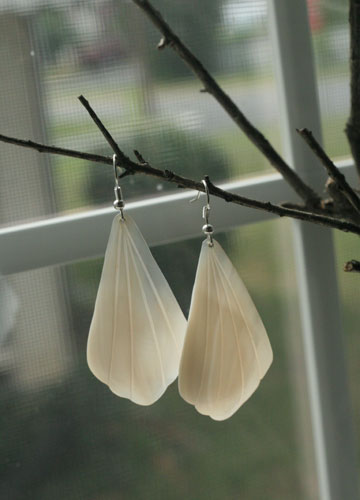
I fell in love with these shell earrings I found at a shop this week that I go to only about once a year. One earring hook was missing and the other definitely needed to be replaced but I would replace any hooks if buying used jewelry. This helps to brighten up the piece as well. This find was timely since my son broke an ornament and I felt bad not buying anything. (What a good excuse!)

jens-shell-earrings.jpg

Often I have gotten a bag of vintage beads or buttons for ~$2, and for that there are usually some treasures inside. Now that I am in with all the owners downtown the ladies will save out bags of buttons for me (and give me a great price!) Finding actual treasures may be a challenge but the character and uniqueness they come with may be worth it!

Making your own mini journal

Thursday, July 5th, 2007

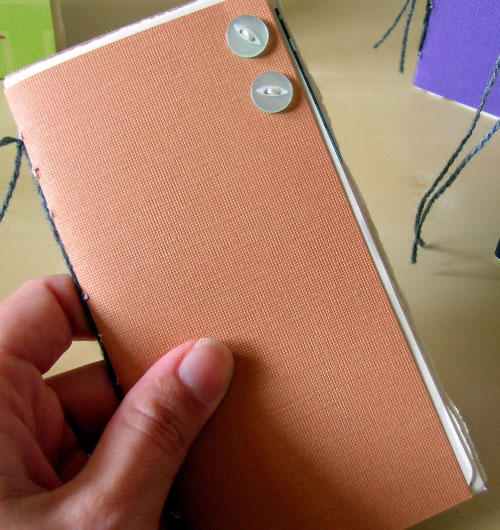
mini-books.jpg

My name is Jennifer, and I love all things having to do with paper. But recently journals that I see in stores just haven’t been doing it for me. I don’t want just lined paper, scrapbook paper or watercolor paper… and I don’t want 15 different journals going all at once (though I must stress I have no problem with owning 15 journals at one time).

With this in mind I started to ponder making my own book. What better way to solve my dilemma than to make something with whatever kind of paper I wanted. I started to read and read on book binding, but I didn’t want to invest in an entirely new hobby, not yet anyway… I simply wanted to try it.

So I took all of this information that I gathered and made my very own mini journals. My supplies were as follows:

  • ~ paper (of all kinds)

  • ~ ruler
  • ~ yarn
  • ~ embroidery thread
  • ~ sewing and embroidery needles
  • ~ a Popsicle stick
  • ~ heavy books (I used Shakespeare’s Complete Works and a Norton Anthology)
  • ~ buttons
  • ~ other random crafty bits

I picked my size of paper (6×6 in this case) and cut the paper I had chosen to fit. I used all sorts of paper… from notebook paper to fancy scrapping paper to card stock. I also ended up using multiple sizes of paper- some 3×3 or 4×3. This created an interesting layering effect in the finished journal.

open-books.jpg

Once I cut my paper I folded it in half using my trusty Popsicle stick to make a proper fold. I then used my ruler to measure and punch 8 holes in the center of the fold. I used the needles to make the holes. Then came the fun bit of assembling the book. I put the paper together and then used my yarn and embroidery needle to sew the book together. Once it was together I placed the book under the heavy books and waited…… The next morning my lovely little journals emerged in all their splendor. I then used buttons, paper and chip board letters to decorate the covers of the journals.

blue-buttons.jpg

I may end up becoming more serious about book binding at some point, but for now this is a lovely and inexpensive way to try your hand at book binding and to have a journal that is uniquely yours.

To learn more about the proper way to bind a book take a look at this website, which is truly informative and offers some excellent tips that can be used in any paper binding experience.

Fabric Glue Art

Thursday, June 14th, 2007

For our sweet Joy’s birthday I wanted to give her something that fit with her knitting addiction but for Joy anything plain just won’t do. So I was anxious to try out adding bling with fabric glue.

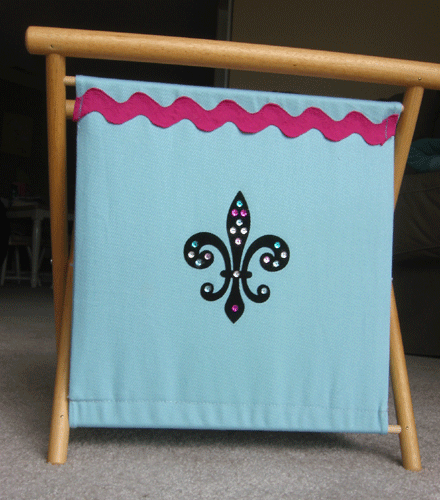
joys-knitting-basket-front1.gif

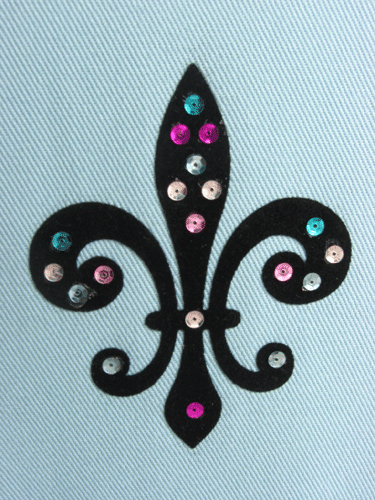
At the craft store I loaded up on huge pink rick-rack, multi-colored sequins, a velvety iron-on fleur d’ lis patch and fabric glue. I added on the patch and was glad to be able to add to the border of this knitting basket without having to take the basket and its lining apart. I simply turned under the ends of the ric-rack and sewed it vertically, then glued it, on the front and back. Then the fun part- arranging the sequin color order over the black patch. The only problem with the fabric glue was that it was a little stringy when you lifted it away from the fabric, just like using a glue gun. But when the sequins were all in place I just scraped away any excess dry glue with a pin.

joys-knitting-basket-detai.gif

It was done in no time and I am looking around now at what else I can glue bling to! The first project will be to decorate the tan knitting basket I bought for myself, then maybe to add color to floral bags I have made on the flowers, then the cat bowl, and my husbands’ briefcase…

Bridesmaids’ Bags

Friday, June 8th, 2007

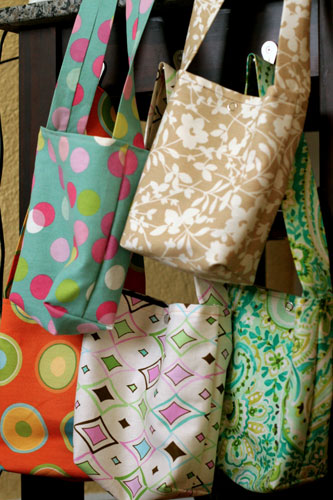
I have been excitedly working on a project recently, and for a good cause - a friends’ wedding. She asked me to make a small handbag like I had posted previously for each of the girls in her bridal party that she would fill with gifts. The bride shopped with me at the fabric store and we picked out a main fabric and lining to suit each of her close friends. We only needed a 1/4 yard of each, so this turned out to be a pretty inexpensive gift per person. I added a pocket for the first time and snaps that are easily hammered into place. I hope they enjoy them- the time on my part and the careful selection of the fabric on the bride’s part.

bridesmaidbag2.jpg

After shopping for fabric she and I also came back to my house and made different earrings for each of the bridesmaids to match their dresses. I love feeling like a vital part of someone’s special day!

bridesmaidbag1.jpg

So my encouragement this week is that your craft can also be a good excuse to spend time with people. Too easily we craft nerds can hide in our studio or craft corner and shut the world out so we can “work” but it can also be a fun opportunity to teach someone about your passion or talk while you craft. Don’t be afraid to let people into your creative world! Also, get creative with what can be made for bridesmaids gifts. My sewing isn’t totally professional but I think my little bags were a practical, cute idea for these gifts. Do you have any alternative gift ideas to share?

Goofy Trash Flap

Thursday, May 3rd, 2007

Brian and I were talking one night about how often he has to take out the trash. Not exactly complaining but wondering if there is any way we can get a bigger trash can. We like to keep the trash under the sink but we had to keep opening the side door to throw stuff away. He was literally taking out the trash every few days cause our trash can was so little.

This is what it looked like.

img_0001.jpg

He suggested we get a bigger trash can and just put a flap up there. You know like a fast food restaurant? We popped the wooden piece out. It was just clipped in and I made a flap that can Velcro in. This is what it looks like. I just sewed some thick fabric together and glued some piece of drywall I had laying around on the back of it to make it close..

img_0002.jpg

Now all we need is a Thank You sign on it. So random, but it works. He was thrilled and so proud of our little trash flap. Love coming up with this stuff with you baby. :)

img_0003.jpg

Flower Loom How-to

Monday, April 30th, 2007

I needed a flower loom for a crochet project I’m doing, but didn’t have one. I went to three different craft stores and no success of finding one. I could order one off the internet, but that’s more money and time than if I just made one myself. So I headed back to the craft store in search of supplies.

flower-loom1.jpg

All you’ll need is a 3/16″ wooden dowel, a package of wooden rounds, scissors/small saw, and some glue. I used hot glue for this tutorial, but you may want to use a wood glue or fast-drying epoxy, since the hot glue won’t hold up to a lot of tugging and pulling. And if you can’t find round wooden shapes, you can always use square ones, and make a circle using a compass. You’ll cut (or saw, whichever is easier) your dowell into 1 to 2-inch pieces. For a larger loom, you’ll want 10-12 pieces. First, glue four pieces to the opposite sides. You can mark the center of the circle with a pen so you place the pieces evenly.

flower-loom2.jpg

Then you’ll position the remainder of the pieces in place.

flower-loom3.jpg

You can do the same with smaller rounds, making different shape looms. For the large loom I used 12 pegs, for the medium, 8, and for the small, 6.

flower-loom4.jpg

Now you can embellish anything, using yarn, ribbon, or even twine.

flower-loom5.jpg

flower-loom6.jpg

Bargain Yarn

Wednesday, April 11th, 2007

img_0013.jpg

This is the yummiest acrylic yarn I have found in a while. I was in Florida for my brothers wedding a couple of weeks ago and thought I would look through the craft section at the Walmart there. I was so excited to find this. It was 50 cents a skein!!! It feels a lot like the Angel Hair yarn from Joanne’s. Yeah I pretty much bought every one - I love it! I’m trying to decide what to do with it tho. I mean I can hardly think of anything but a scarf cause it is sooo cozy, but knitting a scarf in April?? Come on! Any ideas?

Tree Totebag

Tuesday, April 3rd, 2007

I saw this bag recently in a clothing magazine but decided of course to try and make my own.

tree-tote-alloy-edited.jpg

I drew the leaf and tree shapes out on cardboard and cut them for a pattern. Then cut the pieces out, arranged the order, and pinned each peice. This was fun since they could be kinda scattered. The time consuming part then was stitching each leaf.

leafbag4.jpg

The bag in the picture was stitched entirely in white but I alternated the thread matching the 4 colors of felt I used for the leaves. I embroidered the felt tree trunk in light brown to make it stand out against the indigo corduroy I chose for the bag.

leafbag2.jpg

leafbag3.jpg

leafbag1.jpg

When all of the embroidery was done I sewed up the sides and added a floral lining, which I doubt the original has. Overall, I am pretty happy with the attempt. What do you think of my version? Wait, you haven’t gotten to the best part yet!

The cost of theirs: $25.00
The cost of mine: -$2.50