genericviagra

buy cheap cialis pill online lloyds pharmacy viagra cheapest without prescription farmacia online alprostadil

viagra no prescription required

cheap without prescription Cialis Super Active online meds where can i buy viagra cheap without prescription brand viagra online sildenafil online

canadian discount pharmacy

cheap without prescription Generic Levitra purchase tadalafil amoxicillin no prescription cheap without prescription pill online buy cheap generic viagra

yohimbe

Generic Viagra buy cheap cheap cialis impotence treatment cheapest without prescription buy viagra online stamina rx

buy prescriptions

buy cheap Viagra Super Active sildenafil citrate tablets soma pharmacy buy online cheap pharmacy cialis online

next day cialis

Zithromax cheap without prescription viagra sale online abortion pill online cheapest without prescription brooks pharmacy no prescription required

online pharma

buy cheap Viagra Soft viagra price comparison can i buy viagra online buy online order kamagra net pharmacy

viagra herbal

cheap without prescription Xenical discount viagra online lowest price viagra cheapest without prescription get viagra prescription online doctor

cialis generic

Levitra cheapest without prescription canadian rx canadian viagra online buy cheap canadian prescription drugs buy amoxil

Archive for the 'Crochet' Category

Knit Bits for a Great Cause

Thursday, October 18th, 2007

pink-ribbon.jpg In honor of Breast Cancer Awareness Month, I wanted to pass along some opportunities to use your crafty skills to support those who are battling or have survived breast cancer.

I found this pattern on knitty.com for knitted breast prothesis. I contacted our local yarn shop owner and she directed me toward this pattern. I know for our area she collects them and takes them to a treatment clinic to be given to breast cancer patients and hope that you can find a similar opportunity in your area. See what you can find if you want to get involved! (She suggested a soft, breathable wool yarn for this. Check out her shop if you are in VA!)

I have also heard of knitting or crocheting scarves that they give women whenever they find out the devastating news, but have been unable to find a direct link or pattern online. If you do know of a reliable pattern or contact please share in the comments for I am sure that there are many that would be interested in helping in this way.

The third way that you can help is through the purchase of a product that I could write a whole post on by itself- Denise Interchangeable Knitting Needles in pink! These will be the last needles you will ever need to buy and money from each purchase goes toward breast cancer research. So get those needles and start knitting!

Crochet Row Markers

Tuesday, October 16th, 2007

You asked what I do with the leftover part of my toggle clasps after I make stitch markers? Well, I make crochet row markers!!

ccb2d46b.jpg

I was getting frustrated because the only crochet row markers I could find were ones with clasps on them, and those always seemed to snag on my yarn. But not these ones! You simply slip the bar in between the stitches you are marking, the beads hang in the front marking your stitch

dsc_0609.jpg
and the bar extends across the back of your project:

dsc_0610.jpg

I have been so pleased with how these work, and you have no waste when you make stitch markers. I have a couple of sets in my store, Baby Blossoms, if you’d like to check out the different styles and looks that can be made :D

Crochet with Plastic Bags

Tuesday, September 25th, 2007

I was searching the internet looking for crochet grocery bags, and I stumbled onto Marlo’s Crochet Corner. Posted there is an excellent tutorial on how to reuse your plastic grocery bags to make a tote bag.

I love this idea! It would make a nice, thick and sturdy bag to carry your groceries in, while helping the environment.

So then I did more searching, and I found lots of ideas for using plastic bags in your projects:

A crochet hat

A water bottle holder (I really like this one!)

A Pot scrubber

And I also found collections of ideas!

MyRecycledBags.com

Needlepointers.com

I find this very inspirational, and I can see some recycled products in my future!! Has anyone tried this? Have you had success or any pointers to share? :D

Hand Spinning Wool

Friday, September 21st, 2007

I recently got a drop spindle kit so I could learn to hand spin my own wool. The kit came with a drop spindle, some wool roving, and instructions of how to put the spindle together.

kit.jpg

After scouring the net for some hand spinning instructions I decided to give it a try. Well, it was definitely harder than they make it out to be :D It took me a long time to get the tension right, and the spin right, and my hands in the right place.

But I have success:

yarn.jpg

Hand spun yarn! Its not pretty, and I don’t now if I’ll be able to actually use it, but its a start!

Has anyone else hand spun yarn? Any tips to offer a newbie? :D

I need serious help

Monday, August 20th, 2007

Not professional – well, not yet atleast, but I’m headed in that direction – but any one who has crocheted a ripple blanket before, particularly the “Soft Waves” pattern from Jan Eaton’s ripple book, if you could help me I would be forever grateful. Seriously. I can not figure this thing out and it’s driving me bananas. I feel like I’m taking crazy pills!

Heather and I deduced that maybe the pattern is wrong, since the hills and valleys aren’t lining up and after a few ripples, the next few become one even ripple (since, according to the pattern and counting, I’m increasing on the valley and decreasing on the hill). So if there is anyone out there who could help me, I can not tell you how grateful I will be. I’ll send you some yarn or hooks or something as a thank you. Leave me a comment with your email address and let’s start the crusade to save my sanity!

UPDATE: This is me, sitting in the corner with a dunce hat on :( A couple things to remember when working a pattern: 1) it helps to write it out, step by step, and check them off as you complete them until you get the hang of it. And 2) Don’t watch TV while trying to do a pattern for the first time. No matter how much you tell people, and yourself, that you can multitask. It probably will jack up your project. So thanks to all who helped, and an additional thanks to Jennifer for clarifying a few other things that would’ve been future problems had I even gotten that far!

Learn to Crochet – Show and Tell

Monday, August 6th, 2007

Time to show off the completed lapghans that your fellow readers completed!

Ruth made this beautiful lapghan in shades of purple and green:


finished_afghan.JPG


Theresa made a beautiful lapghan with blues, purples and beiges!


t_learn_to_crochet_lapghan.jpg


These were the only two pictures submitted for the prize, so they will each get a small package of crochet goodies!  Congratulations ladies, and thanks so much for following the lessons!

And thank you everyone for following the lessons and your comments along the way!  I really enjoyed doing them, and I look forward to more”schools” in the future!  Watch for a learn to knit school after the embroidery school!

Learn to Crochet

Tuesday, July 31st, 2007

If you’ve ever wanted to learn to crochet, make sure you don’t miss our eleven part series:

  1. Lesson #1
  2. Lesson #2
  3. Lesson #3
  4. Lesson #4
  5. Lesson #5
  6. Lesson #6
  7. Lesson #7
  8. Lesson #8
  9. Lesson #9
  10. Lesson #10
  11. Lesson #11
 

Learn to Crochet – Lesson #11

Tuesday, July 31st, 2007

See all the posts in the Crochet School…

We’ve reached our last lesson! You did it!! You should now have a nice lapghan all sewn together, ready to finish off the edges?

There are two stitches I will go over for finishing the edges, the crab stitch and ruffles. Both are very easy to master, but create completely different looks.

Crab Stitch (a.k.a Reverse Single Crochet)

First of all, you will want to do a row of sc around your entire blanket, working 3 sc into each corner. This gives a nice clean edge to work off of.

From crochetcabana.com:

After completing a row of single crochet, do not turn the work around, chain one, *insert the hook into the next stitch to the right (not in the stitch you just completed, but the next one, draw up a loop. Here’s how you do that – You just angle your hook down and grab that sucker and pull it through. yo as normal and pull through both loops on the hook. rep from * across row.

Follow the link for pictures of the finished edge as well :)

Ruffled Edge

This edging uses a lot of yarn, so keep that in mind :) Again, you will want to do a row of sc around your entire blanket, working 3 sc into each corner.

Begin with a chain 4. Triple crochet into the same space, and then triple crochet in the same stitch. Work 2 trc into each stich along the edge, work 4 trc into the stitch before the corner, 6trc in the corner, 4 trc in the stitch after the corner and then 2 trc in each stitch along the edge. Continue around. You can see a picture of the ruffled edge here.

That’s it!! You will now have a wonderful lapghan to keep you warm on the upcoming cool fall and winter nights!

If you want to be entered into the draw for the fun crochet goodies, send me a picture of your completed afghan to heccles at gmail dot com by 10pm EST on Sunday August 5. I will share everyone’s completed lapghans and announce the winner next Tuesday!!

Learn to Crochet – Lesson #10

Tuesday, July 24th, 2007

See all the posts in the Crochet School…

So now your squares should be nice and flat and even! Time to start assembling your lapghan.

There are a few different methods to seaming your squares together. I found some great pictures and explanations on Crochet911.com

The most common method of seaming is called the “mattress stitch” or “invisible weaving”. Place your squares together in front of you, and collect together some matching yarn with your darning needle. Beginning at the bottom, pick up the first stitch on the right, and then on the left square. Weave back to the right, and then to the left again. Continue the length of the side of the square. This method creates a nice flat seam.

Invisible seaming - From crochet911.com

Another method of seaming is backstitching. This method works really well, but the seams are a bit bulkier. You will hold the right sides of the squares together, and weave the yarn in and out along the top of the squares.

Backstitch - from crochet911.com

You can also slip stitch the squares together, however this also creates a bulkier seam. Holding the right sides of the squares together, you will slip your hook under the loops of both squares, yarn over and pull the yarn through both squares, then through the loop on the hook. Continue the length of the square.

Slip Stitch - from crochet911.com Slip Stitch - from crochet911.com

The final method of seaming I will discuss is overcast, which again creates a bulky seam. With blunt-pointed needle and matching yarn, place right sides together and insert needle back to front, bringing the needle over the edge. Insert needle back to front again under the top loops of the squares. Continue the length of the sides.

Overcast - from crochet911.com

Using your choice of method, or trying all of them, assemble your lapghans and next week will will talk about finishing the edges of them!!

Recycling Plastic Bags

Wednesday, July 18th, 2007

Mr. McGuire:I want to say one word to you. Just one word.
Benjamin: Yes, sir.
Mr. McGuire: Are you listening?
Benjamin: Yes, I am.
Mr. McGuire: Plastics.

–The Graduate

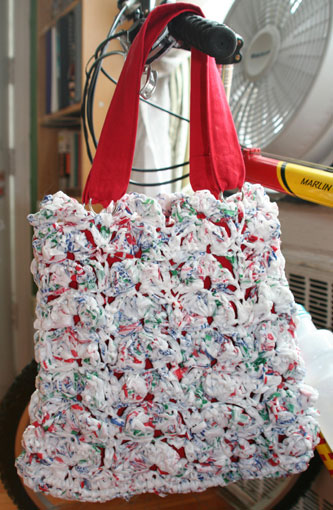
My name is Simone, and lately I’ve become completely obsessed with plastic shopping bags. I think it started when I couldn’t stuff another bag into the bottom of my holder without pushing fifteen more out of the top. On the other hand, I also could not bring myself to toss them because, after all, they were perfectly good bags. I then stumbled upon crocheting strips of plastic into, you guessed it, another bag. Since one tote-sized, crocheted bag takes at least 30 to 50 shopping bags, this project did make a dent into my collection.

tote-bag-2.jpg

Oft cited My Recycled Bags.com provides excellent instructions on how to prepare recycled plastic yarn from shopping bags and shares some crochet patterns for this kind of yarn. Once you have a ball of plastic “yarn,” you can also mix it with other materials. For example, I made this bag by alternately crocheting rounds of plastic yarn and yarn made out of denim strips.

round-purse.jpg

I think it would be kind of fun to follow the Daisies’ crochet instructions, make different kinds of plastic squares, and sew them all together into. . . a bag. (If anyone can come up with something else to crochet besides a bag, please let me know. A rain poncho perhaps?)

Recently, I saw a posting about fusing plastic bags to make a plastic fabric. That inspired me to make plastic beads out of fused plastic bags.

beads.jpg

You use the same technique you would apply to making paper beads, i.e. cut a triangle out of the “fabric” and roll it up from the broad to the narrow end. You may encounter more resistance from the plastic than you would from paper. I first roll up a bead without applying glue. I then unfurl the bead, apply the glue (Uhu Mosaic) and roll it up again. Like paper beads, you can leave the bead like that or apply a layer of lacquer.
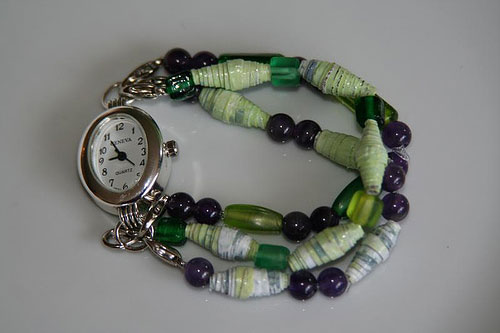
watch.jpg

Lastly, I decided to make a wallet out of two ‘I Love NY’ bags and a white trashbag without any print on it.
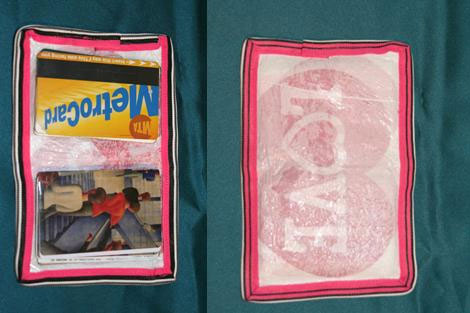
wallet.jpg

* I fused the three bags together and cut out a 6 1/2″ x 4 3/8″ rectangle.
* I then cut out two 4 3/8″ x 2 5/8″ rectangles out of clear vinyl left over from some bedding packaging that I had saved for just such an occasion. These will become the inside pockets on the left and the right side of the wallet.
* I then basted the pockets to the left and the right of the rectangle with a glue gun to keep everything in place.
* To finish it off, I trimmed the wallet with a 31″ long piece of 7/8 inch ribbon. The ribbon is folded in half and sewed on around the wallet through the fused plastic and the vinyl with a top stitch.

Start to finish the whole project took me a little over an hour. You could add a velcro closure to the wallet to keep everything in place, if you don’t stuff it with as many random pieces of plastic as I tend to do.

Now I’m worried that New York will encourage businesses to cease the use of plastic bags. In that case, where will I get my raw materials? Have fun with plastic. Let me know if you have any other ideas of what to do with this stuff.