The “Ok” Diaper Bag Set
Thursday, March 15th, 2007Before Lucy was born I was a sewing mad woman. Things have *ahem* slowed down since then. The desire is still there, just no time. One of the things I HAD to finish before she came was a diaper bag. I put this little ensemble together for our diapering needs. A diaper bag, a changing pad and little bag for my stuff. The changing pad was a towel that I died to match the fabric and quilted it sorta. If you can call that quilting- adding some batting to the back and sewing fabric on the other side. I love it when she’s on it cause it seems so comfy, but it’s too big and takes up most of my space. I’m also afraid to wash it cause the color might bleed into the fabric.

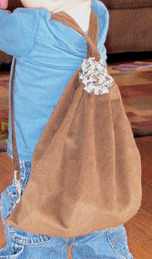
The bag has tons of pockets, I like that but it’s a little too floppy. I made it from some left over ikea curtains we used for our craft room at church and some floral fabric I found at Walmart. I also made the straps so I could remove them and just slip the bag into another bag and still have all the great pockets. Yeah that didn’t work so well. Again, too floppy. darn. Oh, the detail on the pocket is from an old shiny head band I had. You know me, gotta have my bling!

The little pouch for my things is the only thing I’m really in love with. I carry it with me everywhere. I even made a little side pocket for my “business” cards. Brian made me some Bloom cards so I could give out my number when I met a new crafting friend. I also love the bead on the side. It just gives it a little vintage somethin’. I am already designing a new bag in my mind with some Anna Maria Horner fabric that will be bigger and better! We’ll see when I’ll actually get to that…


 Place the two larger pieces right side together, and sew around the edges using a 1/4″ seam allowance, leaving one side partially unsewn to turn the pieces right side out. Turn it right side out, and pin the pocket to the front of it. Ideally, if the same 1/4″ seam was used for the sewing and ironing, the pieces should fit together perfectly. Also attach ribbon for tying the case when its finished.


 I made this bag for Candace’s son’s birthday. I am always trying to think up gifts for little boys that are not another toy, so I came up with this scaled down backpack to hold their toys. I chose corduroy for the outside of the bag which I wanted to be able to withstand a little boys’ abuse. The inside fabric is a cute print of wild animals. You could go in so many directions with this by choosing different fabrics or embellishments for a boy or girl.