adobe flash player download for vista 32 bit os

buy cheap Dreamweaver for Mac adobe illustrator and download ppd download adobe buy cheap download adobe photoshop elements 6 adobe robohelp 7 download

adobe illustrator cs2 download

discount Adobe Acrobat for Mac adobe photo shop brush download adobe flash direct download buy cheap adobe premiere 6 tryout download download adobe reader cd

download latest version of adobe reader

buy cheap adobe cs5 for mac adobe flas download download cracker adobe acrobat discount adobe photoshop 7 download adobe illustrater download

adobe rree reader download

autocad for mac buy cheap adobe 8 reader download adobe distiller free download cheap adobe reader download portable adobe flash player free download repair

free adobe acrobat download for windows vista

cheap Defrag Professional 14 adobe reader download mac adobe flash offline download cheapest free adobe fireworks download full version download adobe ilustrator

adobe type manager light download

Creative Suite 5.5 cheap adobe acrobat rider download adobe reader 812 download buy cheap download adobe photoshop 8 cs adobe reader download mac

download adobe reader pdf free

cheap Adobe CS 5.5 download adobe after effects adobe fash player download cheap download latest adobe acrobat reader download adobe reader cd

adobe acrobat 8 crack download

Photoshop CS5.5 cheap download acrobat adobe adobe photoshop brushes download cheap free adobe photoshop full version download adobe creative suite 3 download

download free adobe photoshop cs

AutoCAD LT 2012 discount adobe photoshop cs 3 download adobe download free photo shop buy cheap free download adobe premiere pro cs3 download adobe flash trial

download adobe reader 8

buy cheap Autodesk Inventor 2012 adobe and acrobat and reader and 4 0 and download free download adobe illustrator 9 cheapest download trial version of adobe acrobat 8 professional download adobe audition 2 for free

adobe photoshop cs 3 download

Autodesk Revit 2012 discount how to download adobe flash movies download adobe svg viewer cheap adobe premier pro cs2 download crack adobe premire download

download adobe premiere pro

download hustler in adobe format adobe distiller free download cheap stop adobe download free safe download of adobe acrobat reader

free download adobe 6

autocad 2011 cheap adobe flash 2004 download adobe acrobat writer free download cheap free download hustler magazine in adobe format download adobe audition 2 for free

adobe soundbooth download

autocad lt buy cheap freeware similar to adobe dreamweaver download download free adobe photoshop elements cheapest free download adobe acrobat distiller adobe reader 6 free download

pdf and adobe and download

creative suite 4 cheapest isxmpeg codec download from adobe premier download adobe acrobat 6 standard cheap adobe after effects download adobe flash cs download

free adobe acrobate download

discount creative suite 5 download adobe illustrator adobe illustrator svg filter download cheap download adobe after effects cs3 free download install adobe acrobat reader

free adobe premiere download

cs5 master collection cheap adobe cs3 mac download download full adobe premiere buy cheap download adobe reader8 adobe flash offline download

adobe cs3 classroom in a book lesson files download

adobe creative suite buy cheap acrobat adobe free download adobe flash direct download cheap adobe premiere 6 download crack adobe macromedia flash download

download adobe photoshop elements 4

download adobe pdf adobe acrobat raeder v7 download cheap download adobe latest version adobe acrobat reader for windows 98 free download

adobe raider 8 download

download adobe indesign cs3 free download adobe reader for linux discount download adobe reader version 5 download adobe after effects 5

Archive for the 'Felt' Category

Cactus Pin Cushion

Monday, March 12th, 2007
cactus-pin-cushion-full-1.gif

I saw this cute pin cushion in a book and ran home to try it! I use pins all the time in my sewing but hate how lightweight the cushions usually are, slipping off the table as I try to work with one hand while holding fabric in place. This little pot adds stability to the cushion. The original used a pot about 1″ around larger than the cushion and was filled with sand around the cactus. With a young child I could see that quickly getting knocked over. Instead I made the cactus to fit snugly in the pot with just enough room to tuck in a few other necessary sewing supplies.

cactus-cut-out-2.gif

I handstitched 3 pieces of felt to make the cactus, one longer than the others to curve under and make the bottom. Then stuffed it in the pot. To weigh it even more you could glue a magnet or washer to the bottom of the cactus and glue that to the inside bottom of the pot. I am going to try this idea with other shapes as well to personalize a cushion for my sewing friends.

iPod Cozy

Monday, January 15th, 2007

ipod6.jpg

My fabulously amazing husband and his parents got me an iPod this year for Christmas. However, what’s a fantastic piece of equipment like that without an equally fantastic cozy to keep it in? So I fashioned a felt (are you surprised?) iPod cozy that only cost about $.60 to make, and only took two hours from start to finish.

First, you’ll measure out how much felt you’ll need. Then you’ll cut a front and a back piece, making sure the back piece is longer than the front (so it will fold over and close).

ipod1.jpg

Next, you’ll decide on whatever shape you want (a flower, an animal, or just shapes of any kind) and pick your embroidery floss.

ipod9.jpg

Cut out your shape, and adhere it to the felt with a needle (to keep it in place while stitching) and then using the backstitch you’ll sew it to the felt. You could also use a blanket stitch if you like as well. You can place your shape anywhere you like, but make sure you don’t place it too close to the edge – you’ll need to allow some room there for the seam.

ipod3.jpg

Next, add any other imbelishments you like, (buttons, more embroidery or other shapes) and then attach the snaps to the tops of the two pieces, making sure they line up correctly so it will close correctly.

ipod4.jpg

To finish up the cozy, stich together the front and back pieces (using either a blanket stitch or a running stitch), and voila, a fabulous and functional iPod cozy.

finished-ipod.jpg

Quick and Easy Felt Appliqués

Tuesday, January 9th, 2007

I have really been into using felt lately. It’s like the wonder material – you can make so much with it, it’s inexpensive and so easy to use. I had bought some little boys shirts for cheap ($3 at Walmart, and they are nice, too) and decided to use them to stitch some felt applique’s on. So I decided on a catepillar and a lion. Once I cut out the shapes I needed in the colors I wanted, I added any embellishments (like eyes, mouths, ears, etc) and then just secured them on the shirt using a blanket stitch.

catepillar.jpg

I finished up with a few other accents and voila – cute (and boyish) felt applique shirts. Each one cost approx $4 and about an hour to make from start to finish.

lion1.jpg

lion2.jpg

Felt Penguin

Wednesday, December 20th, 2006

finished-penguin.jpgThis will be my son’s first Christmas, and I wanted to make him something special. I’m not really into stuffed animals, so I haven’t bought any for him. But since he’s taken an interest in the ones he already has, I decided to make him one using a fabric that’s inexpensive, washable, and easy to work with: felt.

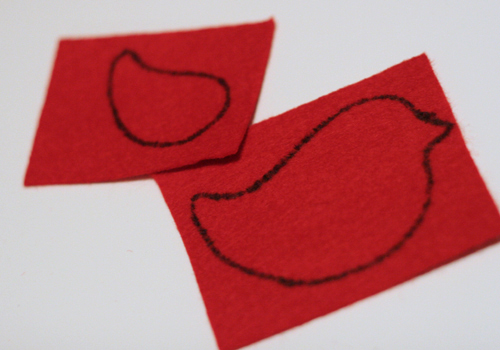
You can make any animal you choose, I just chose a penguin since I’m really into birds right now, and I wanted his to be cute but also boyish. So first you’ll want to pick an animal, draw it out and then get it blow up using a copy machine, to however big you want it. Cut out the shapes and trace them onto cardboard, then cut those shapes out. When you’re cutting feet, arms, or anything that’s to go on the edge of the animal, you’ll want to add a little extra, maybe a quarter to a half-inch, to the place where you’ll adhere the piece to the edge.

penguin1.jpg

Place your shapes on the pieces of felt you’ve chosen and secure them with a needle or pin. Cut around the shapes. Since you’ll need a front and a back, and you have sharp enough scissors, you may want to double up the felt to cut the pieces so the pieces match up perfectly.

penguin2.jpg

Next you’ll want to stitch your top pieces onto the body of the animal. Place pieces in desire places and secure with a pin or needle. Here I put the belly on first, then the beak. I also added a little polyfil to the belly and beak to give the pieces a little more dimension. I used a blanket stitch for all the pieces but you can use any stitch you’re comfortable with. I then stitched the eyes on using a seed stitch.

penguin3.jpg

Next you’ll want to stitch together the feet, adding a little polyfill to them before closing. Stitch the feet onto the piece that will be the backside of your stuffed animal.

penguin4.jpg

finished-penguin2.jpg

After all your pieces are placed, then you can stitch the front and back side together, stopping when you’re almost done to add the polyfil. Add as much fill as you want. You don’t want to overstuff your animal, but you also don’t want it really flat either. If your animals has tight corners, use the end of a pencil or pen to push the fill into them. Place a pin or needle close to the edge of where you’ll stitch to keep it close together so you’re final stitches will be straight. Finish up the seam and voila! A finished (and adorable) stuffed animal.

From start to finish this project took about 3 hours so it’s something you can do while watching TV or if you have some spare time. And as always, have fun with it. Don’t worry if your animal isn’t perfect or even a little choppy (like mine). I think imperfections add to it’s character and cuteness, and I’m sure who ever you’re making it for won’t mind at all.