genericviagra

buy cheap cialis pill online lloyds pharmacy viagra cheapest without prescription farmacia online alprostadil

viagra no prescription required

cheap without prescription Cialis Super Active online meds where can i buy viagra cheap without prescription brand viagra online sildenafil online

canadian discount pharmacy

cheap without prescription Generic Levitra purchase tadalafil amoxicillin no prescription cheap without prescription pill online buy cheap generic viagra

yohimbe

Generic Viagra buy cheap cheap cialis impotence treatment cheapest without prescription buy viagra online stamina rx

buy prescriptions

buy cheap Viagra Super Active sildenafil citrate tablets soma pharmacy buy online cheap pharmacy cialis online

next day cialis

Zithromax cheap without prescription viagra sale online abortion pill online cheapest without prescription brooks pharmacy no prescription required

online pharma

buy cheap Viagra Soft viagra price comparison can i buy viagra online buy online order kamagra net pharmacy

viagra herbal

cheap without prescription Xenical discount viagra online lowest price viagra cheapest without prescription get viagra prescription online doctor

cialis generic

Levitra cheapest without prescription canadian rx canadian viagra online buy cheap canadian prescription drugs buy amoxil

Archive for the 'Paper' Category

Story Booklet Tutorial

Thursday, July 10th, 2008

Bobbi-lee of TomandJasmine.wordpress.com starts off this season’s guest contributor cycle with a tutorial on how to make a very personal story booklet:

I made this little story booklet for my sisters 20th birthday which was last week and thought I should make a tutorial at the same time. This little booklet is a great gift idea for the young and old, or it can just be a little book of your illustrations or poetry. Have fun!

First of all you need to do the pages (unless you are making a blank book to draw and write in later then skip this part). I started with an A4 page of watercolour paper and divided it into 15 equal rectangles. Draw your little illustrations in pencil then paint them or colour them with your choice of paints.

watercolourpaint.jpg

Once you have done your little drawings and the paint is dry, outline them in black felt tip marker and write the poem or story in.

outline-with-fineliner.jpg

Once that’s all done you can cut out the pages neatly with a scalpel and ruler. Don’t cut yourself!

cut-the-paper.jpg

Now comes the fun part. Cut out some strips of paper for the binding. The pieces I used were about 8×4 cms but it really doesn’t matter what size as long as it is smaller than the actual pages. Now fold the strips of paper and glue one side of the fold to one side of a fold on another piece. Keep gluing the folded parts together until you get what looks like a mini book.

strips-of-paper.jpg

Now start gluing the back of the watercoloured pages to the mini book like in the image below. If this doesn’t make sense please let me know-I am terrible at explaining. Keep gluing each page until the book is all glued together. Remember to keep the pages in the right order you wanted and remember that some pages will be back to back.

gluing-pages-together.jpg

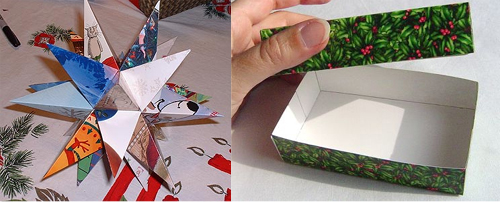
Now that the booklet is almost done it needs a cover. I cut a piece of cardboard scrap I had lying around. Glue the last two paper strips to the cardboard. The cover is one piece of cardboard not two pieces. Once glued fold it like in the picture. You might need to hold it under some weight (such as another thick book) to help it keep its shape.

glue-cover-card.jpg

Now all you have to do is line the cover with some pretty paper. I chose this gorgeous scrapbook paper that has glittery accents on it. Line both the inside and outside of the cover.

cover-lining.jpg

Now you have a cute little story booklet. I tied it with pretty ribbon to give it something extra. You can print a title on the cover, use transfers or stickers or add some beads and ribbon. It’s up to you.

final-book.jpg

All Tied Up With A Bow

Wednesday, May 7th, 2008

img_9183web.jpg

As my handiwork attests I’m a terrible stamper. I never seem to be able to avoid getting the rim of the stamp onto the paper, the ink doesn’t distribute evenly, I could go on and on. Any hints on how this is done would be greatly appreciated. However, as a concept piece and for a birthday present for a seven-year-old, I think this works: I cut out a piece of brown wrapping paper to fit the present, and then proceeded to stamp Daniel’s name all over it. For recycling purposes a brown paper bag would work equally well, but for some reason they only do plastic in NYC.

While stamping the D-A-N was still a very Zen experience, by the time I got to the I-E-L part, I was ready to pack it up. Fortunately he didn’t have a lengthy name like Balthazar. (That would have been Elizabeth’s name if my husband had had his druthers and she had been a boy.)

The bow used to be part of an exercise video tape. I got that idea from Danny Seo.

Note to self: Don’t try to remove the ribbon from the tape case five minutes before you have to leave for the party.

Origami Hearts

Wednesday, February 13th, 2008

At the beginning of the year, I set myself a goal of making 99 different pair of earrings this year. Here is Pair No. 3. Admittedly, progress has been a little slow lately, but it is only February. So in the spirit of the season here are the origami hearts.

img_8497_500.jpg

To make them use your favorite origami heart folding technique and make four hearts. These were folded out of 5 x 5 cm paper scraps. Glue two hearts together, which leaves you with one pair. You can varnish the hearts to make them more sturdy. To suspend them, pierce the heart (very dramatic) with a pin and ease a jump ring through the hole. From there on out it’s up to your creativity: turn them into earrings, make a bunch for a charm bracelet, or skip the piercing and glue a pin back to the heart.

If you want to follow my progress with this endeavor, here is the 99Earrings project blog.

A Ball, A Box, A Book. . .

Monday, December 31st, 2007

ballboxbook.jpg

Okay, I understand, enough with the holiday theme already. However, as the year draws to a close and you are contemplating the pretty cards on your mantle, consider saving them for one of these projects:

A Ball

ball.jpg

All Free Crafts.com has a tutorial on making a ball shaped ornament out of a card. This is a fun little project that turned out better than I had expected.

A Box

hexbox-copy.jpg

Julie Bolduc has instructions for a hexagon shaped lidded box. I actually didn’t receive enough suitable cards to make this box (16), but it looks like a cool project that you could make out of a variety of papers.

A Book

book.jpg

In July, Jennifer shared a guest posting on making a mini journal. You could follow her instructions and create a similar journal using a holiday card as a cover. The book could be left blank, you could turn it into an Advent journal with a little thought or activity for each day, or you could make a special address book for next year’s holiday cards.

A Luminary

luminary.jpg

Kawaii Crafter made these pretty luminaries out of Christmas Cards. I think the picture says it all. They are the perfect thing for dreary days during the next three months, at least in the Northeast.

Other Cool Ideas

star_box.jpg

Jenny Harada made a funky star. It looks like you’ll need about 10 cards for this project.

And here is Diane Gilleland’s popular greeting card gift box as featured on her blog CraftyPod

I hope this is some inspiration to Reuse before you Recycle. Maybe you can make a little something before 2008 begins.

From all of us at Crafty Daisies: Happy New Year!

Stamping Holiday Placecards

Sunday, November 25th, 2007

thanks-cards-1.gif

I know I am a few days past Thanksgiving, but I wanted to share an idea that I like to use for my holiday table that you could apply toward your upcoming Christmas plans- stamping placecards, messages, or labels.

thanks-pop.gif

I cut cardstock about 3″ by 3″ and love to use metallic ink great for holidays like copper color, gold or silver. Very festive! With a tiny aphabet or message stamp I create labels for each member of the family around the table. Sometimes I have written a small message inside or written specifically why I am thankful for them or love them. You could even make a game of it or hide the winner of a small prize, or first to get in the buffet line! There are lots of ways to be creative here and make your meal more memorable!

thanks-full-table.gif

I have also used these cards to disperse reminders about the table (like the “Thanks” cards), or as labels when there are many people visiting my buffet. For example to label: Regular or Decaf coffee, a baked dish or dessert, Splenda or sugar, etc. This would be a great craft to let the kids in on too and let them help you stamp or decorate with holiday stickers. These would look beautiful coordinated with the stamped napkins or paper tablecloth posted earlier this month. Get stamping!

thanks-all-cards.gif

Oh No, Only 10 Days Until December

Wednesday, November 21st, 2007

houseedit500.jpg

I grew up in Germany and advent calendars were always a big deal in my family. I remember this beautiful embroidered calendar my mother made for my aunt with all kinds of interesting little packages attached to it. My brother and I would discover calendars made out of matchboxes and walnut shells or just wrapped up little packages tied together with string. Last year, my mother even put together a calendar for my brother’s dog. So in the spirit of the season, I went online to browse for some inspiration for this year’s calendar.

Paper Calendars

Kids Craft Weekly explains how to put together a cute origami cup calendar. You could also make little origami boxes as explained by Lisa Lam from U-handblog, or just simple cones and fill them with goodies.

Another fun idea from Kinder Stadt is to use toilet paper rolls and to turn them into snowmen, Santa Clauses, or penguins. pinguin.jpg

If you have the space you could create a whole village of 24 houses. Marilyn Scott-Waters of The Toymaker has a great template for a house complete with chimney.

Fabric

Jenny B. Harris of Allsorts just reposted instructions for her felt pocket calendar. I think you could also re-purpose her elf shoes. You could make 12 pairs of shoes and hang them from a clothesline.

Last year, Susie of Susie’s Country Garden made a garland of little stockings.

Eldrid Røyset Førde from Bremanger, Norway has English instructions for a different stocking type calendar.

I also like this quick calendar by Shizzyknits.

shizzyknits1.jpg

Other Materials

Splitcoaststampers has a tutorial for a calendar using little favor tins.

Miniature terracotta pots are another popular starting point for advent calendars. Turn them upside down, add a Styrofoam ball for a head, and paint them to make Santas, elves, snowmen, etc. Then either glue them on top of the box that will contain the gift, or cover the bottom with felt and/or cardboard to hide the gift in the pot itself. Here is a German tutorial from Creadoo with pictures of “potty” creatures to give you some ideas.

I’ve finished my calendar what do I put inside?

If you are still recovering from a Halloween candy hangover and are worried about lead levels in gum ball machine toys, you may want to consider filling your calendar with different activities. Kiddley has a list of activities you could use. You could also put pictures of friends and family in your calendar and put together a progressive collage, or collect or make some ornaments to hide in the calendar and then hang off a branch or your tree.

For more inspiration, go to flicker and search for pictures in the adventcalendar cluster.

Kid’s Paper Table Cover

Tuesday, October 23rd, 2007

kids-table-with-judah.gif

To make eating at the “kids table” seem like a more fun idea, I wanted to create a special spot decorated just for them. This would be great for Thanksgiving or family meals and if it’s messy when they are done, just throw it away! It would also be fun to stamp the child’s name at their place, or let them color in the stamps or draw on the paper if the meal is done and you want them to stick around a little longer with the family.

Supplies needed:
Craft paper, brown or white traditionally, but any color
Rubber stamps
Stamp ink
Tape

kids-table-1.gif

I went ahead and taped the runner to the bottom of the table to make it easier to stamp. Then I created a pattern around the paper with the pumpkin, leaf, acorn, and swirl of wind stamps in different colors. Obviously my boy couldn’t stay away from my display.

kids-table-detail.gif

Making your own mini journal

Thursday, July 5th, 2007

mini-books.jpg

My name is Jennifer, and I love all things having to do with paper. But recently journals that I see in stores just haven’t been doing it for me. I don’t want just lined paper, scrapbook paper or watercolor paper… and I don’t want 15 different journals going all at once (though I must stress I have no problem with owning 15 journals at one time).

With this in mind I started to ponder making my own book. What better way to solve my dilemma than to make something with whatever kind of paper I wanted. I started to read and read on book binding, but I didn’t want to invest in an entirely new hobby, not yet anyway… I simply wanted to try it.

So I took all of this information that I gathered and made my very own mini journals. My supplies were as follows:

  • ~ paper (of all kinds)

  • ~ ruler
  • ~ yarn
  • ~ embroidery thread
  • ~ sewing and embroidery needles
  • ~ a Popsicle stick
  • ~ heavy books (I used Shakespeare’s Complete Works and a Norton Anthology)
  • ~ buttons
  • ~ other random crafty bits

I picked my size of paper (6×6 in this case) and cut the paper I had chosen to fit. I used all sorts of paper… from notebook paper to fancy scrapping paper to card stock. I also ended up using multiple sizes of paper- some 3×3 or 4×3. This created an interesting layering effect in the finished journal.

open-books.jpg

Once I cut my paper I folded it in half using my trusty Popsicle stick to make a proper fold. I then used my ruler to measure and punch 8 holes in the center of the fold. I used the needles to make the holes. Then came the fun bit of assembling the book. I put the paper together and then used my yarn and embroidery needle to sew the book together. Once it was together I placed the book under the heavy books and waited…… The next morning my lovely little journals emerged in all their splendor. I then used buttons, paper and chip board letters to decorate the covers of the journals.

blue-buttons.jpg

I may end up becoming more serious about book binding at some point, but for now this is a lovely and inexpensive way to try your hand at book binding and to have a journal that is uniquely yours.

To learn more about the proper way to bind a book take a look at this website, which is truly informative and offers some excellent tips that can be used in any paper binding experience.

Make your own paper

Thursday, June 28th, 2007

Hello. My name is Joanna and I’m a paper addict. I hoard paper of all kinds. I do not discriminate against any texture, type or color. I love it all and never knowing when I might need it for a project, I keep it all. When I can no longer keep track of all the scraps, I know I must do what any self-respecting paper addict must do – make more paper! Here’s how I go about it.

First, gather your supplies:

  • ~ Paper scraps with a matte finish (newspaper, tissue paper, construction paper or junk mail but try to avoid the glossy ads)
  • ~ Several towels you don’t mind getting dirty
  • ~ Blender
  • ~ Deckle (this is what you use to strain the pulp, more on that later)
  • ~ Container large enough to fit your deckle (my deckle makes a letter sized sheet of paper so I have found a large plastic storage bin works for me)
  • ~ Sponge
  • ~ Iron (optional)

To begin, you have to make your pulp:

1. Fill your plastic container with several inches of water. You need enough to submerge the deckle completely.

2. Tear your papers into small pieces about 1 inch square and add to the water.

3. Let soak until all of your pieces are completely wet. Any dry pieces will not break up entirely and will leave specks in your finished product. This can be desirable so feel free to vary your soaking times until you get the look you want.

4. With the blender 2/3 full of water, add your soaked pieces of paper and blend until smooth. This also varies the look of the finished product so feel to play with your blending times. Just remember that the smoother the pulp, the smoother the finished product.

5. Return processed pulp back to the plastic storage bin, stir to evenly distribute.

cd_jm_tutorial-1.jpg

Next, you need to form the sheets. The shape of your deckle will determine the shape of your paper. I purchased mine at my local craft store but you can also make your own by using window screen stapled to a wood frame. I have never tried this so let me know how it turns out if you do!

1. Hold your deckle at an angle as you slide it into the pulp mixture. I go straight to the bottom of the container.

2. Swish it around while it’s submerged. This ensures an even layer of pulp covers the deckle.

3. Keeping the deckle horizontal, remove it from the water and let it begin draining. At this point you can move the pulp around if you need to.

4. Using the sponge, wipe across the screen side of the deckle to remove excess water. Take care how much you tilt the deckle as the pulp can still slide around.

5. I set my deckle on the side of the container to drain while I get the next step set up.

cd_jm_tutorial-1-1.jpg

The next step is called couching (pronounced cooching)

1. Place a layer of towels on your surface.

2. Place the deckle screen side down onto the towels.

3. Lay another towel over top of the formed sheet (will be against the pulp) and press with your hands and the sponge to remove additional water.

4. Turn out sheet onto first layer of towels. Sheet should be dry enough to just fall off the deckle. If not, flip and press again. If this makes you nervous, leave the towel on the pulp and turn out the sheet onto it.

5. Layer sheets between towels and press to remove additional water.

6. Remove sheets and lay flat to dry.

cd_jm_tutorial-2-1.jpg

The last step is drying the sheets with an iron (which is optional). I like to iron my sheets dry not only because I’m horribly impatient but because the iron gives the paper a smooth finish.

1. With iron on high, start ironing the wet sheet while still sandwiched in between a towel.

2. Iron until towel starts to feel dry (enjoy the steamy facial in the process!)

3. Pull back top layer of towel and iron sheet itself. When the iron skips right across the sheet you’ll know it’s ready to be ironed directly. It will stick and pull the pulp if it’s not ready.

4. Iron until sheet is crisp and dry.

cd_jm_tutorial-3.jpg

A note about colors:

The pulp will always be a few shades darker than the finished product. I like to use solid colored cardstock or tissue paper color the pulp. Since it’s heavier, the cardstock adds a nice speckle to the finished paper. Take care when using strong colors as the dyes can stain clothing.

cd_jm_tutorial-4.jpg

Clean up:

I like to do this outside because I make a mess whenever I do anything crafty. Since I’m already outside, I just dump the any left over pulp mixture in the yard when I’m finished (the pulp hangs around for a bit so choose an out of the way place for this). If you’re inside, strain the mixture before dumping it down the drain. Even outside, sometimes I will still strain it to save the unused pulp, especially if I liked the color. Once strained, press the pulp to remove as much water as possible and then let dry. The resulting chunk can be broken up and added to your next batch or add some white glue and sculpt with it!

cd_jm_tutorial-5.jpg

Here’s a sample of a few different textures and colors I’ve made recently. I simply varied the weight of the paper and how long it was processed in the blender.

cd_jm_tutorial-6.jpg

Sweets for your Sweetie

Tuesday, February 13th, 2007
vdaycookies1.jpg

In addition to being a craft-nazi, I also love to bake. So when you love to be in the kitchen and have limited funds, making food gifts is the way to go. With Valentine’s Day just a few days away, you can make some easy and delicious cookies, and package them in boxes and bags perfect for the holiday.

The box is made from posterboard and then covered in scrapbooking paper. The template I used I found here and just made it for how big I needed it. Then I glued scrapbooking paper to the outside once the box was assembled.

vdaycookies3.jpg

The cookies pictured here are sugar cookies and they are the easiest and yummiest cut-outs I’ve ever tried. The icing recipe that follows dries hard and shiny, making it a perfect recipe to stack your cookies. If you’re really not a fan of cooking or labor-intensive items, this cake cookie recipe is super easy, and takes no time and effort at all. Really really not a fan of cooking? Then head to your local bakery and snatch up some goodies and put them in homemade packaging. Your recipients will still thank you.

vdaycookies2.jpg

Cut-Out Sugar Cookies

1 cup butter, softened
3 3/4 cups all-purpose flour
1 cup white sugar
1/4 cup heavy whipping cream
2 eggs
2 tsp baking powder
1 tsp vanilla extract

In a large bowl, cream together the butter and sugar. Add the eggs one at a time, then the vanilla and mix until smooth. Sift together the flour and baking powder and stir into the creamed mixture alternating with the heavy cream. Cover the dough and chill for 2 to 3 hours.

Preheat oven to 350 degrees F (175 degrees C). Grease cookie sheets.

On a lightly floured surface, roll out the dough to 1/4 inch thickness. Cut into desired shapes with cookie cutters and place them 1 inch apart on the baking sheets. Bake for 12 to 14 minutes, until bottoms and edges of cookies are light brown. Remove from baking sheet and cool on wire racks. Makes approx. 4 dozen cookies.

Sugar Cookie Icing

1 cup confectioners’ sugar
2 tsp milk
2 tsp light corn syrup
1/4 tsp vanilla or almond extract
food coloring

Combine the sugar and milk until smooth, then add the corn syrup and extract until the icing becomes stiff. Add more sugar to thicken or more milk to thin. Divide into seperate bowls and tint with food coloring. Let dry atleast an hour before stacking.