Archive for the 'Quick' Category

Summer Headband

Monday, July 30th, 2007

I got this pattern here from Heather Bailey’s site. My summer swap partner sent me this cute white and black headband that I really wanted to try.

jen-headband.jpg

Heather’s pattern is free to download and was very simple to use. Her directions and diagrams were great, and this is a great way to use up those skinny pieces of fabric left over. Check it out!

I made these to send off to our Joy and a few other friends who are melting in Mexico.

summer-headbands-2.gif

summer-headbands.gif

Sea shell shadowbox

Friday, July 27th, 2007

Hi, I’m Gina. As do many others, I have always loved the beach. Growing up in Minnesota, though, there are few opportunities to be in the ocean, so I guess I tried to take advantage of all of mine by bringing the beach home with me. Thus I have accumulated a lot of shells, beach rocks, coral, and other beachy finds from various trips, some with sentimental value. For example, one of the rocks I used in the project was from the spot on a rocky beach in New Zealand where my husband proposed.

There are lots of ways to display shells – on countertops, in bowls, etc. But I wanted a way to look at the special ones all at once without them taking up too much space or requiring much dusting. So I decided to create a seashell shadow box.

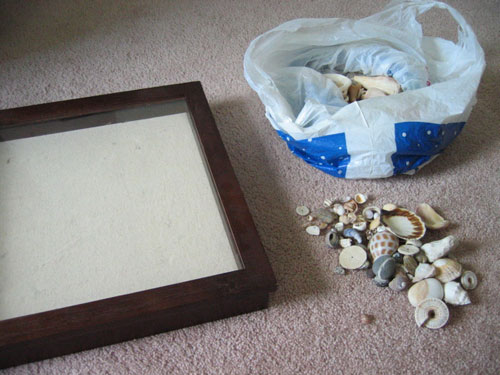
To begin, you need your collection of shells, your trusty glue gun, and a shadow box. Mine has a lovely dark wood frame and a neutral linen background that mimics sand:

shadowbox1_1.jpg

Next, you lay your shells in a pleasing pattern. You could go with a more random arrangement if you like, but I preferred to arrange them so that I could balance shape, color, and size:

shadowbox2.jpg

Then you glue! Most of mine were light enough not to require much glue, but obviously rocks or large, heavy shells will need more. Make sure when you’re gluing (and when you lay everything out) that your shells all fit when the lid is closed. One of mine (the large on in the bottom right corner) was oddly shaped and would only balance on one edge, so I paid attention to that while gluing to ensure I glued the correct edge.

shadowbox3.jpg

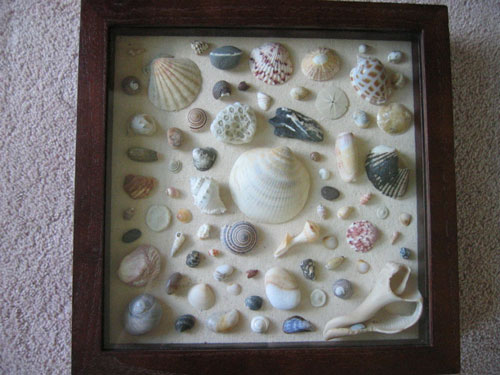
I love the finished product! I had tons of shells left over, but I liked keeping some space between the shells. I think a tighter arrangement could also be lovely, though.

shadowbox4.jpg

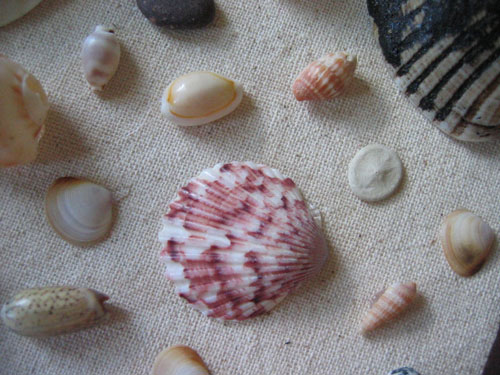
Here are close-ups of the shells and the linen background of the shadow box:

shadowbox5.jpg

shadowbox6.jpg

So have fun with your shells! I’m sure everyone has a collection of sorts that would fit nicely into a shadow box, even if it isn’t seashells.

Placemat Purse

Wednesday, July 11th, 2007

I have been wanting to try this for a while- taking a cute fabric placemat and turning it into a purse. My first one must have been pretty successful since I sold it to a friend at the craft fair before the doors opened and it was so easy to make!

placemat-bag-1.gif

Shopping for a placemat is the first fun part. At most places you can buy them individually and usually for only a few dollars. I have even seen some cute placemats at the dollar store. The first one I made had a white background, brown trim, and brown flowers embroidered on it. All I did was turn it with right sides together and sew up the sides, gusset the bottom, and added handles. I had gotten several pairs of wooden and bamboo handles at the craft store for about $3. I found brown corduroy fabric to match and sewed a piece about 6″ long to the inside of the bag on the front and back, slipping the handle inside the corduroy piece and folding it over before sewing. The placemat was sturdy and had a solid brown fabric on the back so I did not need to add a lining. The only thing I wish I had done differently was to sew the handles a little closer to the bag or make a wider handle strap so the handles would not feel too loose in the strap.

placemat-bag-kim-1.gif

These are a few of the other placemats that I have bought to try out. I am working now on making a paper crocheted placemat into a purse, which I think will look great for summer. (After Heather’s tutorials I may even be able to do the crocheting myself one of these days too!) I will post it as soon as I am done!

before-placemats.jpg

Fabric Glue Art

Thursday, June 14th, 2007

For our sweet Joy’s birthday I wanted to give her something that fit with her knitting addiction but for Joy anything plain just won’t do. So I was anxious to try out adding bling with fabric glue.

joys-knitting-basket-front1.gif

At the craft store I loaded up on huge pink rick-rack, multi-colored sequins, a velvety iron-on fleur d’ lis patch and fabric glue. I added on the patch and was glad to be able to add to the border of this knitting basket without having to take the basket and its lining apart. I simply turned under the ends of the ric-rack and sewed it vertically, then glued it, on the front and back. Then the fun part- arranging the sequin color order over the black patch. The only problem with the fabric glue was that it was a little stringy when you lifted it away from the fabric, just like using a glue gun. But when the sequins were all in place I just scraped away any excess dry glue with a pin.

joys-knitting-basket-detai.gif

It was done in no time and I am looking around now at what else I can glue bling to! The first project will be to decorate the tan knitting basket I bought for myself, then maybe to add color to floral bags I have made on the flowers, then the cat bowl, and my husbands’ briefcase…

Polymer Clay Pens

Monday, May 28th, 2007

I have found so many fun things to do with my polymer clay this was my first try at a pen for Candace on her birthday.
img_0084.jpg

I always knew that this stuff would be a good time but didn’t think it would be this fun! You basically construct everything as you normally would, bake at the same time and degree that the instructions say, just be careful when touching the pen tip after baking as it will be quite hot.

img_0083.jpg

Then thanks to Joanna’s tips on making canes in different colors I came up with this. It makes me so happy to write with it.
img_0044.jpg

Flower Loom How-to

Monday, April 30th, 2007

I needed a flower loom for a crochet project I’m doing, but didn’t have one. I went to three different craft stores and no success of finding one. I could order one off the internet, but that’s more money and time than if I just made one myself. So I headed back to the craft store in search of supplies.

flower-loom1.jpg

All you’ll need is a 3/16″ wooden dowel, a package of wooden rounds, scissors/small saw, and some glue. I used hot glue for this tutorial, but you may want to use a wood glue or fast-drying epoxy, since the hot glue won’t hold up to a lot of tugging and pulling. And if you can’t find round wooden shapes, you can always use square ones, and make a circle using a compass. You’ll cut (or saw, whichever is easier) your dowell into 1 to 2-inch pieces. For a larger loom, you’ll want 10-12 pieces. First, glue four pieces to the opposite sides. You can mark the center of the circle with a pen so you place the pieces evenly.

flower-loom2.jpg

Then you’ll position the remainder of the pieces in place.

flower-loom3.jpg

You can do the same with smaller rounds, making different shape looms. For the large loom I used 12 pegs, for the medium, 8, and for the small, 6.

flower-loom4.jpg

Now you can embellish anything, using yarn, ribbon, or even twine.

flower-loom5.jpg

flower-loom6.jpg

Quick Jean Fix

Wednesday, April 18th, 2007

My boy has trouble keeping his pants pulled up. Well, since he is only 15 months old I am not too worried about it yet, but I would like him to be able to wear the box of new pants he has before it is too hot for pants. He is 15 mo. but barely wears 12 mo. pants because he is a skinny little guy. Even the half-elastic waistband is often not enough so I borrowed this idea usually found in clothing for fast-growing elementary and pre-teens: the inner adjustable button.

jean-fix.gif

All you need is: elastic, 2 small buttons, a seam ripper, and sewing machine or needle.

1. I cut 2 pieces of 1/2″ elastic about 2″ long. (adjust to the amount you need garment taken in)
2. I used the seam ripper to cut a slit to fit my button toward the end of each elastic piece. (this was easier than using the button holer, if it frays a little it will be okay.)
3. Line up how much you want the elastic drawn in and sew button into pants.
4. With button through your elastic hole, pull elastic to desired place and sew vertically over opposite elastic end. I did not make it adjustable with more than one button but you easily could.

jean-fix-2.gif

This literally took me about 5 minutes and I think will save me some money if I don’t have to skip a season with his pants. Any other tips for fitting thinner kids in their clothes?

Quick Fix

Monday, March 19th, 2007

I have been feeling kinda poopy lately. Brian and I have been getting over a mean cold. It is so hard to be creative when you are feeling bad. I wanted to make something quick just to prove to myself that I’m still a crafting genius. Just something to make me feel better. Ah ha! Glam it up! Of course! What could be more fantastic and more importantly, FAST! I just needed a quick fix. Found this at Michaels for a $1 yippee! You just iron it on. Sweet!
img_0067.jpg

Ahhh Delight. I still have it in me, and my baby’s got bling :)

img_0095.jpg

Now as long as she doesn’t chew it off we’re good. tee hee.