


A star toe is a unique design often used in knitting, particularly for socks. It’s called a “star toe” because the stitches come together at the top, creating a star-like shape.
This type of toe finish is great for achieving a snug and comfortable fit, making it a popular choice for hand-knit socks. If you’re a beginner or an experienced knitter, the star toe can be a fun technique to try.
In this blog, I’ll show you how to knit the perfect star toe and explain the steps in a simple, easy-to-follow way. Let’s get started and add this cool technique to your knitting skills!
Understanding the Structure of the Star Toe
The star toe is a way to shape the end of a sock so that it closes in a neat, star-like pattern. Instead of having a flat or pointed finish, the decreases in this method create a rounded look with lines that meet at the center. This makes the toe comfortable and gives the sock a smooth finish without bulky seams.
The star toe is made by evenly spacing decreases around the sock. These decreases pull the stitches together to form a swirl or star shape. The number of decrease points can vary, but most star toes use four or eight sections.
One great thing about this method is that it doesn’t need grafting, like the Kitchener stitch. Instead, you simply pull the yarn through the last stitches and tighten it. This makes the star toe an easy and clean way to finish a sock.
Benefits of the Star Toe
The star toe is a great way to finish a sock. Here’s why many knitters love it:
1. Comfortable fit: The rounded shape hugs the toes nicely, making socks feel cozy and natural.
2. No bulky seams: Since the decreases come together smoothly, there’s no thick seam to rub against your toes.
3. Even shaping: The stitches decrease evenly around the sock, creating a balanced and symmetrical look.
4. Easy to finish: Unlike some other toe methods, the star toe doesn’t require grafting. You pull the yarn through the last stitches and tighten it.
5. Works with different sock styles: Whether you knit socks from the toe up or top down, you can use the star toe.
6. Neat and durable: The way the stitches come together makes the toe strong and less likely to wear out quickly.
This method is simple, looks great, and makes socks extra comfy!
Yarn and Materials Needed
1. Yarn
- Sock-weight yarn: Also called fingering weight, this is the most common for socks because it’s soft, durable, and not too thick.
- Wool blend: A mix of wool and nylon works best since it’s warm, stretchy, and strong. Wool keeps feet cozy, while nylon helps the sock last longer.
- Cotton or bamboo (optional): If you want a lighter sock, you can use cotton or bamboo, but they won’t stretch as much as wool blends.
2. Needles
- Double-pointed needles (DPNs): A common choice for knitting in the round, especially for the toe section.
- Circular needles (magic loop method): A long circular needle (32 inches or longer) works well if you prefer fewer needles.
- Right size for your yarn: Most sock yarns need US size 1-3 (2.25-3.25mm) needles, but check your yarn label for the best match.
3. Other Materials
- Stitch Markers: These help track where to make decreases for an even star shape.
- Tapestry Needle: This large needle helps you tuck in loose yarn at the end so the sock stays neat.
- Scissors: Needed for cutting yarn cleanly after finishing your toe.
These basic materials will make it easy to knit a star toe that looks great and fits well!
Step-by-Step Guide to Knitting the Star Toe
Knitting a star toe is simple once you get the hang of it. This method creates a smooth, rounded finish without bulky seams. Follow these steps to get a neat and comfortable toe for your socks.
Step 1: Get Your Sock Ready
- Before starting the star toe, make sure you’ve finished knitting the foot of your sock. Stop when the sock is about 1.5 to 2 inches shorter than your full foot length. This leaves enough space to shape the toe properly.
- If you’re knitting top-down (starting from the cuff), you’ll decrease stitches toward the toe. If you’re knitting toe-up, you’ll increase stitches to build the foot before reaching this step.
Step 2: Start the Decrease Rounds
The star toe is shaped by gradually decreasing stitches in a circular pattern. You’ll do this by knitting two stitches together at set points around the sock. First decrease round:
- Knit 6 stitches, knit 2 together (K2tog)
- Repeat this all the way around
You should now have fewer stitches on your needles.
Step 3: Keep Decreasing in a Star Pattern
Now, continue the decrease rounds by reducing the number of stitches between each decrease:
- Knit 5 stitches, K2tog (repeat around)
- Knit one round normally
- Knit 4 stitches, K2tog (repeat around)
- Knit one round normally
Keep repeating this process with fewer and fewer stitches until you see a star-like pattern forming as the decreases pull the stitches together.
Step 4: Closing the Toe
- Once you have 8 to 10 stitches left, it’s time to close the toe. Cut the yarn, leaving a 6-inch tail, and thread the tail onto a tapestry needle.
- Insert the needle through the remaining stitches, pulling them tight like a drawstring. Pull firmly to close the gap. Weave in the yarn tail on the inside of the sock to secure it.
Step 5: Finishing Touches
- Check the fit: Try on your sock to make sure the toe feels smooth and comfortable.
- Weave in all loose ends: Use your tapestry needle to tuck in any leftover yarn so the inside stays neat.
- Block if needed: Lightly dampen and shape the sock to help the stitches settle.
Check out this YouTube video by @RoxanneRichardson for visual guidance.
That’s it! You’ve finished a star toe. This method gives a clean, rounded shape without extra seams, making it a great choice for comfy socks.
How to Adjust the Star Toe for Different Sizes
Not all feet are the same, so adjusting the star toe is important to get the right fit. Whether you’re knitting for small, medium, or large feet, here’s how to make sure the toe feels comfortable.
1. Change the Number of Stitches
The number of stitches you start with will affect how the toe fits. If your sock has more stitches, the star toe will take longer to decrease. For fewer stitches, the shaping will be quicker. Here’s a simple guide:
- Small size: Start with fewer stitches (around 48-56 stitches for a sock).
- Medium size: Stick to the usual stitch count (56-64 stitches).
- Large size: Cast on more stitches (64-72 stitches or more).
2. Adjust the Toe Length
- If you like a snug toe, start decreasing earlier (about 2 inches before the end of your foot).
- If you want more room, wait until 1.5 inches before your foot length.
3. Add or Remove Decrease Rounds
The basic star toe decreases every few stitches, but you can adjust the spacing:
- For a wider toe: Add a few extra knit rounds between decreases.
- For a sharper toe: Skip the extra knit rounds so the decreases happen faster.
With these simple adjustments, you can make sure your star toe fits just right!
Variations of the Star Toe
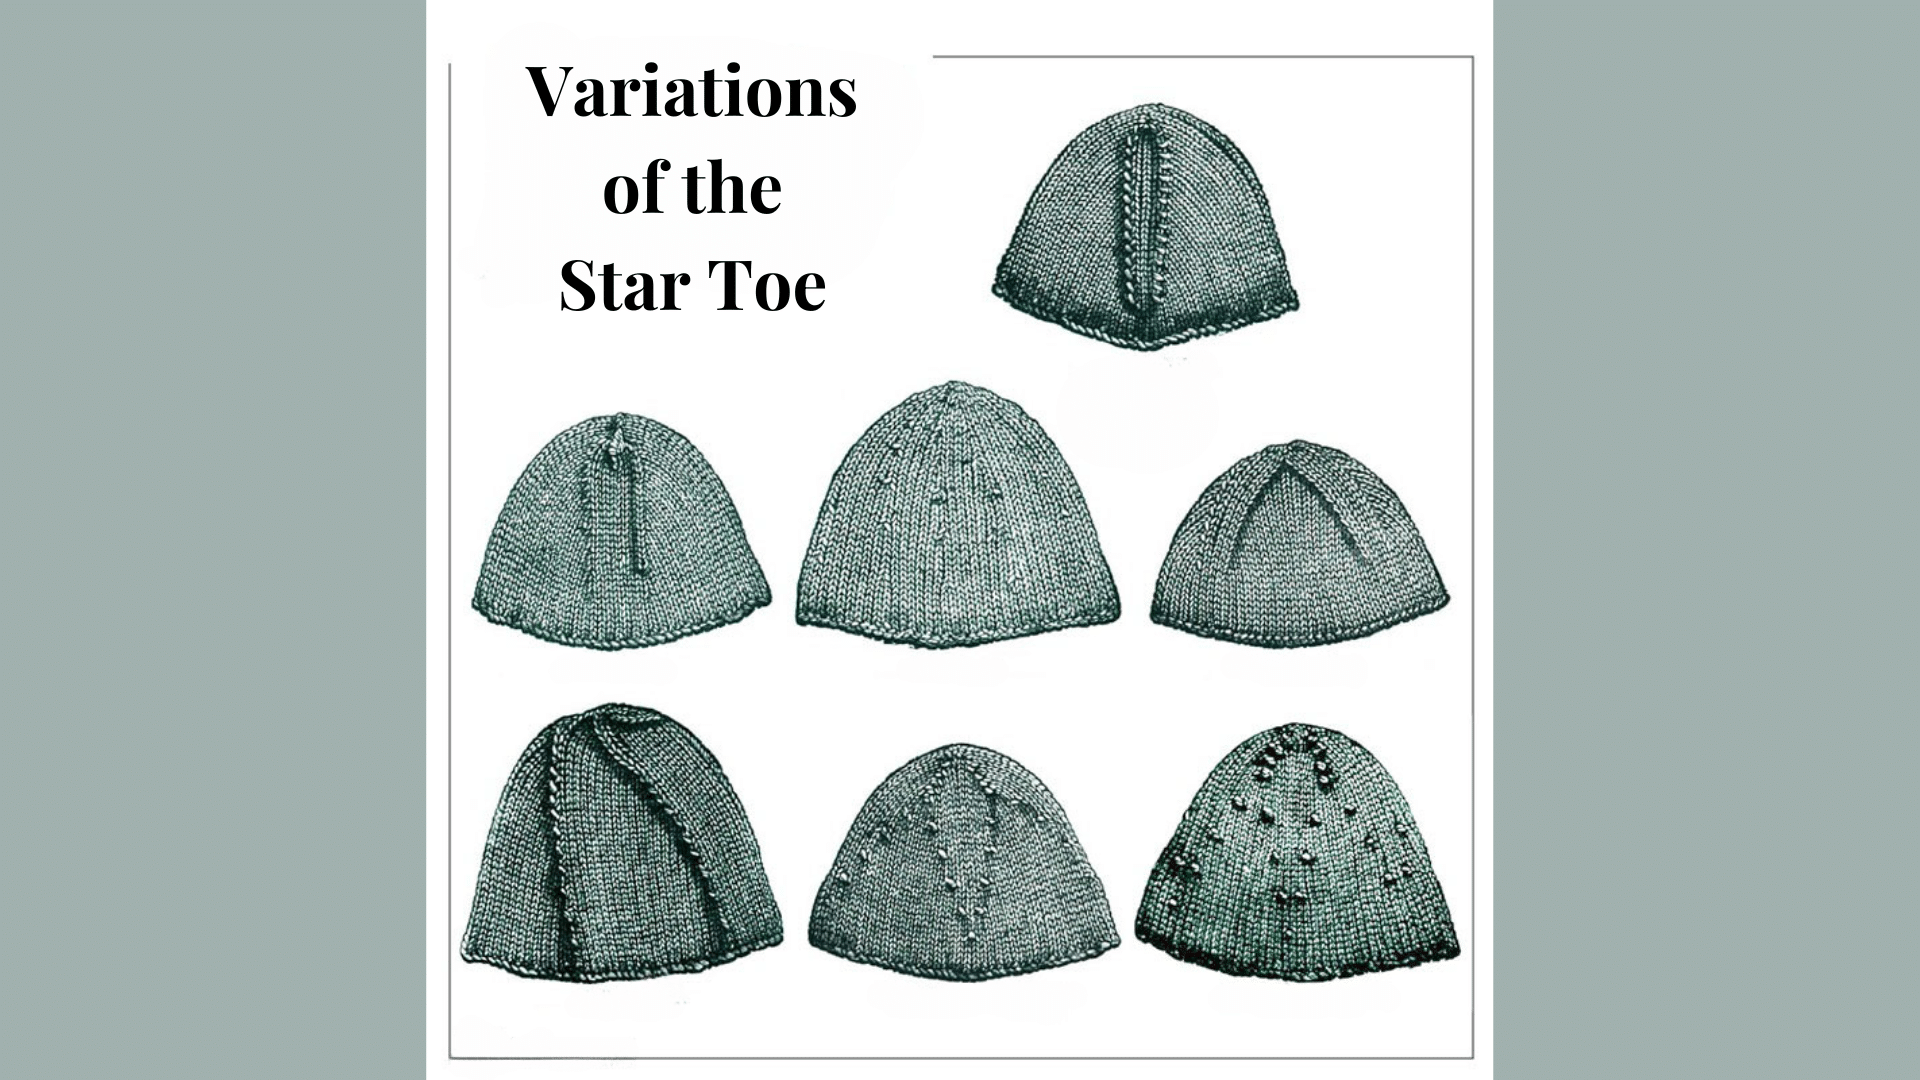
The star toe is a great way to finish a sock, but did you know there are different ways to knit it? A few variations to get the look and fit you want are:
1. Four-Point vs. Eight-Point Star Toe
The classic star toe has four decrease points, but some versions use eight for a different shape.
- Four-point star toe: This is the most common style. The decreases happen in four spots around the sock, creating a clean and simple star shape.
- Eight-point star toe: This version has twice as many decrease points, making the toe look more rounded. It spreads the decreases out, which can feel smoother on your toes.
2. Top-Down vs. Toe-Up Star Toe
The star toe can be used in both top-down and toe-up socks.
- Top-down (cuff to toe): This is the most common method. You knit the sock from the cuff down and start the star toe when the foot is the right length.
- Toe-up (toe to cuff): Instead of decreasing, you start with a few stitches and increase in a star pattern until the toe is the right size. Then, you continue knitting the foot and cuff.
3. Decorative Star Toe
Some knitters like to make their star toe stand out by using different stitch patterns. You can try:
- Purl ridges: Adding a few purl rounds between decreases makes the star design pop.
- Color changes: Stripes or contrasting yarn can make the toe look more interesting.
The star toe is flexible, so feel free to experiment and find the best version for you!
Why Choose a Star Toe Over Other Toe Shapes?
There are different ways to finish a sock, but the star toe is a favorite for many knitters. Here’s why it stands out compared to other toe shapes.
1. No Grafting Needed: Some toe styles, like the wedge toe, require the Kitchener stitch to close the sock. The star toe skips this step. You just pull the yarn through the last stitches and tighten it—easy and fast.
2. Even, Rounded Shape: The decreases in a star toe are spread out evenly around the sock. This creates a smooth, rounded finish instead of a flat or pointy shape.
3. No Bulky Seams: Since the decreases happen in a circular pattern, there are no thick seams pressing against your toes. This makes the sock more comfortable, especially for everyday wear.
4. Works for Any Sock Style: The star toe can be used for both top-down and toe-up socks. It’s flexible and works well no matter which direction you prefer to knit.
5. Looks Neat and Decorative: Unlike some toe shapes that look plain, the star toe creates a subtle, swirled design at the end of the sock. It’s a small detail, but it adds a nice touch.
If you want a simple, comfortable, and easy-to-knit sock toe, the star toe is a great choice!
Common Mistakes to Avoid
Knitting a star toe is simple, but small mistakes can affect the final look and fit. Here are some common problems and how to fix them.
-
Uneven Decreases: If the decreases don’t line up, the star shape won’t form properly. Use stitch markers to keep track of decrease points.
-
Holes Between Decreases: This happens when stitches are too loose. Try pulling the yarn a little tighter after each decrease to close gaps.
-
Toe Feels Too Tight or Too Loose: Start decreasing earlier if the toe feels tight or later if it feels too roomy. Trying the sock on before closing the toe helps.
-
Messy Finish: If the final stitches don’t pull together smoothly, weave the yarn through twice before tightening to create a neater closure.
Fixing these small mistakes will give you a well-shaped and comfortable star toe!
Conclusion
The star toe is a simple and neat way to finish a sock. It creates a smooth, rounded shape without bulky seams, making it comfortable to wear. Plus, it’s easy to knit as there is no tricky grafting is needed!
You can get a perfect star toe every time by following the steps and avoiding common mistakes. One of the best things about this method is how flexible it is. You can adjust the size, try different variations, and even add little details to make it your own
Whether you’re knitting socks for yourself or someone else, the star toe is a great choice for a clean and professional finish. Grab your needles, pick your favorite yarn, and start knitting.
Frequently Asked Questions
Why is it called a star toe?
It’s called a star toe because the decreases form lines that meet at the center, creating a star-like shape. This design looks nice and gives a snug, even fit.
Is the star toe better than a wedge toe?
It depends on preference. The star toe is more rounded, while the wedge toe is sharper. The star toe doesn’t require grafting and feels smoother.
Can I use the star toe for toe-up socks?
Yes! Instead of decreasing, you start with a small number of stitches and increase in a star pattern. This creates the same rounded effect as in top-down socks.
Why does my star toe have holes?
Holes happen when stitches are too loose around the decrease points. Try knitting a little tighter or using a smaller needle size to close the gaps.
Can I change the number of decrease points?
Yes! Most star toes use four or eight decrease points. Four creates a classic shape, while eight gives a more rounded look with smaller decrease sections.


