


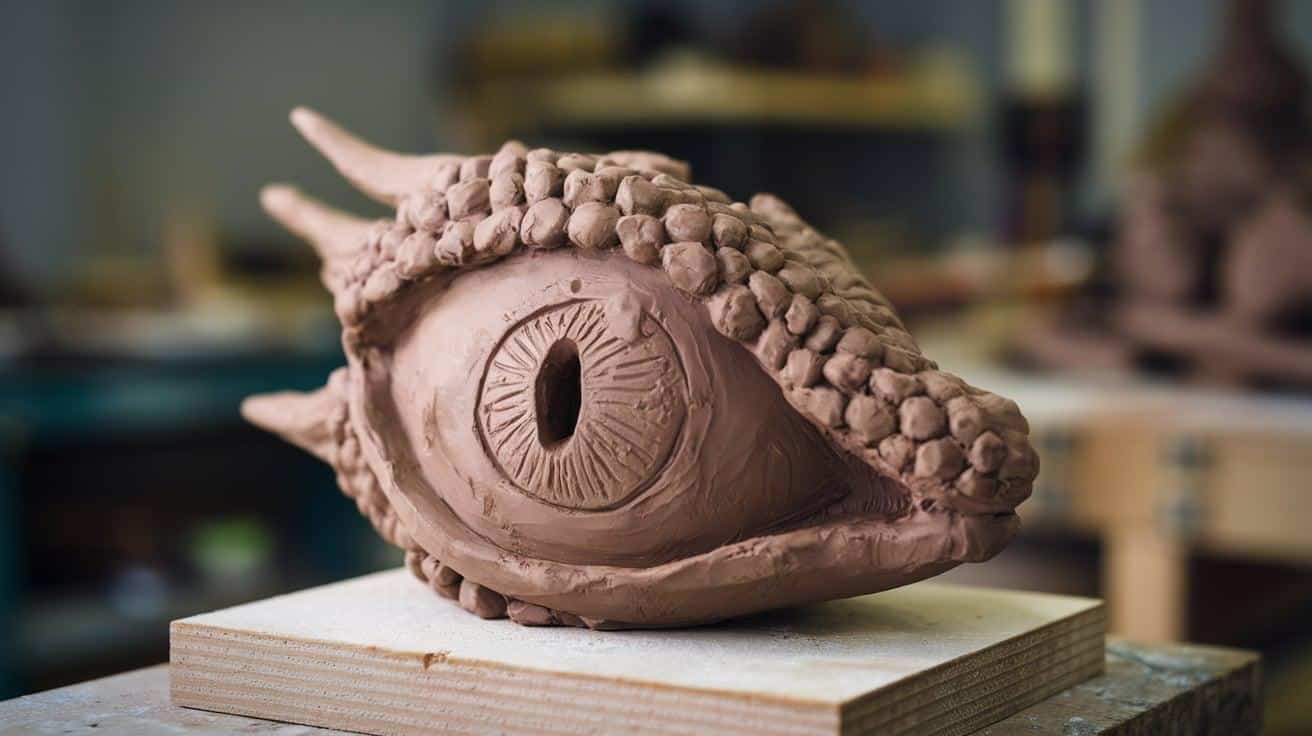
Ever wanted to bring a mythical creature to life with your own hands? You’re in the right place.
This guide will show you how to sculpt a realistic dragon eye from clay—from basic shaping to adding those spine-tingling details that make it look alive.
I’ll walk you through:
- Choosing the right materials
- Building the basic eye structure
- Creating realistic scales and textures
- Painting techniques that add depth
- Mounting your finished piece
The steps are straightforward, even if you’ve never sculpted before. By the end, you’ll have a dragon eye so realistic you might catch it watching you from your shelf.
Let’s bring your dragon to life!
Materials Needed
Before we start, let’s gather everything you’ll need. Having all your supplies ready makes the creative process much smoother.
Here’s what I use when making dragon eyes:
- Polymer clay in several colors (black, white, and your choice of eye color)
- Clear glass cabochon or marble (for the iris)
- Basic sculpting tools (you can use toothpicks in a pinch!)
- Acrylic paints
- Small paintbrushes (sizes 0 and 00 work great)
- Gloss varnish
- Baking sheet and oven
Don’t worry if you don’t have fancy tools. I made my first dragon eye using a butter knife and a chopstick!
The most important material? Patience.
Your clay will pick up on your energy. When you rush, it shows in your work. Take breaks if you need to.
Ready to transform these simple materials into something magical? Let’s get started!
Preparation Steps
Before we get started, let’s get your supplies ready. I’ll keep it simple so you’ll know exactly what you need.
First, gather your materials:
- A block of air-dry clay
- Sculpting tools or items from around the house (like a butter knife or toothpick)
- A clean work surface
- Acrylic paints
- A small paintbrush
- A cup of water
Next, set up your space:
- Choose a flat, well-lit area to work.
- Lay down a sheet of wax paper or a cutting board to protect your surface.
- Have a damp cloth or sponge nearby for cleaning up.
By the time you’re done, you’ll have a well-prepared workspace. This will make the process smoother and more enjoyable.
Step-By-Step Creation Process
Here’s the step-by-step process to make it from scratch. You’ll learn how to shape the clay, add details, and paint it.
By the end, you’ll have a realistic dragon eye sculpture you can be proud of.
1. Creating the Base Structure
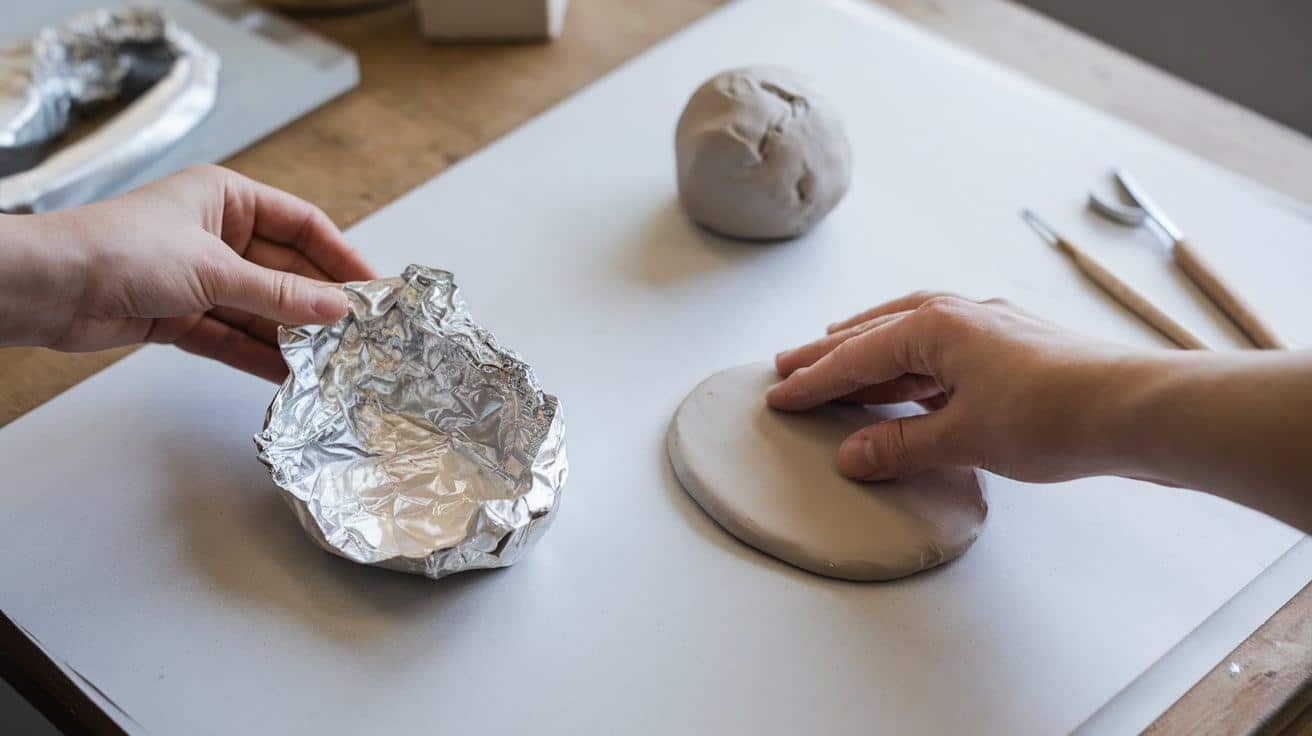
Let’s start with the foundation of the dragon eye sculpture. A strong base makes everything easier. I’ll walk you through it so you’ll know exactly what to do.
Here’s what you’ll need:
- Aluminum foil
- A small ball of clay
- Basic shaping tools
Build the Core
I’ll begin by shaping aluminum foil into a rough oval. You’ll do this to create the eye’s basic form.
Just ball up the foil, then press it flat on one side to rest steadily on your workspace. This step is quick and simple.
Cover the Core with Clay
Next, I’ll take my ball of clay and gently press it around the foil. You’ll do the same. Cover the foil completely, smoothing as you go. This layer doesn’t need to be perfect yet. The key here is creating a stable surface to work on later.
2. Sculpting the Iris and Pupil
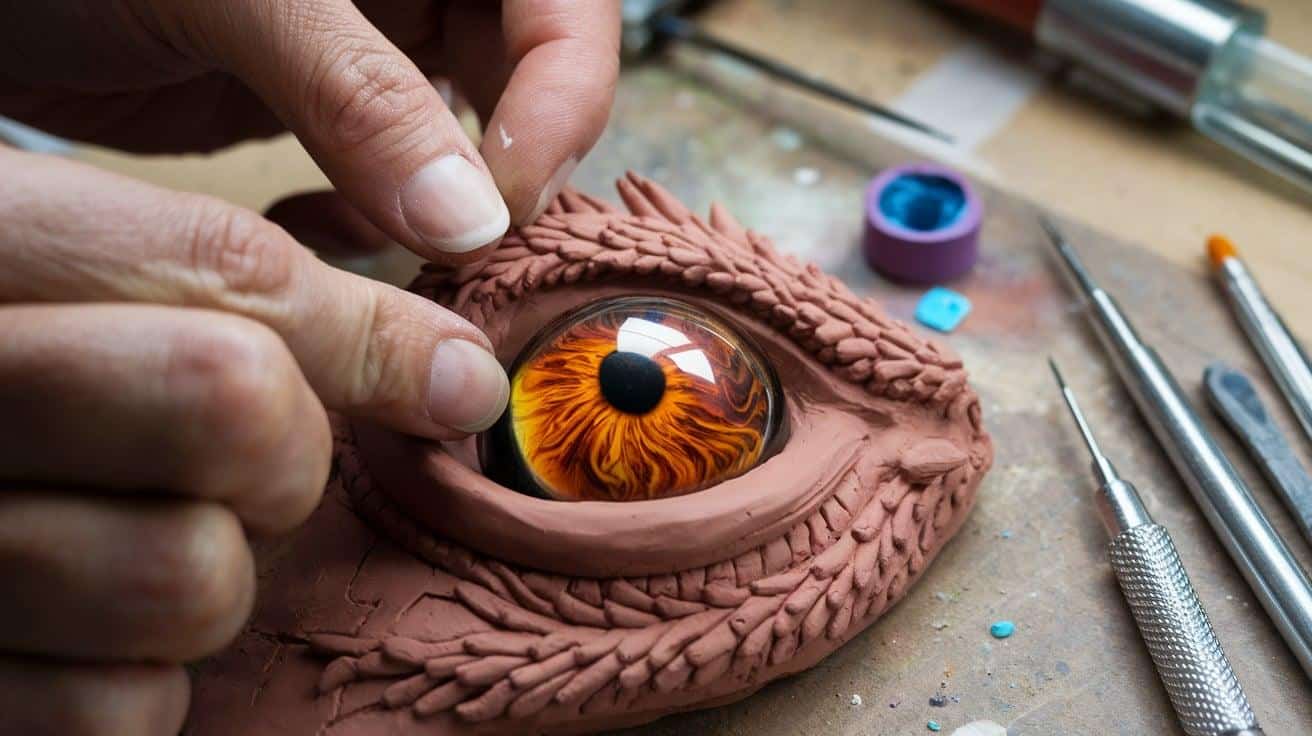
Let’s focus on the most striking part of your dragon eye – the iris and pupil. This is what gives your creation its hypnotic quality. I’ll show you how to make it look realistic and captivating.
Here’s what you’ll need:
- Glass cabochon or clear marble
- Colored clay for the iris
- Black clay for the pupil
- Fine detailing tools
- Small paintbrush
Prepare the Iris Base
I’ll begin by selecting a glass cabochon for the eye. You’ll place this into the socket we created earlier, making sure it fits properly.
Just press it gently into position to see how it sits. This will be the foundation for your dragon’s gaze.
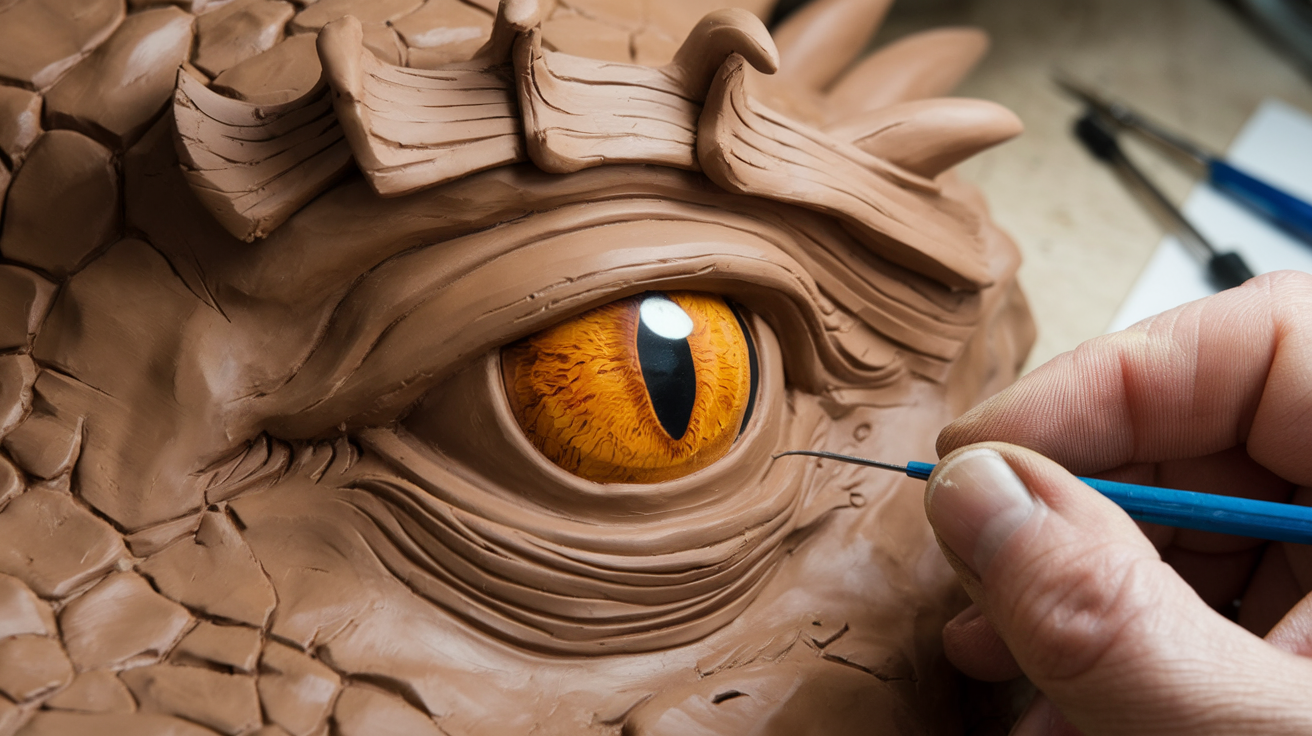
Create the Iris Details
Next, I’ll roll out very thin sheets of colored clay. You’ll want to choose vibrant colors that reflect your dragon’s personality – amber, emerald, or sapphire tones work beautifully.
Layer these thin sheets under the glass, adding swirls and patterns to mimic a reptilian iris. Remember to leave space in the center for the pupil.
3. Detailing the Scales
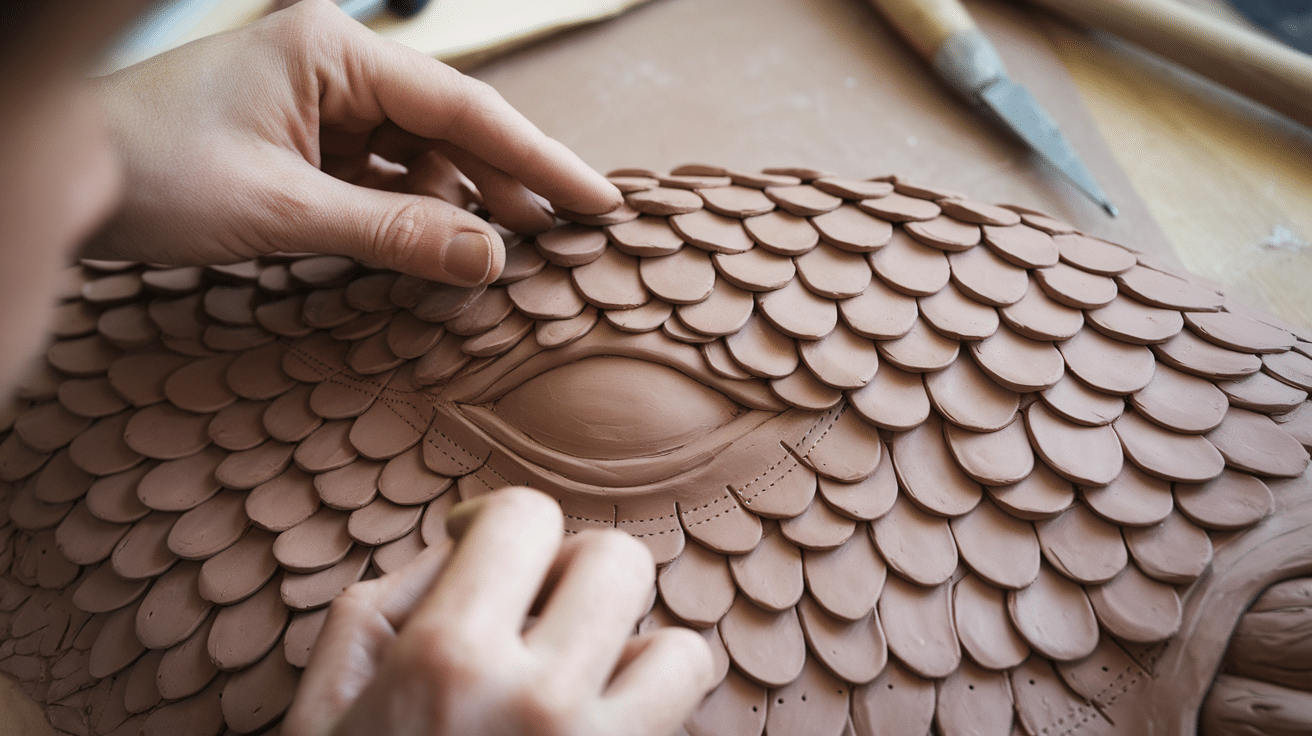
Let’s move on to creating those distinctive dragon scales that will bring your sculpture to life. This step transforms a simple eye into something truly magical. I’ll guide you through the process so you can achieve amazing results.
Here’s what you’ll need:
- Small amounts of clay
- Clay cutting tool or knife
- Texture tools (toothpick, pen cap, etc.)
- Reference images of reptile scales (optional)
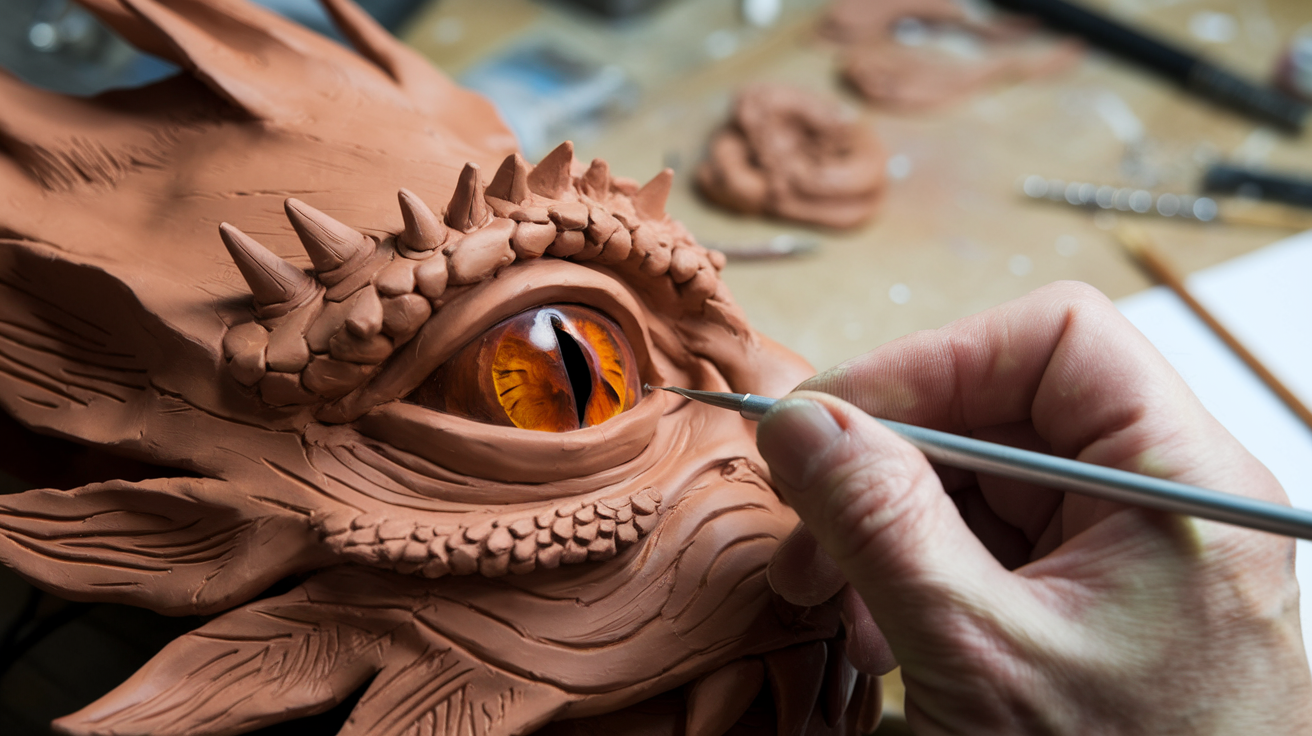
Create the Scale Pattern
I’ll start by planning where my scales will go. You’ll want to arrange them in a natural pattern around the eye.
Take a moment to look at lizard or snake photos if you need inspiration. Just mark light guidelines with your tool to map out the scale placement. This helps create a cohesive look.
Form Individual Scales
Next, I’ll roll tiny bits of clay into balls, then flatten them into teardrop or diamond shapes. You’ll make dozens of these in slightly varying sizes. The scales closer to the eye should be smaller, while the outer scales can be larger.
Press each scale onto your base, overlapping them slightly like shingles on a roof. Work in sections, moving outward from the eye socket.
4. Creating the Eyelids and Surrounding Features
Let’s focus on adding realistic eyelids and textures to make your dragon eye look alive and expressive. These details make all the difference in your finished sculpture. I’ll walk you through each step so you can create something truly impressive.
Here’s what you’ll need:
- Small amounts of clay
- Clay smoothing tool
- Fine detailing tool or needle
- Reference images of reptile eyes (optional)
Form the Basic Eyelids
I’ll start by rolling two thin strips of clay for the upper and lower eyelids. You’ll place these along your eye socket’s top and bottom edges.
Just press them gently into place, allowing them to overlap the eye slightly. This immediately gives your sculpture more dimension.
Shape and Texture the Eyelids
Next, I’ll use my fingers and tools to shape the eyelids into natural curves. You’ll want to make them thicker at the edges and thinner where they meet the eye.
Add small wrinkles and folds using your detailing tool. These subtle lines make the eyelids look flexible and realistic.
5. Adding Final Sculptural Elements
Let’s add those special details that will make your dragon eye unique. These finishing touches transform a good sculpture into something extraordinary. I’ll show you how to take your creation to the next level.
Here’s what you’ll need:
- Small bits of clay in various colors
- Fine detailing tools
- Wire or toothpicks
- Reference images for inspiration
Create Surrounding Features
I’ll add small ridges and horny protrusions around the eye area. You’ll want to place these strategically to enhance the dragon’s fierce appearance.
Just roll tiny clay snakes or cones and attach them where the brow ridge or cheekbones would be. These details suggest the full dragon face, even though we only sculpt the eye.
Add Texture and Definition
Next, I’ll use my tools to create skin texture around the scales. You’ll develop small wrinkles and pores that make the sculpture look more realistic.
Press your tool gently into the clay, varying the pressure to create natural-looking imperfections. Nature isn’t perfect, and neither should your dragon eye be!
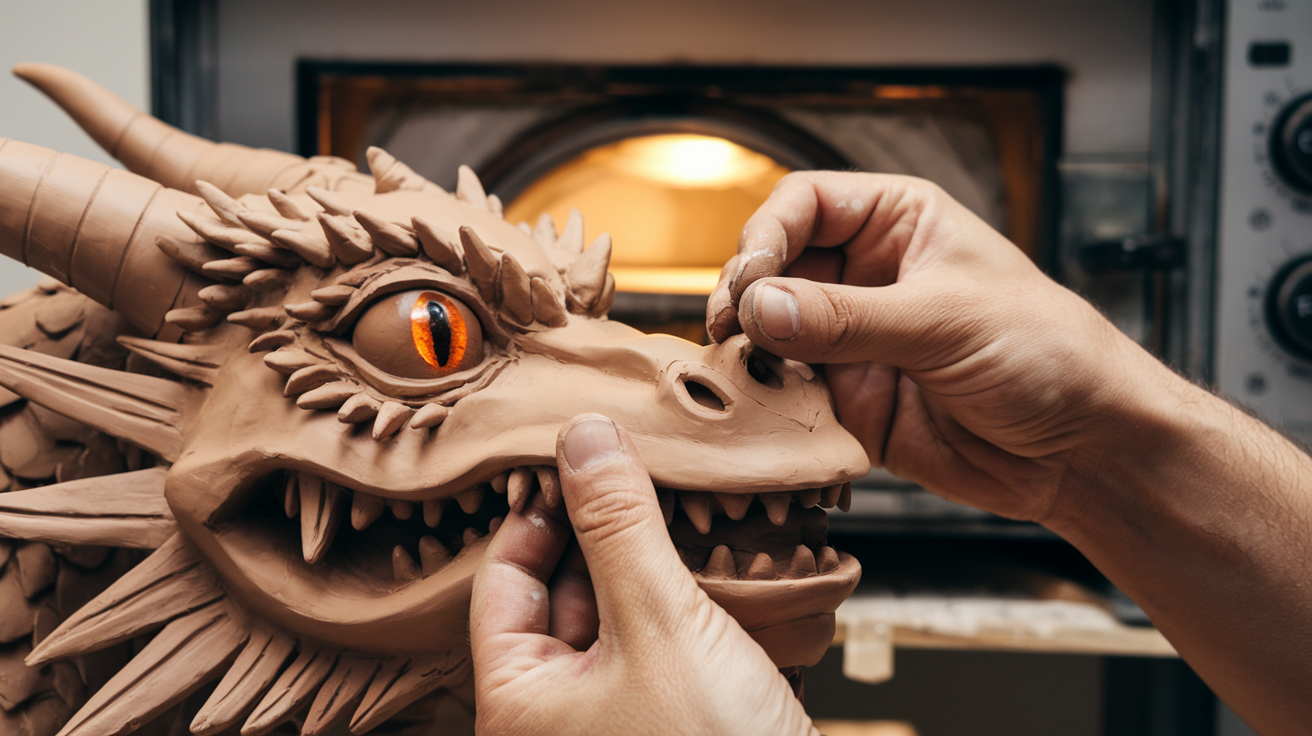
6. Baking/Curing Process
It’s time to make your dragon eye permanent with proper baking. This step transforms soft clay into a durable sculpture. I’ll walk you through the important details so you can avoid common mistakes.
Here’s what you’ll need:
- Oven or toaster oven
- Oven thermometer
- Ceramic tile or baking sheet
- Aluminum foil
- Timer
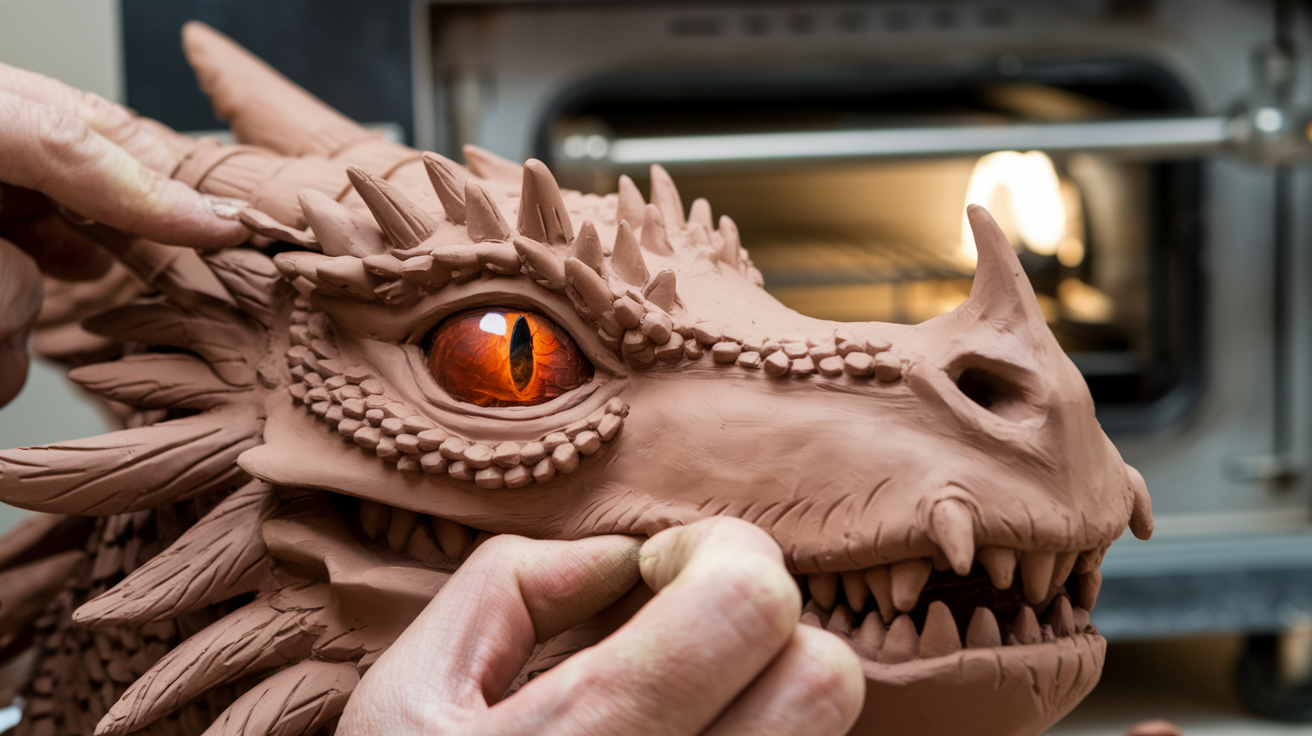
Prepare Your Sculpture
I’ll check my dragon eye for fingerprints or unwanted marks. Before baking, you’ll want to smooth these out with a tool or your finger.
Just look carefully at your piece from all angles. Small fixes now will save frustration later.
Set Up Your Baking Surface
Next, I’ll place aluminum foil on my ceramic tile or baking sheet. You’ll do this to create a stable, heat-distributing surface for your sculpture.
Position your dragon eye carefully on this surface, ensuring it won’t roll or shift during baking. This prevents unwanted warping or flattened details.
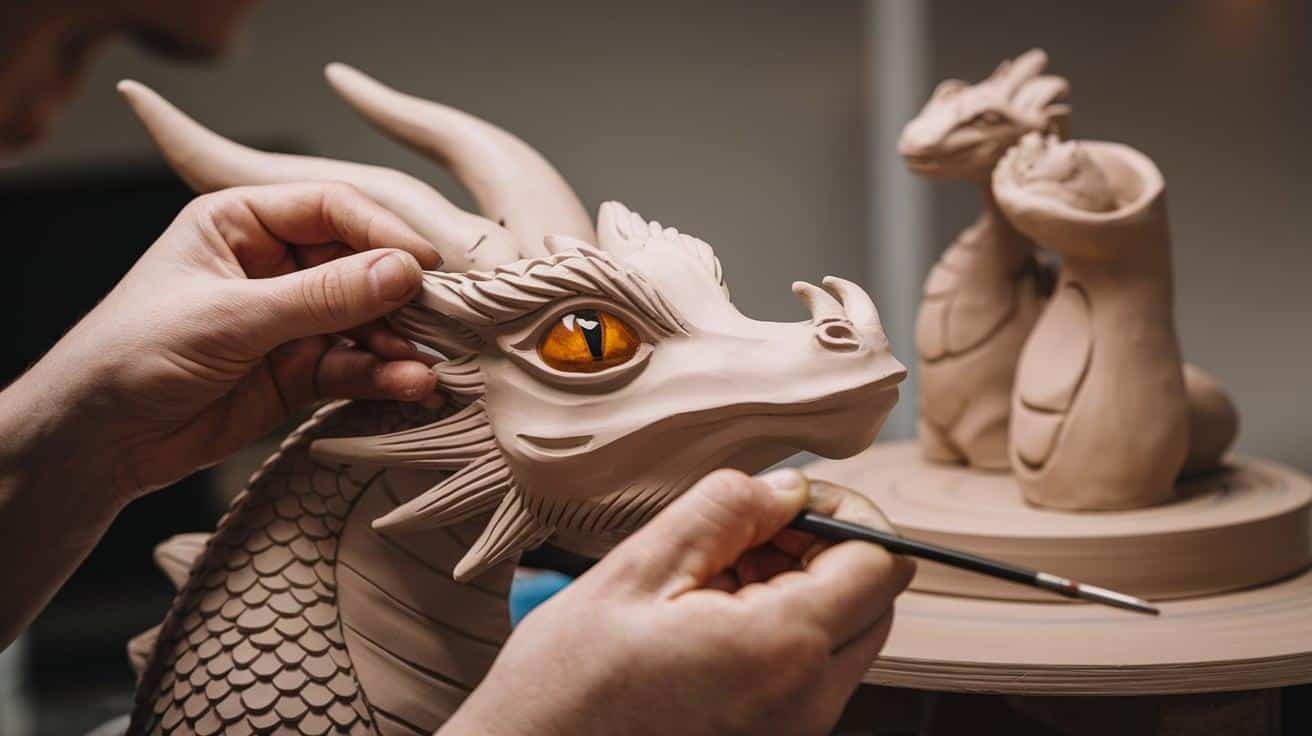
7. Detail Painting
Let’s bring your dragon eye to life with detailed painting. This is where your sculpture truly begins to look magical and realistic. I’ll share my techniques so you can create depth and dimension.
Here’s what you’ll need:
- Small detail brushes
- Acrylic paints in various colors
- Water cup and palette
- Paper towels for blotting
- Clear glaze or varnish
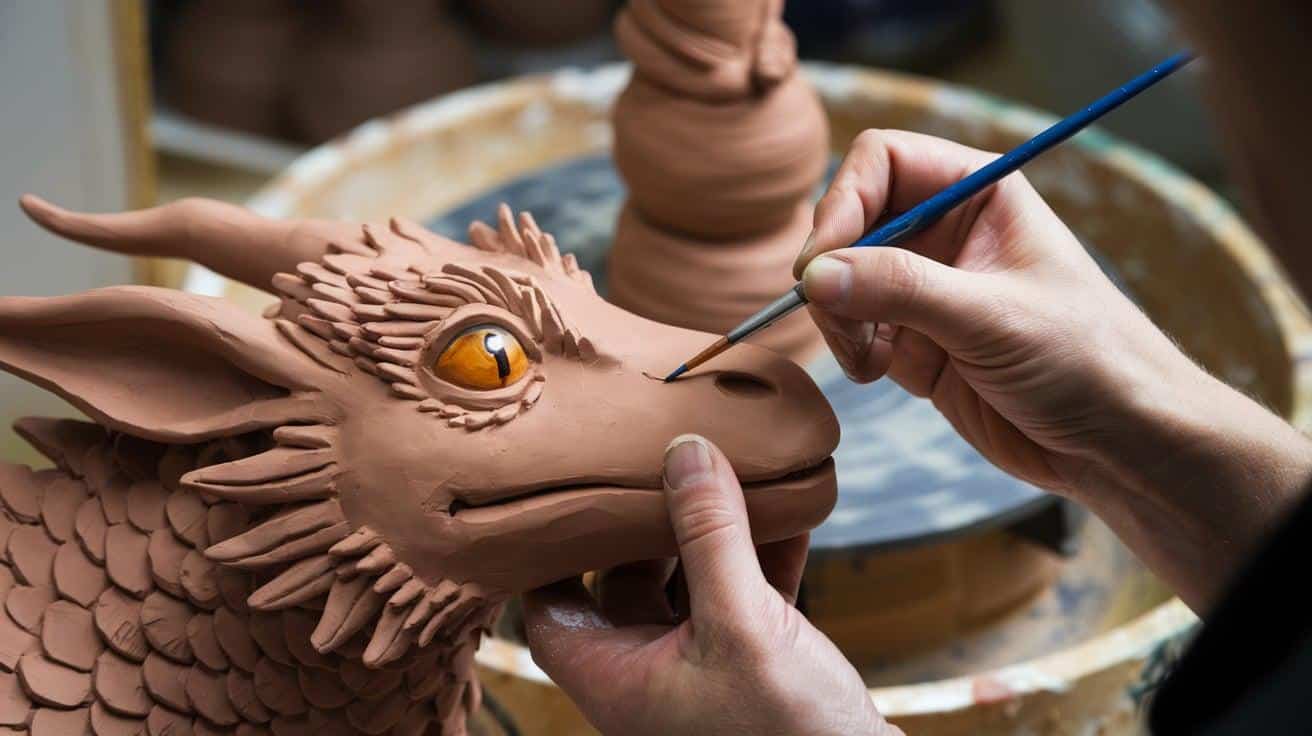
Paint the Base Colors
I’ll start by applying base colors to different areas of the eye. You’ll want to use thin layers rather than thick ones.
Just brush on your chosen colors for the iris, pupil, and surrounding scales. Allow each section to dry before moving to the next to avoid smudging.
Add Depth to the Iris
Next, I’ll use a small brush to create depth in the iris with multiple colors. You’ll build layers of color, starting with darker tones at the outer edge and working inward with lighter colors.
Create thin lines radiating from the pupil using a fine brush. This mimics the structure of a real eye and adds incredible realism to your piece.
8. Finishing Touches
Let’s add those final details to make your dragon eye come alive. This is where your sculpture transforms from good to extraordinary. I’ll walk you through each step to ensure your creation stands out.
Here’s what you’ll need:
- Clear gloss medium or varnish
- Small detail brushes
- Metallic paints (optional)
- Soft dry brush for highlights
Add the Wet Look
I’ll start by applying a layer of gloss medium to the eyeball itself. You’ll want to make it look wet and alive.
Just brush on a thin layer and let it fully dry. Add a second coat for extra depth and shine. The iris should look moist and realistic.
Highlight the Scales
Next, I’ll use a dry brush to highlight the texture. You’ll take a nearly dry brush with a tiny amount of lighter paint and brush very lightly over the raised areas of the scales.
Focus on the edges and high points of each scale. This creates dimension and makes your scales look more defined and realistic.
9. Mounting and Display Options
Let’s finish your dragon eye sculpture with a display that shows it off perfectly. The right mounting can make your creation look even more impressive. I’ll show you several options so you can choose what works best.
Here’s what you’ll need:
- Small wooden plaque or stand
- Strong adhesive (E6000 or similar)
- Decorative elements (optional)
- Clear protective dome (optional)
Choose Your Display Style
I’ll first decide whether my dragon eye looks best on a wall or a shelf. You’ll want to consider where you plan to show it off.
Wall mounts create a dramatic effect, while stands allow viewing from multiple angles. Just picture where your eye will look the most realistic in your space. This helps determine the best mounting option.
Secure the Eye to Its Base
Next, I’ll apply a strong adhesive to the back of my sculpture. You’ll do this carefully to ensure it bonds well without showing.
Allow plenty of drying time—usually 24 hours for a permanent hold. Position the eye exactly how you want it before the glue sets. A slight upward angle often creates the most lifelike appearance.
Troubleshooting Common Issues
Even experienced sculptors run into problems. Don’t worry if things don’t go perfectly. I’ve faced every issue you might encounter and found simple fixes.
Fixing Cracks
Cracks appearing in your clay? Smooth a tiny bit of water over the crack with your finger. It works like magic!
Clay Too Soft
Is the Clay not holding its shape? Please put it in the refrigerator for 10 minutes before trying again. Cold clay is easier to detail.
Other Quick Fixes
- Scales falling off: Score both surfaces before pressing them together
- Eye looking flat: Add more layers of dark paint in the deep parts
- Pupil not centered: Gently shift it while the clay is still soft
- Uneven texture: Use a soft brush to smooth rough areas
Remember that perfect dragon eyes don’t exist! Small “mistakes” often make your creation look more natural and unique.
Variations and Creative Ideas
Let’s explore ways to make your dragon eye unique. I’ve tried many styles, and these ideas can spark your creativity.
Different dragons need different eyes. Ice dragons look great with pale blue irises. Fire dragons shine with amber or red.
Try changing these elements:
- Pupil shape (slit, round, or star-shaped)
- Eye color combinations
- Scale patterns and textures
- Size (tiny for jewelry or large for display)
Special effects make your work stand out. Glow-in-the-dark paint adds mystery. Pearl powders create a magical shimmer on scales.
Want something bold? Add small gemstones among the scales or embed wire for a mechanical dragon look.
Fantasy has no rules. Your dragon eye can be as wild or classic as you want!
Conclusion
You did it! Your dragon eye sculpture is now complete. I hope you’ve enjoyed this creative journey. Making a dragon eye takes time, but the results are worth it. Your new creation will impress friends and add magic to your space.
Remember that practice makes perfect. Each eye you make will be better than the last. Don’t worry if your first attempt isn’t ideal. The skills you learned here work for other projects, too. Try making different fantasy creatures or jewelry with these techniques.
I’d love to see what you create! Share photos of your finished dragon eyes in the comments below. Thank you for joining me on this adventure. Happy sculpting, and may your dragon eyes always look fierce and magical!
Frequently Asked Questions
How Long Does It Take to Make a Dragon Eye Sculpture?
A basic dragon eye takes about 3-4 hours to complete. This includes sculpting time, baking, and painting, though you may need breaks between stages.
Can I Use Air-Dry Clay Instead of Polymer Clay?
Yes, air-dry clay works for dragon eyes, too. Just be aware it might crack more easily than polymer clay, so add more water while working with it.
My Scales Keep Blending. How do I Fix This?
Let each scale dry slightly before adding the next one. You can also use a little water on your tool to clean the edges between scales.
How Do I Make the Eye Look Wet and Alive?
Add a clear gloss sealer just to the eyeball part after painting. This creates a realistic wet shine that makes the eye appear to be watching you.
My Dragon Eye Broke During Baking. Can I Repair It?
Yes, you can glue broken pieces with strong adhesives like E6000. After it’s dry, cover the seam with a thin layer of clay, then rebake according to directions.


