
Ever wanted to make your own Christmas stockings but felt overwhelmed? You’re in the right place.
In this guide, I’ll walk you through everything you need to create beautiful, personalized stockings that your family will treasure for years. No fancy skills are required.
I’ve been sewing stockings for over a decade – from simple designs to elaborate creations. I’ve made all the mistakes, so you don’t have to.
You’ll learn:
- How to choose the perfect pattern
- Which materials work best
- Step-by-step sewing instructions
- Solutions to common problems
Store-bought stockings can’t compare to handmade ones. They lack that personal touch that makes holidays special.
By the end of this article, you’ll have the confidence to create stockings that perfectly match your home and personality. Let’s get started!
Choosing the Right Stocking Sewing Pattern
Picking a pattern can feel overwhelming. Don’t overthink it.
- Classic sock shape: Perfect for beginners
- Fancy cuffed design: Adds a touch of elegance
- Character-themed: Fun for kids
- Modern minimalist: Simple and sleek
My advice? Start simple. You can always make another one next year.
Materials and Tools You’ll Need
Before you begin your grid painting, it’s important to gather the right materials and tools. Having everything prepared will make the process smoother and help you achieve better results.
Fabric Options
- Felt (easy to work with)
- Cotton (versatile and washable)
- Velvet (luxurious but tricky)
- Flannel (cozy and forgiving)
Essential Tools
- Sharp scissors
- Straight pins
- Sewing machine (or needle and thread)
- Iron
- Fabric marker
- Measuring tape
Pro tip: Buy a bit more fabric than you think you need. Trust me on this one.
Step-by-Step Guide to Sewing a Stocking
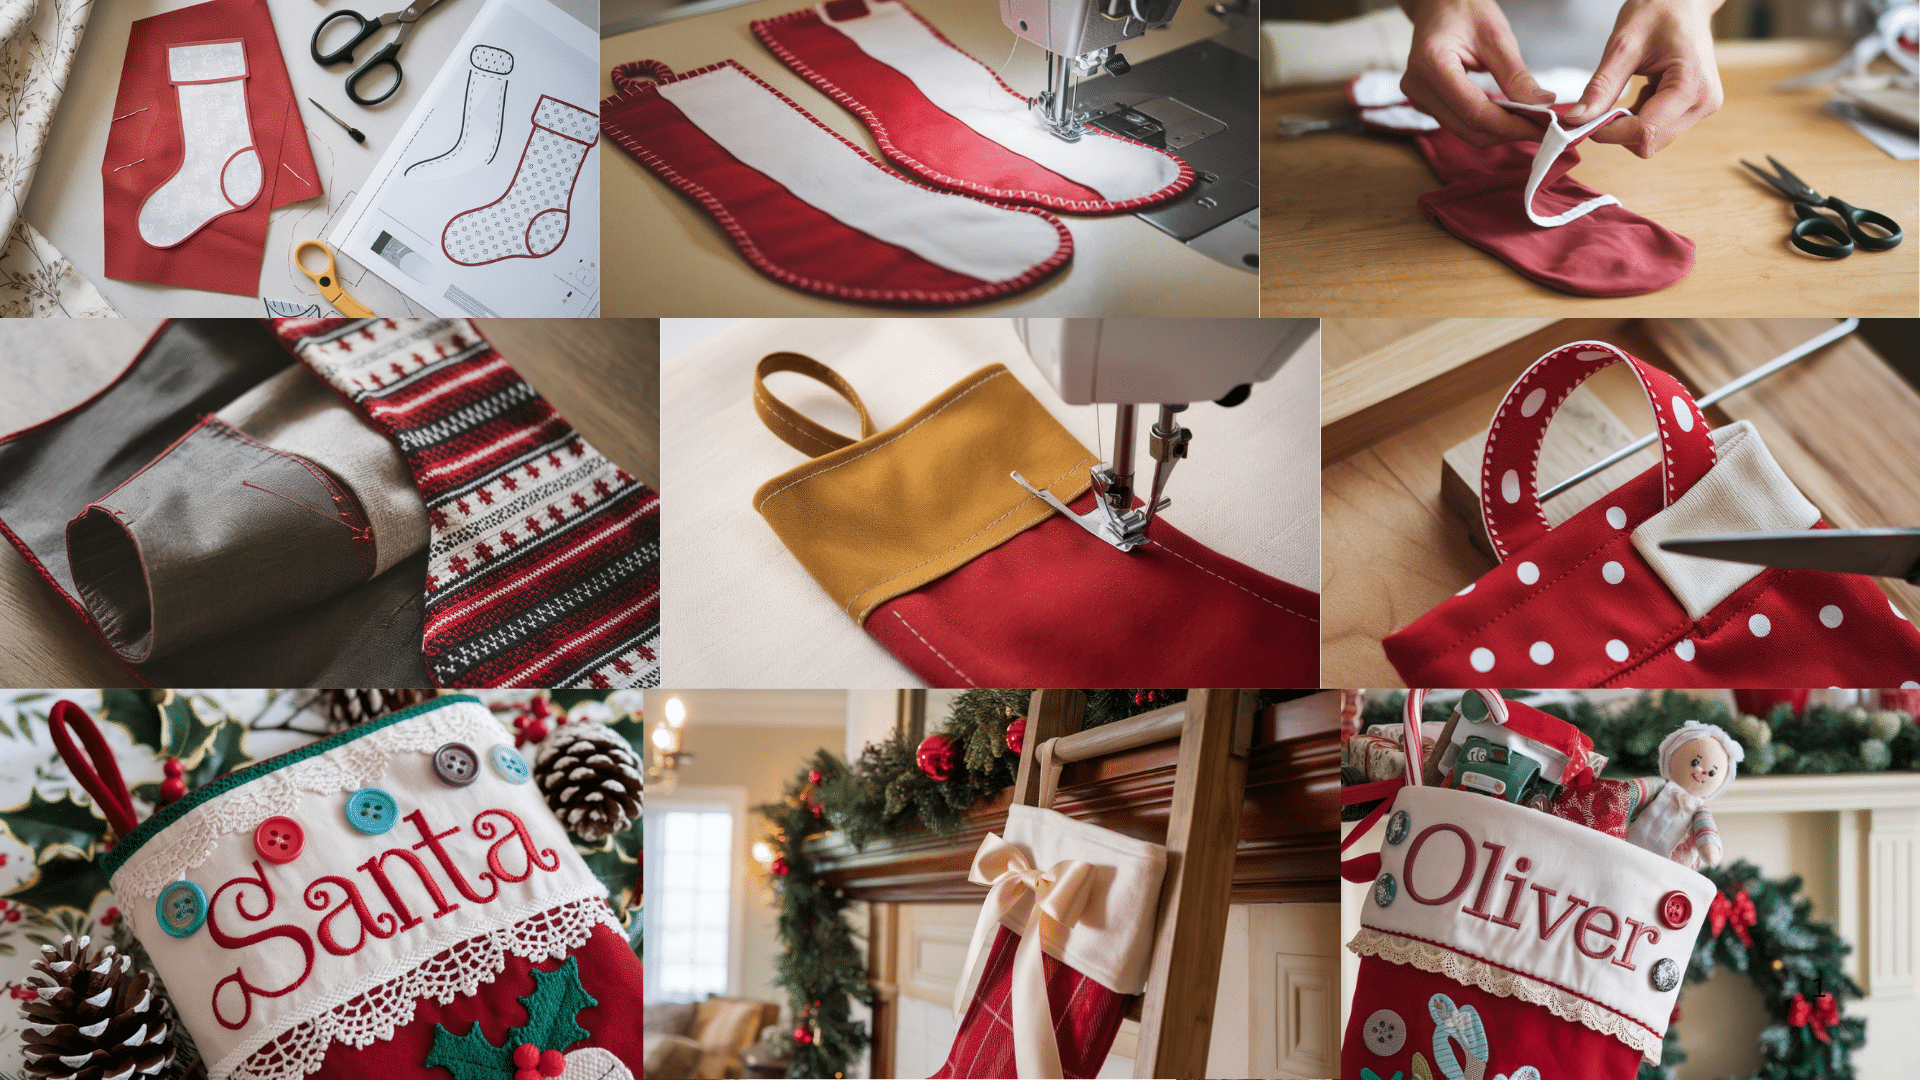
Ready to start? Let’s break this down into manageable steps.
Step 1- Create Your Pattern
If you don’t have a printed pattern, draw your stocking shape on paper. Make it about 16-20 inches long and 7-9 inches wide at the top. Cut out your paper pattern.
Tip: Fold your paper in half before drawing half the stocking shape. This ensures symmetry when you cut it out.
Step 2- Cut Your Fabric
Fold your main fabric in half with the right sides together. Pin your pattern to both layers. Cut around the pattern, leaving a 1/2-inch border for seams.
Remember: Cut two identical pieces for each stocking. If using different fabrics for the front and back, cut one from each.
Step 3- Add Interfacing (Optional)
For sturdier stockings, iron lightweight interfacing to the wrong side of each piece. This gives your stocking more structure and makes it easier to sew.
Step 4- Prepare for Sewing
Place the two stocking pieces together with the right sides facing each other. The “right” side is the pretty side that will show when finished.
Double-check: Make sure the heel and toe of both pieces line up perfectly.
Step 5- Pin the Edges
Insert pins around the edges of your stocking, about 1-2 inches apart. Leave the top edge open – this is where you’ll turn it right side out and add gifts later!
Pro tip: Place pins perpendicular to the edge for easier removal while sewing.
Step 6- Sew the Stocking
Using a straight stitch on your machine, sew around the pinned edges with a 1/2-inch seam allowance. Go slowly around curves.
Hand sewing? Use a backstitch for strength, keeping stitches about 1/8 inch apart.
Step 7- Trim and Clip
Trim excess fabric around the curved areas to 1/4 inch. Make small cuts (without cutting the stitches) around the toe and heel curves to help them lay flat when turned.
Step 8- Turn and Press
Turn the stocking right side out through the top opening. Use a pencil eraser or chopstick to push out the toe and heel areas gently. Press with an iron on the appropriate heat setting.
Step 9- Create the Cuff
Cut a rectangle of contrasting fabric twice as tall as you want your finished cuff and 1 inch wider than your stocking opening. Fold in half lengthwise, right sides together, and sew the short ends.
Measurements: For a 4-inch cuff on a stocking with a 7-inch opening, cut a 9×8 inch rectangle.
Step 10- Attach the Cuff
Turn the cuff right side out and press. Place it inside the stocking with the raw edges aligned at the top. Pin in place, then sew around the top with a 1/2-inch seam allowance.
Step 11- Add a Hanging Loop
Cut a 6-inch piece of ribbon or a 6×2 inch strip of fabric. Fold it in half to form a loop. Pin the raw edges to the inside back of the stocking at the top corner of the cuff seam. Sew securely.
Step 12- Final Press and Decorations
Give your stocking a final press with the iron. Then, add any decorative elements—embroidery, appliqué, buttons, or trim.
Stuck? Take a break. Sometimes, stepping away helps you see the solution.
Customizing Your Stocking
Here’s where the fun begins!
You can add:
- Names (embroidered or fabric paint)
- Appliqué designs
- Ribbon trim
- Buttons or small ornaments
- Pom-pom fringe
- Quilted sections
Bold idea: Create a family theme where each stocking shares a design element but has individual touches.
Remember – there are no rules. If you love it, it’s perfect.
Troubleshooting Common Issues
Sewing never goes perfectly.
Here’s how to fix common problems:
- Puckered seams: Rip them out and try again with more pins.
- Uneven edges: Trim carefully after sewing.
- Too small: Make it a wine bottle holder instead!
- Crooked stitching: Embrace the handmade look. Or add trim to cover it.
The beauty of handmade items is their uniqueness. Those little flaws tell a story.
Fun Ways to Use Handmade Stockings
Stockings aren’t just for Christmas morning.
Try these ideas:
- Gift Packaging: A mini stocking holds gift cards perfectly
- Table Decorations: Small stockings can hold silverware
- Teacher Gifts: Fill with treats and gift cards
- Pet Stockings: Make tiny ones for furry family members
- Home Decor: Hang a row in different sizes on a wall
I once made baby announcement stockings for my sister’s pregnancy reveal. The tiny stocking said, “Coming Soon!”
Conclusion
Sewing your own Christmas stocking isn’t just a craft project – it’s creating a family keepsake.
I’ve watched children’s eyes light up when they see stockings with their names. I’ve felt the pride of hanging something I made with my own hands.
These simple fabric creations become part of our holiday traditions.
Your stocking doesn’t need perfect stitches to be ideal for your home. The little imperfections tell the story of your creative journey.
Years from now, when you unpack that handmade stocking, you’ll remember the day you made it. And that memory is worth far more than anything you could buy in a store.
Ready to start sewing? Your future holiday memories are waiting in that fabric.
Frequently Asked Questions
What’s the Easiest Stocking Pattern for Complete Beginners?
A basic sock shape without a cuff is ideal. You’ll only need to sew around the outline and add a hanging loop.
Can I Sew Stockings Without A Pattern?
Yes! Trace an existing stocking or draw your shape on paper. Add a 1/2-inch seam allowance all around.
How Do I Prevent Fabric from Fraying at The Edges?
Cut your fabric with pinking shears or run a zigzag stitch along the raw edges. Felt doesn’t fray, making it perfect for beginners.
What’s the Best Way to Personalize Stockings for Family Members?
Embroider names or use iron-on letters for a clean look. You can also choose fabrics that reflect each person’s interests or favorite colors.
How Can I Make My Stocking Sturdier?
Add interfacing to your fabric before cutting or use a layer of cotton batting between fabric layers. This adds structure without making it too stiff.