genericviagra

buy cheap cialis pill online lloyds pharmacy viagra cheapest without prescription farmacia online alprostadil

viagra no prescription required

cheap without prescription Cialis Super Active online meds where can i buy viagra cheap without prescription brand viagra online sildenafil online

canadian discount pharmacy

cheap without prescription Generic Levitra purchase tadalafil amoxicillin no prescription cheap without prescription pill online buy cheap generic viagra

yohimbe

Generic Viagra buy cheap cheap cialis impotence treatment cheapest without prescription buy viagra online stamina rx

buy prescriptions

buy cheap Viagra Super Active sildenafil citrate tablets soma pharmacy buy online cheap pharmacy cialis online

next day cialis

Zithromax cheap without prescription viagra sale online abortion pill online cheapest without prescription brooks pharmacy no prescription required

online pharma

buy cheap Viagra Soft viagra price comparison can i buy viagra online buy online order kamagra net pharmacy

viagra herbal

cheap without prescription Xenical discount viagra online lowest price viagra cheapest without prescription get viagra prescription online doctor

cialis generic

Levitra cheapest without prescription canadian rx canadian viagra online buy cheap canadian prescription drugs buy amoxil

Archive for the 'Bags' Category

Scrap Sack Tutorial

Sunday, May 18th, 2008

By request I wanted to do a tutorial on the Scrap Sack I posted using up scrap fabric and disguising your seam with a stripe of ribbon.

img_2210.jpg

There are no measurements for the fabric because you will want to use up what strips or scraps that you have and make size bag you desire. You will need: measuring tape, pins, fabric, wide grosgrain ribbon, iron, & sewing machine/serger.

1. Lay out the fabric strips that you want to use. Fold it to picture what the bag will look like finished. My seam will be on a side, though it could be at the bottom, depending on your pieces. You can see one piece in taller than the other.

img_2190.jpg

2. Cut ribbon the same width as fabric. Measure and cut 2 ribbon handles, either short handbag length or longer to fit over the shoulder. (Cut 1-2″ longer than you want the finished handles to turn out.) I cut red handles here but decided to do white as you can see in my finished product.

img_2191.jpg

3. Lay right sides of fabric together and sandwich in the ribbon. Match up the 3 layers at the top edge, pin together, and sew across this top edge.

img_2192.jpg

4. Turn fabric right side up to inspect that the 3 layers are all included in seam. Pretty already!!

img_2193.jpg

5. On wrong side, press seam to one side and iron fabrics flat. Do not iron over right side of ribbon. Trust me!

img_2194.jpg

6. Turn top edge down twice about 1/2″ each time and press. This will be the casing your handles will slip under.

img_2195.jpg

7. Do not sew over the edge you just pressed. We will do that last. Next, sew down the other sides of the bag. You can see the pins pointed to where I am going to sew. (I am using a serger to make that enclosed edge but a regular machine seam is the same.)

img_2197.jpg

img_2200.jpg

8. The handles: I like to point the open, top edge toward myself. Take a ribbon handle (or whatever you want to use for a handle, fabric will work too), measure in from the edge where you want the handles placed and slip the handle in.

img_2202.jpg

9. Fold the handle then toward yourself and pin. Curve the handle over and pin it the same distance from the opposite side. Flip bag over to back and repeat with second handle.

img_2203.jpg

img_2204.jpg

*Note: There are many ways to make and attach handles, this is just the way that I made up that I like.

10. Last step – Choose a stitch and sew across the top edge that you pressed. I like to use a wide, tight, zigzag stitch. Turn inside out and you are done.

img_2206.jpg

img_2212.jpg

Suggestions: Use different fabric stripes; quilt pieces together; sew several stripes of ribbon; square the bottom of the bag.

If you follow these directions and want to share what you come up with, email your picture to us by June 1 and we will post them to spread the ideas. Send name and pic to [email protected]. Thanks!

Practical Denim

Tuesday, May 13th, 2008

This post features the remains of my unloved jeans that I cut up for this bag. I’ve been toying with the idea of a recycled denim bag, but was trying to come up with a variation on the theme. So here it is, a reversible bag.

jeansbag1.gif

You can either display the jeans side and make a recycled fashion statement, or you can be more low key about your lifestyle, turn the whole thing inside out and display a cool lining.

jeansbag2.gif

The jeans pockets become practical places to stash away your phone, mp3 player, glass baby bottles, in other words, all those treasures you find in your jeans pockets every day. So before you send your denims off to the Goodwill store, take a good luck at them and consider what kind of reincarnation you could create with a sharp pair of shears.

Scrap Sack

Monday, April 21st, 2008

I really should learn better how to conserve my fabric and cut things out better because I am always left with these skinny fabric strips leftover. Am I really going to use it if I keep it? Should I get rid of them? …This debate gets me at the end of every project because I hate wasting fabric! But this bag turned out pretty cute so I think I am going to rummage through that bag of scraps that yes, I did keep and see what I can salvage.

black-stripe-tote-1.gif

I love this fabric and went back to buy it numerous times until one day it was gone forever. I had a request for another bag out of it and only had 2 long, skinny strips left. I don’t like to sew a seam across the middle of a bag so I used extra wide grosgrain ribbon to hide where I sewed the 2 strips together. With fabrics wrong side, I lined up my 2 strips and inserted the ribbon in to sew between. I used this kind of ribbon for the handle too and like the layered look that the ribbon gave to the body of the bag. You could try this obviously with skinnier ribbon or with multiple rows if you have several strips you want to use up. I am excited to revisit some scraps I had doomed to the attic!

black-stripe-tote-2.gif

Magically this lined up almost perfectly, which I didn’t notice until I took the pictures!
The Year of the Bag

Tuesday, November 27th, 2007

1712872128_2824a9cd25.jpg

This year has become my ‘Year of the Bag.’ In the past, I’ve usually bought a bag a year or maybe every other year. Then Kristin La Flamme’s bag pattern
caught my eye and since then my household has been inundated with bags, purses, and pouches.

496330692_b0e5bde510.jpg

Currently, my favorite pattern is the basket bag designed by Lisa Lam on her blog U-Handblog.

orangedaisies.jpg

It is the perfect size, amenable to countless variations and a great gift. I make mine out of felted sweaters, but you can obviously use any kind of sewable fabric. If you are thinking of pledging handmade gifting this year, this would make a fabulous present.

stripeddaisies.jpg

How to Square Bags

Friday, August 24th, 2007

I had been asked by several to explain what I meant by the term “gussetting” in several of my former projects. It’s one of those techniques that is difficult to describe in words but is really easy to do! I promise if you try this quick tutorial it will change the way you sew, especially the way you make bags!
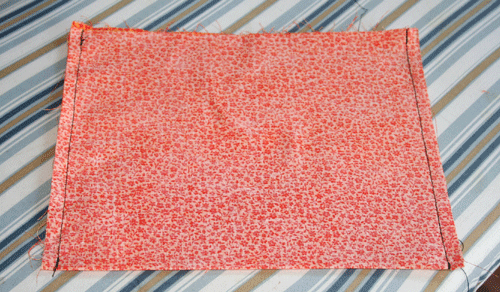
1. For my example I made a small pouch by folding my fabric in the middle (right sides together) to make the bottom of my bag, and sewing up the right and left sides.

square-1.gif

2. Then at one of the corners I put my hand inside of the bag in order to flatten it in the opposite direction.

square-2.gif

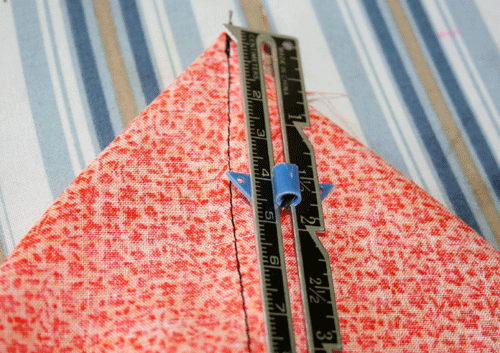
3. Now you are looking at the end of your bag and it should look like a triangle. Center your seam between the other 2 sides of the triangle and measure down from the peak the measurement of half the width you want the bottom to be when finished. Not hard math- 1 1/2″ if you want a 3″ wide bottom…it will depend on the size of your bag.

square-3.gif

4. Using ruler, mark with pencil or chalk a vertical line across your “triangle”. This the line that you sew your seam across.

square-4.gif

5. Repeat for the right and left sides of the bag. This is also how you could make ears on hats for kids, but by sewing on the right side of the fabric.

square-5.gif

6. When you turn the bag inside out it will have 2 square sides. Cover cardboard and add to the bottom to make your bag sturdy. This same technique can also be used on knitted bags, which is were I first learned to gusset.

square-6.gif

Vinyl Tablecloth Beach Bags

Monday, July 23rd, 2007

In a previous post I had toyed with using iron-on vinyl lining to make my bags waterproof, but I think I may have found a simpler, less expensive alternative- just using a vinyl tablecloth. I bought this fun fruity print off a large roll of tablecloth material. It came in a 60″ roll and I got 1 & 1/2 yds. I wanted to make a bag that was waterproof and easy to wipe off, something great to throw your wet towel or suit in after a day at the beach.

tablecloth-bag-1.gif

All you need:
(2) – 24″w x 18″h pieces, cut folded for outer bag and lining (or whatever size you desire)
(1) – 12″w x 10″h piece for outer pocket
1 yard of nylon strap
1 piece of cardboard the size of middle bottom of bag
(1) set of snaps or ribbon for closure

tablecloth-bag-2.gif

1. Fold over top edge of pocket and sew.
2. Choose a front for the bag and pin pocket into place, folding other 3 sides under and sew into place. Then I sewed a straight seam down the middle of my pocket to divide the pocket into 2.
3. Sew the bottom seam and square the corners of outer bag. Repeat for lining. (w or w/o pocket)
4. Measure piece of cardboard based on the squared bottom you now have looking down into your bag. Place cardboard piece on bottom of outer bag. Turn lining bag inside out and drop down into outer bag, lining up the bottom square over cardboard and top edges.
5. With thread and needle sew in 4 places around the outside edges of the cardboard to hold into place. Do not pull too hard on thread or the vinyl can rip. This will secure that the cardboard does not slip.
6. I hammered a silver snap toward the top middle of the bag but am a little worried this may rip when pulled open. I think I will insert ribbon in the next one to just make a center tie.
7. Your bag now is completely assembled except the the unsewn top seam. Fold bag and lining edges over 1/2″ all around, match and pin together. Cut yard of strap in half and line up your 2 straps along the top edge. Sew final seam around top of bag.

You can see that the bag is a little floppy but I used it at the beach and liked it! The fabric and strap total only cost me about $6, and I bought a few packaged vinyl tablecloths in some cool prints for only $3 that I am eager to try.

Recycling Plastic Bags

Wednesday, July 18th, 2007

Mr. McGuire:I want to say one word to you. Just one word.
Benjamin: Yes, sir.
Mr. McGuire: Are you listening?
Benjamin: Yes, I am.
Mr. McGuire: Plastics.

–The Graduate

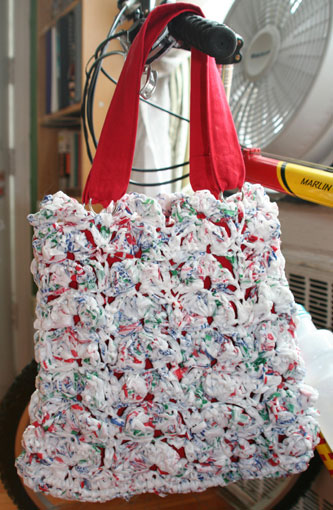
My name is Simone, and lately I’ve become completely obsessed with plastic shopping bags. I think it started when I couldn’t stuff another bag into the bottom of my holder without pushing fifteen more out of the top. On the other hand, I also could not bring myself to toss them because, after all, they were perfectly good bags. I then stumbled upon crocheting strips of plastic into, you guessed it, another bag. Since one tote-sized, crocheted bag takes at least 30 to 50 shopping bags, this project did make a dent into my collection.

tote-bag-2.jpg

Oft cited My Recycled Bags.com provides excellent instructions on how to prepare recycled plastic yarn from shopping bags and shares some crochet patterns for this kind of yarn. Once you have a ball of plastic “yarn,” you can also mix it with other materials. For example, I made this bag by alternately crocheting rounds of plastic yarn and yarn made out of denim strips.

round-purse.jpg

I think it would be kind of fun to follow the Daisies’ crochet instructions, make different kinds of plastic squares, and sew them all together into. . . a bag. (If anyone can come up with something else to crochet besides a bag, please let me know. A rain poncho perhaps?)

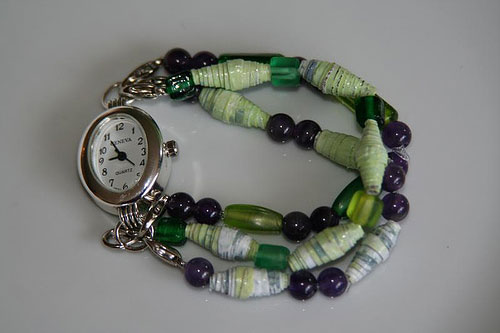
Recently, I saw a posting about fusing plastic bags to make a plastic fabric. That inspired me to make plastic beads out of fused plastic bags.

beads.jpg

You use the same technique you would apply to making paper beads, i.e. cut a triangle out of the “fabric” and roll it up from the broad to the narrow end. You may encounter more resistance from the plastic than you would from paper. I first roll up a bead without applying glue. I then unfurl the bead, apply the glue (Uhu Mosaic) and roll it up again. Like paper beads, you can leave the bead like that or apply a layer of lacquer.

watch.jpg

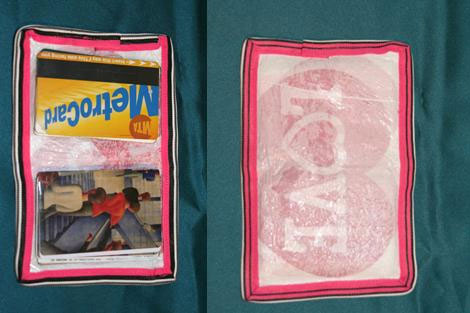
Lastly, I decided to make a wallet out of two ‘I Love NY’ bags and a white trashbag without any print on it.

wallet.jpg

* I fused the three bags together and cut out a 6 1/2″ x 4 3/8″ rectangle.
* I then cut out two 4 3/8″ x 2 5/8″ rectangles out of clear vinyl left over from some bedding packaging that I had saved for just such an occasion. These will become the inside pockets on the left and the right side of the wallet.
* I then basted the pockets to the left and the right of the rectangle with a glue gun to keep everything in place.
* To finish it off, I trimmed the wallet with a 31″ long piece of 7/8 inch ribbon. The ribbon is folded in half and sewed on around the wallet through the fused plastic and the vinyl with a top stitch.

Start to finish the whole project took me a little over an hour. You could add a velcro closure to the wallet to keep everything in place, if you don’t stuff it with as many random pieces of plastic as I tend to do.

Now I’m worried that New York will encourage businesses to cease the use of plastic bags. In that case, where will I get my raw materials? Have fun with plastic. Let me know if you have any other ideas of what to do with this stuff.

Placemat Purse

Wednesday, July 11th, 2007

I have been wanting to try this for a while- taking a cute fabric placemat and turning it into a purse. My first one must have been pretty successful since I sold it to a friend at the craft fair before the doors opened and it was so easy to make!

placemat-bag-1.gif

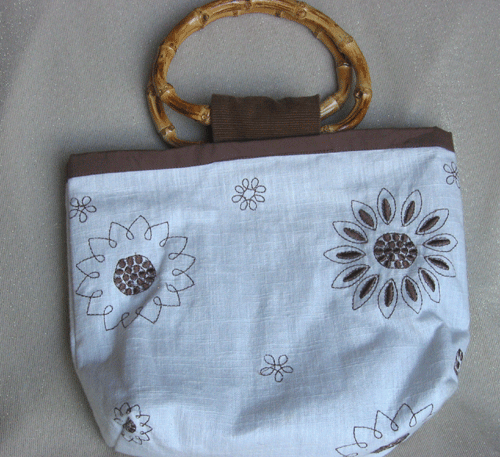
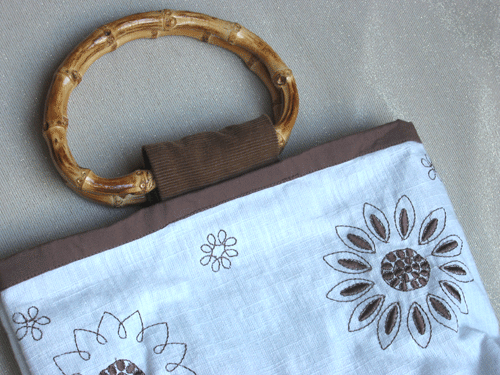
Shopping for a placemat is the first fun part. At most places you can buy them individually and usually for only a few dollars. I have even seen some cute placemats at the dollar store. The first one I made had a white background, brown trim, and brown flowers embroidered on it. All I did was turn it with right sides together and sew up the sides, gusset the bottom, and added handles. I had gotten several pairs of wooden and bamboo handles at the craft store for about $3. I found brown corduroy fabric to match and sewed a piece about 6″ long to the inside of the bag on the front and back, slipping the handle inside the corduroy piece and folding it over before sewing. The placemat was sturdy and had a solid brown fabric on the back so I did not need to add a lining. The only thing I wish I had done differently was to sew the handles a little closer to the bag or make a wider handle strap so the handles would not feel too loose in the strap.

placemat-bag-kim-1.gif

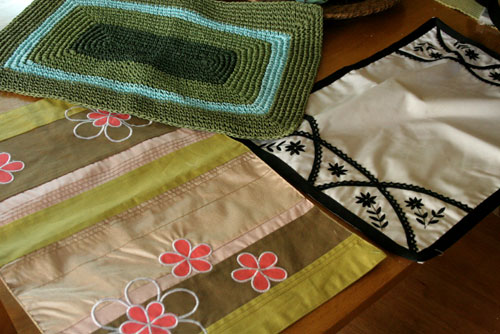
These are a few of the other placemats that I have bought to try out. I am working now on making a paper crocheted placemat into a purse, which I think will look great for summer. (After Heather’s tutorials I may even be able to do the crocheting myself one of these days too!) I will post it as soon as I am done!

before-placemats.jpg

Bridesmaids’ Bags

Friday, June 8th, 2007

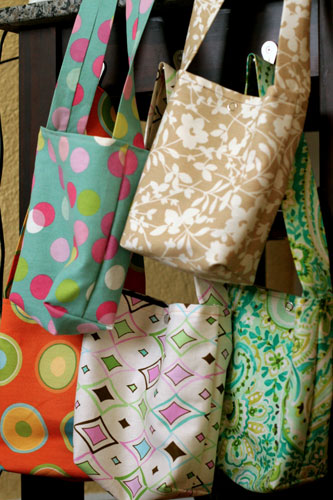
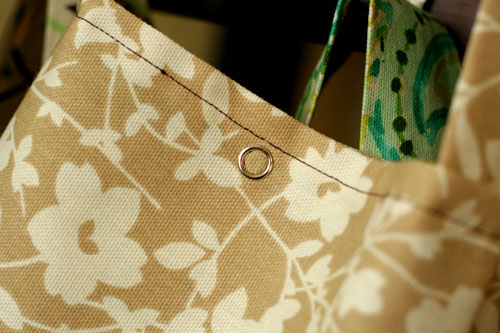
I have been excitedly working on a project recently, and for a good cause – a friends’ wedding. She asked me to make a small handbag like I had posted previously for each of the girls in her bridal party that she would fill with gifts. The bride shopped with me at the fabric store and we picked out a main fabric and lining to suit each of her close friends. We only needed a 1/4 yard of each, so this turned out to be a pretty inexpensive gift per person. I added a pocket for the first time and snaps that are easily hammered into place. I hope they enjoy them- the time on my part and the careful selection of the fabric on the bride’s part.

bridesmaidbag2.jpg

After shopping for fabric she and I also came back to my house and made different earrings for each of the bridesmaids to match their dresses. I love feeling like a vital part of someone’s special day!

bridesmaidbag1.jpg

So my encouragement this week is that your craft can also be a good excuse to spend time with people. Too easily we craft nerds can hide in our studio or craft corner and shut the world out so we can “work” but it can also be a fun opportunity to teach someone about your passion or talk while you craft. Don’t be afraid to let people into your creative world! Also, get creative with what can be made for bridesmaids gifts. My sewing isn’t totally professional but I think my little bags were a practical, cute idea for these gifts. Do you have any alternative gift ideas to share?

Vinyl Lining

Monday, May 14th, 2007

I previously posted about going nuts with the no-sew bond to make my bags stiffer, and thus was eager to try the roll hanging next to it on the rack at the fabric store: iron-on vinyl. My first attempt was on a bag for a swap partner who likes to carry her groceries home in her own bags.

vinylbag1.jpg

I ironed the vinyl to the entire piece I had cut out for a large bag lining, then sewed the bag together. I thought it might be good for carrying home cold groceries so the moisture wouldn’t soak through the fabric bag. (Let me know swap buddy if you have found this to be a good idea.) This might work well also for lining diaper bags since I know I have spent much time cleaning up spilled juice or a busted hand sanitizer bottle from the bottom of the bag. It is easy to iron on and the result is waterproof and very shiny!

vinylbag2.jpg

I thought I had a brilliant idea to make diaper changing pads; cut a square, iron on my vinyl and serge the ends, but the vinyl cannot be machine washed, so obviously that won’t work. But I must find something else! What have you used iron-on vinyl for? Any ideas that have worked well for you or things I could try? (I have 2 yards of it left!!)