Archive for the 'Recycled' Category

Make Your own Fabric Buttons

Sunday, October 14th, 2007

I know I may be way behind the times but I still keep finding gadgets and ideas at the craft store that amaze me. This week I tried out the fabric button makers I had bought 6 months ago. They were very simple to make and now I want to look around the house and see what keepsakes I could make buttons out of. I am considering: an old, favorite shirt or baby shirt, vintage towel or handkerchief, old ties, prom dress, etc. to make a button for a bag or pillow that would be better used there than thrown out. What a sweet memory to carry a bag with a peice of baby’s first clothing! I can’t wait!

So, first, using the pattern on back of package cut out pattern. I cut my circle out of the paper so you can perfectly center and choose the picture that you want.

fabric-buttons-4.gif

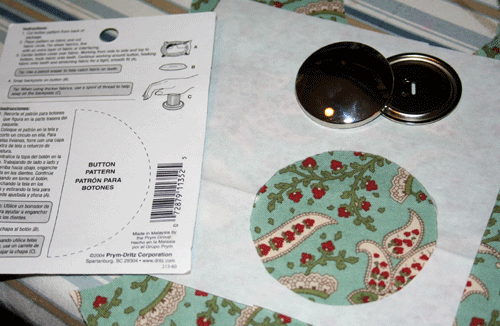
Cut out fabric circle and center around button half with teeth. Press around the circle, catching the fabric on the teeth all the way around.

fabric-buttons-1.gif

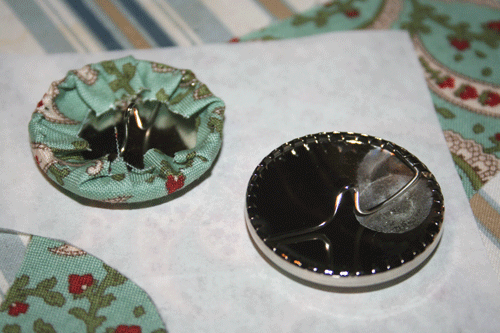
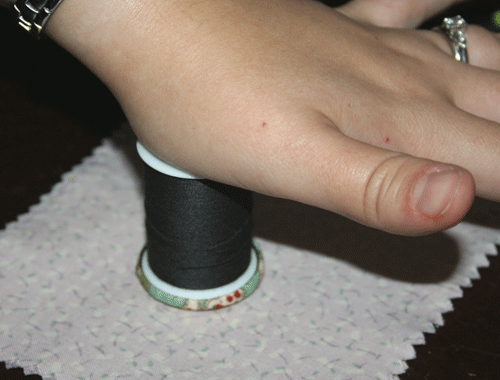
Next, put the flat button half down on top of your fabric button and press into place by pressing down with a spool. Be sure to put the side down that sticks out farther.

fabric-buttons-2.gif

All done! 2 minutes! And now you have a button that perfectly matches what you have sewn!

fabric-buttons-5.gif

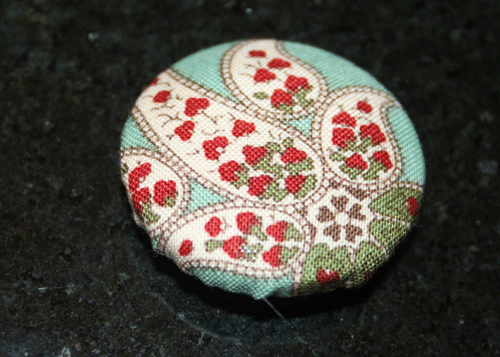
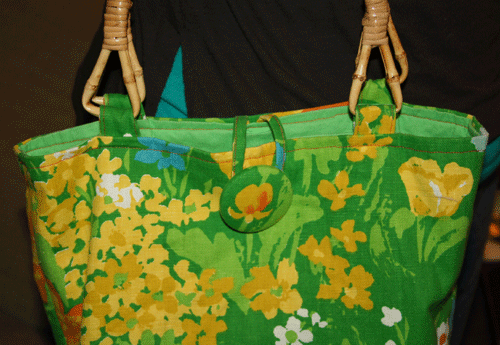
This was my favorite example of this- a bag I received in our Summer swap. LOVE it!

fabric-button-example.gif

A few tips:
Be careful, you can hurt your fingers on those teeth!
If you fabric is too thin, use iron-on interfacing so that the silver button cannot be seen through the fabric.

Pressed Flowers

Thursday, August 9th, 2007

One of the best things about summer is the flowers, don’t you agree? A fun way to keep them around past the peak bloom point (and for those in cold climates to remember the lovely summer colors) is to press them. You can easily make your own flower press, and here’s how.

Start with 2 squares of wood (approximately 8″ across), 4 bolts (approximately 4″ long), 8 coordinating washers, 4 coordinating wingnuts, and several squares of cardboard and felt, with the corners trimmed. I have 7 cardboard pieces and about 10 pieces of felt - these are used to separate the layers of the flowers you press and to provide cushioning.

flowers1.jpg

You simply drill 4 holes near each corner of each square and assemble: bolt, washer, one square of wood, cardboard, felt, paper, flowers, paper, felt, cardboard (etc), board, washer, wingnut. You add layers of plain white paper around the flowers to prevent them sticking to the felt, and it also allows for easy storage later on — I keep mine either in a folded piece of paper or inside envelopes. Screw the wingnuts on tight to press the layers together and compress your flowers. Then you wait for a week or so to allow the flowers/leaves to dry and flatten.

flowers2.jpg

Pay attention to the layout of your flowers and leaves when you are pressing - you want to make sure that it will look how you want it to when it’s flat. Leaves are easy, but be careful with multiple petal layers - sometimes they bend oddly when you press them, and the result is not pretty.

Simple flowers work well though. Pansies are gorgeous:

flowers3.jpg

I’ve also done marigolds, lilac, roses, several kinds of leaves, irises, even a butterfly. If your garden is large, you can have lots of fun playing around with the press and trying different layouts.

Once you have your array of pressed flowers, you can paste them into a frame:

flowers4.jpg

I just used regular Elmer’s and glued the marigold and the butterfly onto thick white paper (I think mine is designed for painting). Tweezers can be helpful in arranging delicate pieces, such as the butterfly - sometimes your fingers are just too sticky. These flowers would be lovely on cards, too, if you enjoy making your own. Let me know of other fun ways to use them - I’m just beginning my foray into paper crafts :)

This guest post comes from Gina - thanks so much for your contribution, Gina!

Recycling Plastic Bags

Wednesday, July 18th, 2007

Mr. McGuire:I want to say one word to you. Just one word.
Benjamin: Yes, sir.
Mr. McGuire: Are you listening?
Benjamin: Yes, I am.
Mr. McGuire: Plastics.

–The Graduate

My name is Simone, and lately I’ve become completely obsessed with plastic shopping bags. I think it started when I couldn’t stuff another bag into the bottom of my holder without pushing fifteen more out of the top. On the other hand, I also could not bring myself to toss them because, after all, they were perfectly good bags. I then stumbled upon crocheting strips of plastic into, you guessed it, another bag. Since one tote-sized, crocheted bag takes at least 30 to 50 shopping bags, this project did make a dent into my collection.

tote-bag-2.jpg

Oft cited My Recycled Bags.com provides excellent instructions on how to prepare recycled plastic yarn from shopping bags and shares some crochet patterns for this kind of yarn. Once you have a ball of plastic “yarn,” you can also mix it with other materials. For example, I made this bag by alternately crocheting rounds of plastic yarn and yarn made out of denim strips.

round-purse.jpg

I think it would be kind of fun to follow the Daisies’ crochet instructions, make different kinds of plastic squares, and sew them all together into. . . a bag. (If anyone can come up with something else to crochet besides a bag, please let me know. A rain poncho perhaps?)

Recently, I saw a posting about fusing plastic bags to make a plastic fabric. That inspired me to make plastic beads out of fused plastic bags.

beads.jpg

You use the same technique you would apply to making paper beads, i.e. cut a triangle out of the “fabric” and roll it up from the broad to the narrow end. You may encounter more resistance from the plastic than you would from paper. I first roll up a bead without applying glue. I then unfurl the bead, apply the glue (Uhu Mosaic) and roll it up again. Like paper beads, you can leave the bead like that or apply a layer of lacquer.

watch.jpg

Lastly, I decided to make a wallet out of two ‘I Love NY’ bags and a white trashbag without any print on it.

wallet.jpg

* I fused the three bags together and cut out a 6 1/2″ x 4 3/8″ rectangle.
* I then cut out two 4 3/8″ x 2 5/8″ rectangles out of clear vinyl left over from some bedding packaging that I had saved for just such an occasion. These will become the inside pockets on the left and the right side of the wallet.
* I then basted the pockets to the left and the right of the rectangle with a glue gun to keep everything in place.
* To finish it off, I trimmed the wallet with a 31″ long piece of 7/8 inch ribbon. The ribbon is folded in half and sewed on around the wallet through the fused plastic and the vinyl with a top stitch.

Start to finish the whole project took me a little over an hour. You could add a velcro closure to the wallet to keep everything in place, if you don’t stuff it with as many random pieces of plastic as I tend to do.

Now I’m worried that New York will encourage businesses to cease the use of plastic bags. In that case, where will I get my raw materials? Have fun with plastic. Let me know if you have any other ideas of what to do with this stuff.

Thrifted Notions

Thursday, July 5th, 2007

I just wanted to share with you some of my lucky finds at the antique stores lately. “Antiqueing” has pretty much become a hobby for my husband and me. He spends an hour scrounging in the basement looking at cabinets and tools while I make small talk with the shop owner, look for the resident kitty or fish with my son, or scour the jewelry counter! These are some of the vintage buttons and shoe buckles that I found recently to use on my bags. I love large buttons, and shell, mother of pearl, brass or wooden ones make great embellishment. Old strands of beads or plastic belts are also great finds for making earrings.

jens-notions.jpg

I fell in love with these shell earrings I found at a shop this week that I go to only about once a year. One earring hook was missing and the other definitely needed to be replaced but I would replace any hooks if buying used jewelry. This helps to brighten up the piece as well. This find was timely since my son broke an ornament and I felt bad not buying anything. (What a good excuse!)

jens-shell-earrings.jpg

Often I have gotten a bag of vintage beads or buttons for ~$2, and for that there are usually some treasures inside. Now that I am in with all the owners downtown the ladies will save out bags of buttons for me (and give me a great price!) Finding actual treasures may be a challenge but the character and uniqueness they come with may be worth it!

Make your own paper

Thursday, June 28th, 2007

Hello. My name is Joanna and I’m a paper addict. I hoard paper of all kinds. I do not discriminate against any texture, type or color. I love it all and never knowing when I might need it for a project, I keep it all. When I can no longer keep track of all the scraps, I know I must do what any self-respecting paper addict must do - make more paper! Here’s how I go about it.

First, gather your supplies:

  • ~ Paper scraps with a matte finish (newspaper, tissue paper, construction paper or junk mail but try to avoid the glossy ads)
  • ~ Several towels you don’t mind getting dirty
  • ~ Blender
  • ~ Deckle (this is what you use to strain the pulp, more on that later)
  • ~ Container large enough to fit your deckle (my deckle makes a letter sized sheet of paper so I have found a large plastic storage bin works for me)
  • ~ Sponge
  • ~ Iron (optional)

To begin, you have to make your pulp:

1. Fill your plastic container with several inches of water. You need enough to submerge the deckle completely.

2. Tear your papers into small pieces about 1 inch square and add to the water.

3. Let soak until all of your pieces are completely wet. Any dry pieces will not break up entirely and will leave specks in your finished product. This can be desirable so feel free to vary your soaking times until you get the look you want.

4. With the blender 2/3 full of water, add your soaked pieces of paper and blend until smooth. This also varies the look of the finished product so feel to play with your blending times. Just remember that the smoother the pulp, the smoother the finished product.

5. Return processed pulp back to the plastic storage bin, stir to evenly distribute.

cd_jm_tutorial-1.jpg

Next, you need to form the sheets. The shape of your deckle will determine the shape of your paper. I purchased mine at my local craft store but you can also make your own by using window screen stapled to a wood frame. I have never tried this so let me know how it turns out if you do!

1. Hold your deckle at an angle as you slide it into the pulp mixture. I go straight to the bottom of the container.

2. Swish it around while it’s submerged. This ensures an even layer of pulp covers the deckle.

3. Keeping the deckle horizontal, remove it from the water and let it begin draining. At this point you can move the pulp around if you need to.

4. Using the sponge, wipe across the screen side of the deckle to remove excess water. Take care how much you tilt the deckle as the pulp can still slide around.

5. I set my deckle on the side of the container to drain while I get the next step set up.

cd_jm_tutorial-1-1.jpg

The next step is called couching (pronounced cooching)

1. Place a layer of towels on your surface.

2. Place the deckle screen side down onto the towels.

3. Lay another towel over top of the formed sheet (will be against the pulp) and press with your hands and the sponge to remove additional water.

4. Turn out sheet onto first layer of towels. Sheet should be dry enough to just fall off the deckle. If not, flip and press again. If this makes you nervous, leave the towel on the pulp and turn out the sheet onto it.

5. Layer sheets between towels and press to remove additional water.

6. Remove sheets and lay flat to dry.

cd_jm_tutorial-2-1.jpg

The last step is drying the sheets with an iron (which is optional). I like to iron my sheets dry not only because I’m horribly impatient but because the iron gives the paper a smooth finish.

1. With iron on high, start ironing the wet sheet while still sandwiched in between a towel.

2. Iron until towel starts to feel dry (enjoy the steamy facial in the process!)

3. Pull back top layer of towel and iron sheet itself. When the iron skips right across the sheet you’ll know it’s ready to be ironed directly. It will stick and pull the pulp if it’s not ready.

4. Iron until sheet is crisp and dry.

cd_jm_tutorial-3.jpg

A note about colors:

The pulp will always be a few shades darker than the finished product. I like to use solid colored cardstock or tissue paper color the pulp. Since it’s heavier, the cardstock adds a nice speckle to the finished paper. Take care when using strong colors as the dyes can stain clothing.

cd_jm_tutorial-4.jpg

Clean up:

I like to do this outside because I make a mess whenever I do anything crafty. Since I’m already outside, I just dump the any left over pulp mixture in the yard when I’m finished (the pulp hangs around for a bit so choose an out of the way place for this). If you’re inside, strain the mixture before dumping it down the drain. Even outside, sometimes I will still strain it to save the unused pulp, especially if I liked the color. Once strained, press the pulp to remove as much water as possible and then let dry. The resulting chunk can be broken up and added to your next batch or add some white glue and sculpt with it!

cd_jm_tutorial-5.jpg

Here’s a sample of a few different textures and colors I’ve made recently. I simply varied the weight of the paper and how long it was processed in the blender.

cd_jm_tutorial-6.jpg

Quick, beautiful candle holders

Tuesday, March 13th, 2007

I’m in the process of redecorating my dining room. Because I could do some serious financial damage, my husband has put me on a budget. I’m always at a loss for what to do for a centerpiece, but always come back to the trusty candles-option. I found the perfect candle holders, but ofcourse they were totally out of the budget. So I opted for an even better idea that was cheaper and looked better.

candle1.jpg

Aren’t they great? And if you look closely, they are just bowls and plates glued together. That’s it! Find some bowls and plates that you like, or use ones you already have. Get some apoxy, let them sit over night, and you have fabulous and original candle holders.

candle2.jpg

.

Keeping his memory alive

Saturday, February 24th, 2007

bill

Bill Dooley October 20, 1953 – February 24, 2004

” Bill Dooley was the first missionary Bruce knew: “I remember thinking, this guy is NEAT-he’s so real and personal.”

“conversations with ABWE missionary Bill Dooley inspired and motivated Beth to consider missions as God’s specific will for her life.”

I would like to introduce you to Bill Dooley, my dad. He was a missionary for 14 years in Chile and later a recruiter for the same missions agency. He encouraged many to know God and love Him. At 50 yrs old, 3 years ago today he flew away leaving us with a hole in our hearts that would never heal. He was a great man and we miss him so much.

I wanted to share with you what I have made for my family so we will always remember him and keep him near. He wore this great sport coat all the time. He looked great in it. It was his favorite. For my mom’s birthday I made this bag for her from his coat. I attached his name tag he wore while he was at conferences and a great picture of his teethy grin. Love that smile!

img_0116.jpg

I made the inside out of the shirt they got on their Alaska cruise their 25th wedding anniversary. The tie tips were a few of his favorites. The blue one he wore at our wedding when he married us. She loved the bag and it’s nice to know that a peice of him is still close to her.

inside.jpg

wedding.jpg

I really started missing him a lot when I got pregnant and wished Lucy could know him. It kills me that they won’t get to play together. So I made her this Lion. (I have a slight obsesion with lions thanks to the Chronicles of Narnia) Papa the Lion is also made from the same sport coat. Recognize the tie? same one. This is the only way I know to keep him close. When you loose a loved one won’t you do the same? Don’t throw all their things away but make something new and keep them close. It’s all we have left of them. Thanks for letting me share this with you on this very special day to me and my family.
img_0080.jpg

Recycling at its best

Tuesday, January 16th, 2007

I love making something new from something old. We found this dress in Jen’s attic in her husbands costume collection. I loved the green and said it would make a great bag. Donnie (her husband) just mentioned joking that her birthday was coming up. So I decided to make her a bag.

img_0735.jpg

I just love the detail in the top part of the dress. I decided to use the elastic section at the top of the dress and just detach the sleeves. The dress was so long i used the rest of it to line the bag and one of the sleeves for a pocket on the inside. It turned out pretty cool. I loved it. I’ve got some of the dress left over I might just make one for myself. It seems all i want to make from old clothes are bags. What have you made from old clothes?

img_0767.jpg

Recycling Christmas Cards

Tuesday, December 26th, 2006

Before you decide to toss all those Christmas cards sent to you, save them and use them as gift tags for next year. It doesn’t require a crafty-hand, just a pair of scissors and a hole punch.

cards-before.jpg

Cut around specific shapes, or take a decorative backdrop and cut shapes in it. Punch a hole in the top for tying them on and cover any writing on the back by gluing a piece of paper over it. You can even embellish them with glitter, sequins or ribbon.

It doesn’t take any time at all, and you’ve turned those beautiful Christmas cards into beautiful gift tags for next holiday season.

cards-after.jpg