genericviagra

buy cheap cialis pill online lloyds pharmacy viagra cheapest without prescription farmacia online alprostadil

viagra no prescription required

cheap without prescription Cialis Super Active online meds where can i buy viagra cheap without prescription brand viagra online sildenafil online

canadian discount pharmacy

cheap without prescription Generic Levitra purchase tadalafil amoxicillin no prescription cheap without prescription pill online buy cheap generic viagra

yohimbe

Generic Viagra buy cheap cheap cialis impotence treatment cheapest without prescription buy viagra online stamina rx

buy prescriptions

buy cheap Viagra Super Active sildenafil citrate tablets soma pharmacy buy online cheap pharmacy cialis online

next day cialis

Zithromax cheap without prescription viagra sale online abortion pill online cheapest without prescription brooks pharmacy no prescription required

online pharma

buy cheap Viagra Soft viagra price comparison can i buy viagra online buy online order kamagra net pharmacy

viagra herbal

cheap without prescription Xenical discount viagra online lowest price viagra cheapest without prescription get viagra prescription online doctor

cialis generic

Levitra cheapest without prescription canadian rx canadian viagra online buy cheap canadian prescription drugs buy amoxil

Archive for the 'Tutorials' Category

Pressed Flowers

Thursday, August 9th, 2007

One of the best things about summer is the flowers, don’t you agree? A fun way to keep them around past the peak bloom point (and for those in cold climates to remember the lovely summer colors) is to press them. You can easily make your own flower press, and here’s how.

Start with 2 squares of wood (approximately 8″ across), 4 bolts (approximately 4″ long), 8 coordinating washers, 4 coordinating wingnuts, and several squares of cardboard and felt, with the corners trimmed. I have 7 cardboard pieces and about 10 pieces of felt – these are used to separate the layers of the flowers you press and to provide cushioning.

flowers1.jpg

You simply drill 4 holes near each corner of each square and assemble: bolt, washer, one square of wood, cardboard, felt, paper, flowers, paper, felt, cardboard (etc), board, washer, wingnut. You add layers of plain white paper around the flowers to prevent them sticking to the felt, and it also allows for easy storage later on — I keep mine either in a folded piece of paper or inside envelopes. Screw the wingnuts on tight to press the layers together and compress your flowers. Then you wait for a week or so to allow the flowers/leaves to dry and flatten.

flowers2.jpg

Pay attention to the layout of your flowers and leaves when you are pressing – you want to make sure that it will look how you want it to when it’s flat. Leaves are easy, but be careful with multiple petal layers – sometimes they bend oddly when you press them, and the result is not pretty.

Simple flowers work well though. Pansies are gorgeous:

flowers3.jpg

I’ve also done marigolds, lilac, roses, several kinds of leaves, irises, even a butterfly. If your garden is large, you can have lots of fun playing around with the press and trying different layouts.

Once you have your array of pressed flowers, you can paste them into a frame:

flowers4.jpg

I just used regular Elmer’s and glued the marigold and the butterfly onto thick white paper (I think mine is designed for painting). Tweezers can be helpful in arranging delicate pieces, such as the butterfly – sometimes your fingers are just too sticky. These flowers would be lovely on cards, too, if you enjoy making your own. Let me know of other fun ways to use them – I’m just beginning my foray into paper crafts :)

This guest post comes from Gina – thanks so much for your contribution, Gina!

Sea shell shadowbox

Friday, July 27th, 2007

Hi, I’m Gina. As do many others, I have always loved the beach. Growing up in Minnesota, though, there are few opportunities to be in the ocean, so I guess I tried to take advantage of all of mine by bringing the beach home with me. Thus I have accumulated a lot of shells, beach rocks, coral, and other beachy finds from various trips, some with sentimental value. For example, one of the rocks I used in the project was from the spot on a rocky beach in New Zealand where my husband proposed.

There are lots of ways to display shells – on countertops, in bowls, etc. But I wanted a way to look at the special ones all at once without them taking up too much space or requiring much dusting. So I decided to create a seashell shadow box.

To begin, you need your collection of shells, your trusty glue gun, and a shadow box. Mine has a lovely dark wood frame and a neutral linen background that mimics sand:

shadowbox1_1.jpg

Next, you lay your shells in a pleasing pattern. You could go with a more random arrangement if you like, but I preferred to arrange them so that I could balance shape, color, and size:

shadowbox2.jpg

Then you glue! Most of mine were light enough not to require much glue, but obviously rocks or large, heavy shells will need more. Make sure when you’re gluing (and when you lay everything out) that your shells all fit when the lid is closed. One of mine (the large on in the bottom right corner) was oddly shaped and would only balance on one edge, so I paid attention to that while gluing to ensure I glued the correct edge.

shadowbox3.jpg

I love the finished product! I had tons of shells left over, but I liked keeping some space between the shells. I think a tighter arrangement could also be lovely, though.

shadowbox4.jpg

Here are close-ups of the shells and the linen background of the shadow box:

shadowbox5.jpg

shadowbox6.jpg

So have fun with your shells! I’m sure everyone has a collection of sorts that would fit nicely into a shadow box, even if it isn’t seashells.

Crayon Nibbles

Thursday, July 26th, 2007

crayon4.jpg

My son just turned 18 months, and is really into coloring. I absolutely love this because now we can be creative together. However, he is also a toddler (and a boy) which means most of the time breaking the crayons is often more fun than coloring with them. A friend of mine told me awhile back about melting down crayons to make chunkier ones that are easier for little hands to hold (and tougher for them to break). This is also a great way to use up broken crayons that you have laying around.

crayon1.jpg

What you’ll need:

  • Crayons (like I said, you could use ones you already have or buy some. I purchased 5 boxes of 24-pack crayons for 20 cents each – back to school bargains!)
  • mini muffin pan (one that you don’t mind getting a little crayon on)
  • exacto knife (optional)

You’ll want to preheat your oven to 265 degrees F. Peel off all the paper from the crayons (for the new ones, I found it much quicker to remove the paper in one smooth motion if I carefully ran the exacto knife down the center of the paper and peeled the paper back), and break them into 1/2″ to 1″ pieces. Arrange two to three like colors in each slot, then bake for 6-8 minutes (don’t over bake – you want them just melted so you can’t distinguish the crayon shape anymore). Let them congeal a little on the counter, then place them in the freezer until they are firm (approx. 30 minutes). They should then pop right out.

This is great for little hands that aren’t steady enough to hold thin crayons. They can wrap their whole hands around them and go to town without breaking them.

crayon2.jpg

crayon3.jpg

They also make great back to school and birthday gifts for other little artists in your life.

crayon5.jpg

Vinyl Tablecloth Beach Bags

Monday, July 23rd, 2007

In a previous post I had toyed with using iron-on vinyl lining to make my bags waterproof, but I think I may have found a simpler, less expensive alternative- just using a vinyl tablecloth. I bought this fun fruity print off a large roll of tablecloth material. It came in a 60″ roll and I got 1 & 1/2 yds. I wanted to make a bag that was waterproof and easy to wipe off, something great to throw your wet towel or suit in after a day at the beach.

tablecloth-bag-1.gif

All you need:
(2) – 24″w x 18″h pieces, cut folded for outer bag and lining (or whatever size you desire)
(1) – 12″w x 10″h piece for outer pocket
1 yard of nylon strap
1 piece of cardboard the size of middle bottom of bag
(1) set of snaps or ribbon for closure

tablecloth-bag-2.gif

1. Fold over top edge of pocket and sew.
2. Choose a front for the bag and pin pocket into place, folding other 3 sides under and sew into place. Then I sewed a straight seam down the middle of my pocket to divide the pocket into 2.
3. Sew the bottom seam and square the corners of outer bag. Repeat for lining. (w or w/o pocket)
4. Measure piece of cardboard based on the squared bottom you now have looking down into your bag. Place cardboard piece on bottom of outer bag. Turn lining bag inside out and drop down into outer bag, lining up the bottom square over cardboard and top edges.
5. With thread and needle sew in 4 places around the outside edges of the cardboard to hold into place. Do not pull too hard on thread or the vinyl can rip. This will secure that the cardboard does not slip.
6. I hammered a silver snap toward the top middle of the bag but am a little worried this may rip when pulled open. I think I will insert ribbon in the next one to just make a center tie.
7. Your bag now is completely assembled except the the unsewn top seam. Fold bag and lining edges over 1/2″ all around, match and pin together. Cut yard of strap in half and line up your 2 straps along the top edge. Sew final seam around top of bag.

You can see that the bag is a little floppy but I used it at the beach and liked it! The fabric and strap total only cost me about $6, and I bought a few packaged vinyl tablecloths in some cool prints for only $3 that I am eager to try.

Making your own mini journal

Thursday, July 5th, 2007

mini-books.jpg

My name is Jennifer, and I love all things having to do with paper. But recently journals that I see in stores just haven’t been doing it for me. I don’t want just lined paper, scrapbook paper or watercolor paper… and I don’t want 15 different journals going all at once (though I must stress I have no problem with owning 15 journals at one time).

With this in mind I started to ponder making my own book. What better way to solve my dilemma than to make something with whatever kind of paper I wanted. I started to read and read on book binding, but I didn’t want to invest in an entirely new hobby, not yet anyway… I simply wanted to try it.

So I took all of this information that I gathered and made my very own mini journals. My supplies were as follows:

  • ~ paper (of all kinds)

  • ~ ruler
  • ~ yarn
  • ~ embroidery thread
  • ~ sewing and embroidery needles
  • ~ a Popsicle stick
  • ~ heavy books (I used Shakespeare’s Complete Works and a Norton Anthology)
  • ~ buttons
  • ~ other random crafty bits

I picked my size of paper (6×6 in this case) and cut the paper I had chosen to fit. I used all sorts of paper… from notebook paper to fancy scrapping paper to card stock. I also ended up using multiple sizes of paper- some 3×3 or 4×3. This created an interesting layering effect in the finished journal.

open-books.jpg

Once I cut my paper I folded it in half using my trusty Popsicle stick to make a proper fold. I then used my ruler to measure and punch 8 holes in the center of the fold. I used the needles to make the holes. Then came the fun bit of assembling the book. I put the paper together and then used my yarn and embroidery needle to sew the book together. Once it was together I placed the book under the heavy books and waited…… The next morning my lovely little journals emerged in all their splendor. I then used buttons, paper and chip board letters to decorate the covers of the journals.

blue-buttons.jpg

I may end up becoming more serious about book binding at some point, but for now this is a lovely and inexpensive way to try your hand at book binding and to have a journal that is uniquely yours.

To learn more about the proper way to bind a book take a look at this website, which is truly informative and offers some excellent tips that can be used in any paper binding experience.

Make your own paper

Thursday, June 28th, 2007

Hello. My name is Joanna and I’m a paper addict. I hoard paper of all kinds. I do not discriminate against any texture, type or color. I love it all and never knowing when I might need it for a project, I keep it all. When I can no longer keep track of all the scraps, I know I must do what any self-respecting paper addict must do – make more paper! Here’s how I go about it.

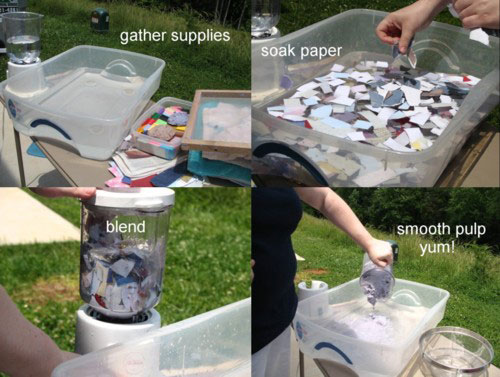
First, gather your supplies:

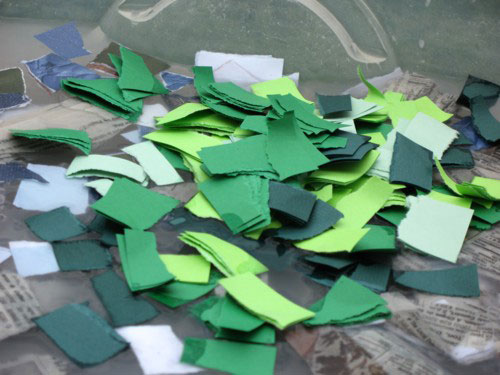
  • ~ Paper scraps with a matte finish (newspaper, tissue paper, construction paper or junk mail but try to avoid the glossy ads)
  • ~ Several towels you don’t mind getting dirty
  • ~ Blender
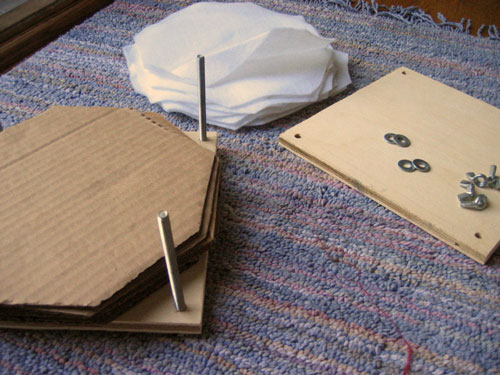
  • ~ Deckle (this is what you use to strain the pulp, more on that later)
  • ~ Container large enough to fit your deckle (my deckle makes a letter sized sheet of paper so I have found a large plastic storage bin works for me)
  • ~ Sponge
  • ~ Iron (optional)

To begin, you have to make your pulp:

1. Fill your plastic container with several inches of water. You need enough to submerge the deckle completely.

2. Tear your papers into small pieces about 1 inch square and add to the water.

3. Let soak until all of your pieces are completely wet. Any dry pieces will not break up entirely and will leave specks in your finished product. This can be desirable so feel free to vary your soaking times until you get the look you want.

4. With the blender 2/3 full of water, add your soaked pieces of paper and blend until smooth. This also varies the look of the finished product so feel to play with your blending times. Just remember that the smoother the pulp, the smoother the finished product.

5. Return processed pulp back to the plastic storage bin, stir to evenly distribute.

cd_jm_tutorial-1.jpg

Next, you need to form the sheets. The shape of your deckle will determine the shape of your paper. I purchased mine at my local craft store but you can also make your own by using window screen stapled to a wood frame. I have never tried this so let me know how it turns out if you do!

1. Hold your deckle at an angle as you slide it into the pulp mixture. I go straight to the bottom of the container.

2. Swish it around while it’s submerged. This ensures an even layer of pulp covers the deckle.

3. Keeping the deckle horizontal, remove it from the water and let it begin draining. At this point you can move the pulp around if you need to.

4. Using the sponge, wipe across the screen side of the deckle to remove excess water. Take care how much you tilt the deckle as the pulp can still slide around.

5. I set my deckle on the side of the container to drain while I get the next step set up.

cd_jm_tutorial-1-1.jpg

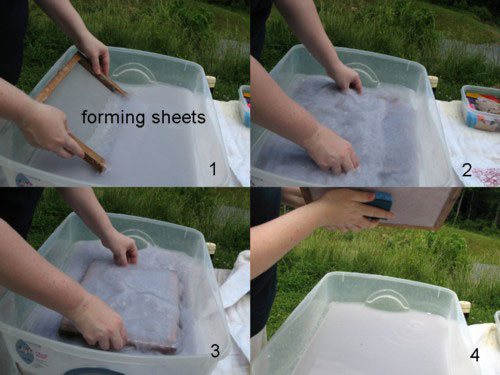
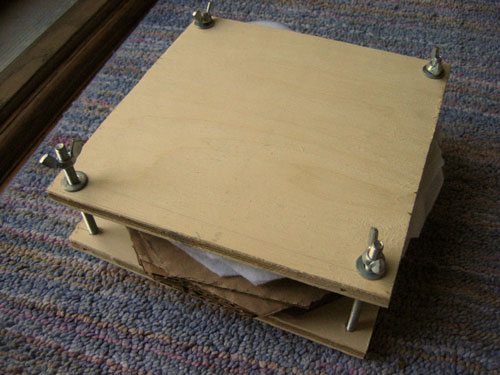
The next step is called couching (pronounced cooching)

1. Place a layer of towels on your surface.

2. Place the deckle screen side down onto the towels.

3. Lay another towel over top of the formed sheet (will be against the pulp) and press with your hands and the sponge to remove additional water.

4. Turn out sheet onto first layer of towels. Sheet should be dry enough to just fall off the deckle. If not, flip and press again. If this makes you nervous, leave the towel on the pulp and turn out the sheet onto it.

5. Layer sheets between towels and press to remove additional water.

6. Remove sheets and lay flat to dry.

cd_jm_tutorial-2-1.jpg

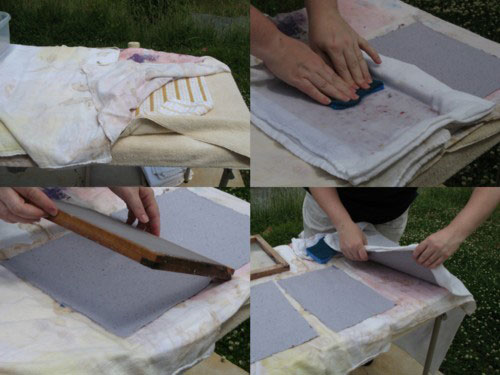
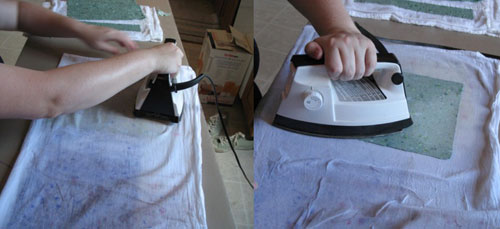
The last step is drying the sheets with an iron (which is optional). I like to iron my sheets dry not only because I’m horribly impatient but because the iron gives the paper a smooth finish.

1. With iron on high, start ironing the wet sheet while still sandwiched in between a towel.

2. Iron until towel starts to feel dry (enjoy the steamy facial in the process!)

3. Pull back top layer of towel and iron sheet itself. When the iron skips right across the sheet you’ll know it’s ready to be ironed directly. It will stick and pull the pulp if it’s not ready.

4. Iron until sheet is crisp and dry.

cd_jm_tutorial-3.jpg

A note about colors:

The pulp will always be a few shades darker than the finished product. I like to use solid colored cardstock or tissue paper color the pulp. Since it’s heavier, the cardstock adds a nice speckle to the finished paper. Take care when using strong colors as the dyes can stain clothing.
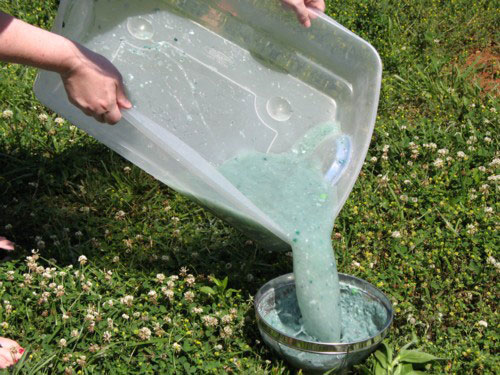
cd_jm_tutorial-4.jpg

Clean up:

I like to do this outside because I make a mess whenever I do anything crafty. Since I’m already outside, I just dump the any left over pulp mixture in the yard when I’m finished (the pulp hangs around for a bit so choose an out of the way place for this). If you’re inside, strain the mixture before dumping it down the drain. Even outside, sometimes I will still strain it to save the unused pulp, especially if I liked the color. Once strained, press the pulp to remove as much water as possible and then let dry. The resulting chunk can be broken up and added to your next batch or add some white glue and sculpt with it!

cd_jm_tutorial-5.jpg

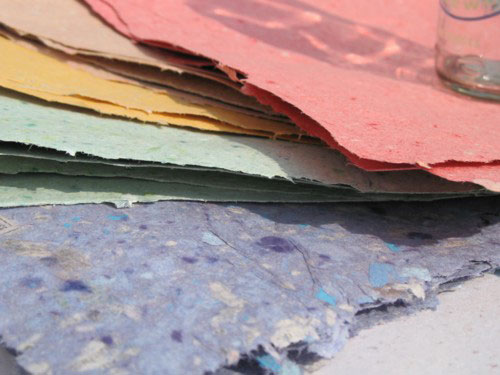
Here’s a sample of a few different textures and colors I’ve made recently. I simply varied the weight of the paper and how long it was processed in the blender.

cd_jm_tutorial-6.jpg

Flower Loom How-to

Monday, April 30th, 2007

I needed a flower loom for a crochet project I’m doing, but didn’t have one. I went to three different craft stores and no success of finding one. I could order one off the internet, but that’s more money and time than if I just made one myself. So I headed back to the craft store in search of supplies.

flower-loom1.jpg

All you’ll need is a 3/16″ wooden dowel, a package of wooden rounds, scissors/small saw, and some glue. I used hot glue for this tutorial, but you may want to use a wood glue or fast-drying epoxy, since the hot glue won’t hold up to a lot of tugging and pulling. And if you can’t find round wooden shapes, you can always use square ones, and make a circle using a compass. You’ll cut (or saw, whichever is easier) your dowell into 1 to 2-inch pieces. For a larger loom, you’ll want 10-12 pieces. First, glue four pieces to the opposite sides. You can mark the center of the circle with a pen so you place the pieces evenly.

flower-loom2.jpg

Then you’ll position the remainder of the pieces in place.

flower-loom3.jpg

You can do the same with smaller rounds, making different shape looms. For the large loom I used 12 pegs, for the medium, 8, and for the small, 6.

flower-loom4.jpg

Now you can embellish anything, using yarn, ribbon, or even twine.

flower-loom5.jpg

flower-loom6.jpg

Simple Makeup Bag

Thursday, April 26th, 2007

makeupbag1.jpg

I made about a dozen of these little bags for the Craft fair. I have had fun choosing the fabrics, embellishments, and buttons and they are so quick to whip up! They are great for makeup bags or I like to put my phone, keys, and cash in it and then put it in my larger diaper bag. I cut a pattern out of a cereal box. It measured: the narrow end/ top = 6 1/2″, the wider bottom = 8 1/2″, height = 6″.

I wanted to make these bags stiff (as I asked about in a previous bag post) so I bought no-sew bond, cut it out using the pattern, and ironed it to the lining. Then you peel away the paper and iron it to the outside fabric. At this point I decide if I want to attatch a stripe of ribbon or trim. Use can use the no-sew bond to attatch this also or sew across the trim with the sewing machine. I also added in a short strap on some of the bags.

makeupbag3.jpg

Then I cut a piece of velcro about 2″ long, folded over a 1/2″ hem, centered the velcro strip and sewed 2 lines, one across the top and botton of the velcro across the width of the bag. This works well too if you want to attatch the trim along the bottom seam for the velcro. Then I turn the bag wrong side out and sew up the sides. I cheat; I sew through the no-sew bond since my fabrics were not very thick. I like the stiffness it gives the fabric. Then I make a gussetted bottom by making a triangle horizontally at the each corner about 1″ down from the edge and sewing across this triangle horizontally. (sorry this is a little hard to describe in words)

makeupbag2.jpg

Such a quick and easy gift or I love having a girly bag inside my big, plain diaper bag!

Quick Jean Fix

Wednesday, April 18th, 2007

My boy has trouble keeping his pants pulled up. Well, since he is only 15 months old I am not too worried about it yet, but I would like him to be able to wear the box of new pants he has before it is too hot for pants. He is 15 mo. but barely wears 12 mo. pants because he is a skinny little guy. Even the half-elastic waistband is often not enough so I borrowed this idea usually found in clothing for fast-growing elementary and pre-teens: the inner adjustable button.

jean-fix.gif

All you need is: elastic, 2 small buttons, a seam ripper, and sewing machine or needle.

1. I cut 2 pieces of 1/2″ elastic about 2″ long. (adjust to the amount you need garment taken in)
2. I used the seam ripper to cut a slit to fit my button toward the end of each elastic piece. (this was easier than using the button holer, if it frays a little it will be okay.)
3. Line up how much you want the elastic drawn in and sew button into pants.
4. With button through your elastic hole, pull elastic to desired place and sew vertically over opposite elastic end. I did not make it adjustable with more than one button but you easily could.

jean-fix-2.gif

This literally took me about 5 minutes and I think will save me some money if I don’t have to skip a season with his pants. Any other tips for fitting thinner kids in their clothes?

Hallowed Easter Eggs

Wednesday, March 28th, 2007

My brother and I used to make these eggs when we were younger and my mom liked it b/c they didn’t stink up the house after only a few days, like their hard-boiled counterparts. In fact, they’ll keep as long as you can keep from crushing them, since they’re made from real eggs.

They’re super easy, but b/c they take a bit of lung work and a gentle grasp, an adult should do the hollowing, leaving the decorating to the kiddies.

hollowedeggs1.jpg

You’ll want to gently cleanse the eggs first. Then you’ll take a pin and puncture the top and the bottom of the egg.

hollowegg2.jpg

You’ll want to make sure the hole is large enough for air to go into the egg, and for the contents to empty. What I do, is make three pinholes close to each other and then connect them, making a larger hole.

hollowegg3.jpg

Then you’ll clean off the top of the egg that will touch your mouth. Hold the egg gently in your hands and blow through the hole, blowing the contents into a bowl (sorry, no picture for that, trust me, it’s quite disturbing). To make it easier, take the pin and insert it in the bottom of the egg, moving it around to break up the yolk. If you find you’re having a hard time, try and enlarge the hole some more, or shake the yolk around after you’ve broke it up. Once the egg is empty, run under cold water, and blow any excess water out. Let egg dry on a paper towel and decorate as desired, but be careful with the hollowed eggs – they are extremely fragile.

hollowegg4.jpg

holloweggs5.jpg