Archive for the 'Tutorials' Category

Crochet Hook Case

Wednesday, March 14th, 2007

I’m constantly searching for my crochet hooks, so as a part of my quest to organize my craft area, I decided to sew up a crochet hook case.

I cut two pieces of fabric 12″ x 18″, and a third piece of fabric 6″ x 18″. I cut the third piece of fabric on a slight angle along one long side, so accommodate for different lengths of hooks (this will be the pocket). Take the smaller piece, and iron the edges in approximately 1/4″ to finish the pocket.

march12034.jpgmarch12031.jpgPlace the two larger pieces right side together, and sew around the edges using a 1/4″ seam allowance, leaving one side partially unsewn to turn the pieces right side out. Turn it right side out, and pin the pocket to the front of it. Ideally, if the same 1/4″ seam was used for the sewing and ironing, the pieces should fit together perfectly. Also attach ribbon for tying the case when its finished.march12036.jpg march12037.jpg

When I took the above picture, I had placed the ribbon wrong…you want to have both ribbon pieces on the same side of the case, not one on each side. Topstitch around the case to attach the pocket and for finishing. Then you will want to mark lines for the pockets that hold the hooks. I marked them at 1″ spacing, and then stitched over the chalk lines.

I added snaps to my case, so that the top stays put when folded over and the hooks don’t fall out. I’m pretty happy with how it turned out, except that I used a stretchy fabric, which didn’t sew up too nicely, my case isn’t exactly square :) But that’s fixable with adjusting the tension, and I just didn’t take the time to do that. Otherwise, it does its job and its cute too!

march12040.jpgmarch12039.jpg

march12042.jpg

Polymer Clay Button Tutorial

Monday, March 5th, 2007

Here it is guys.. only 3 min long. Enjoy.

Clone Yourself a Dress Form

Wednesday, February 21st, 2007

duct-tape-dress-form.jpg 
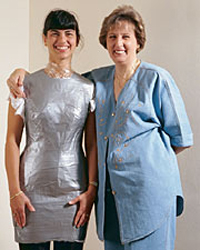
For those who like to make their own clothes, but can’t afford a store-made dress form, deck yourself in duct tape and you’ve got an inexpensive alternative. Threads magazine gives four easy and fun ways to create your own dress form using either papier-mâché or duct tape. They say you can complete this project in as little as two hours, using no more than $15 in materials. I’ll be trying this in the weeks to come, so check back to see my cloned dress form.

Capes for my Heroes

Wednesday, February 14th, 2007
judah-in-cape.gif

For Valentine’s Day my husband and I decided to make each other a gift. I am anxious to see what he comes up with, while I decided to make him one of the things on his “list” that he can enjoy while playing with our son: Superman. We want to fill a chest with costumes for playing dress-up, so I made 2 versions of this cape that would hopefully make Clark Kent proud.

I bought red 1/4″ bias tape and 2 yards of red satin, measured the length to about the bottom of the seat of their pants.

Small Child: 18″L x 16″W
Adult: 40″L x 28″W

1. I like to iron my hems rather than pinning so I started with the sides, turned over twice about 1/4″ and ironed them down. Then I hemmed the sides and did the same with the bottom.

2. At the top I ran a thread through near the edge and pulled it in to gather. Then I sewed across my gathering. Be sure to keep your finger near the sewing needle so you can press down the fabric where it gathers.

gather-for-cape.gif

3. Next, I used 1/4″ red bias tape to create the tie. Open the tape, center it across your fabric, and tuck in the newly gathered top seam. Then sew all the way across the bias tape. It shouldn’t unravel but you can also tuck in and sew the ends of the tie.

sew-binding-on-cape.gif

I think this would be really cute with a contrasting color of bias tape around all of the edges. I can’t wait to see them play!

Easy, Inexpensive Dog Bed

Friday, February 9th, 2007

dogbed2.jpg

I never thought our pug, Jaxon, ever cared about where he slept. This dog will sleep anywhere, and all day if he likes, so I thought a dog bed was just a dog bed. Until I got him one that clearly did not meet his standards. He would’ve rather slept on the hardwood floor than in this thing. So out it went and I was left with the dilemma of spending yet another $20 on a dog bed that he may or may not like. And would most definitely be ugly.

So I decided to go the cheaper (and better looking) route by making one myself. I bought a cheap, yet fluffy, pillow from Walmart and some canvas fabric on sale at JoAnn’s that would match our decor.

I’m new to sewing and I didn’t have a pattern to go by, just what was in my head, so for all you experienced sewers out there, please excuse my ignorance and don’t laugh at the diagram I put together below. I mean it - don’t laugh!

Okay, so you get enough fabric to completely cover your pillow. I got a standard sized one and used just a smidge over a yard (a yard x 45″). First you’ll hem the top of your fabric, one of the shorter sides (Figure 1). Then you’ll fold your fabric in half length-wise (so the opposite side is on the outside) and sew the edges together (Figure 2). You’ll finish by sewing the bottom of the fabric together (Figure 3), so the only opening will be at the top. Turn your pillowcase inside out and then slide your pillow in, tuck the remaining fabric underneath and you’re done!

figure12.jpg

I don’t know how to do a zipper, but if you know how to do this, then have at it and you can close it. I chose to let the fabric be a little longer, and then just tucked the longer portion underneath. This reason was two-fold: one, so I could accomodate a larger, longer pillow in the future, and second, I was lazy and just wanted a quick fix for the puppy.

From start to finish this project cost $9 and about 20 minutes. At the end you will have a functional dog bed that looks as fabulous as it is comfy. And the best part of it all is it’s washable!

dogbed1.jpg

Exploding Scrapbook Box

Tuesday, January 30th, 2007

Here is a great gift idea that you could make and give your loved one for Valentine’s Day. This is what the box looks like put together:

today2023.jpg

The lid comes off, and this is what is found inside:

today2028.jpg

I got the idea for this from the cricut.com messageboard, but you don’t need a Cricut to make it. What you do need is 3 pieces of 12×12 cardstock, one piece of 6×6 cardstock and matching paper and/or embellishments you want to use. Start by scoring lines on one piece of cardstock 4 inches apart, making the paper look like a tic-tac-toe board. Cut out the four corners.

today2018.jpg

On another piece of cardstock, score the lines 3.75 inches apart, and cut out the corners. Repeat with another piece of cardstock, making the lines 3.5 inches apart. You will have to trim the length of the edges as well, as much as you want. I chose to round my corners and distress the edges of the layers at this point.

today2019.jpg

To make the lid, take the 6×6 piece of cardstock and score it at 1 inch all the way around. Do a straight line clear across the side of the cardstock on each side. Cut very carefully one line on each side so that you can tuck it up under the next side and tape it. Don’t cut past the one inch score line.

today2020.jpg

Fold the sides in, and glue to secure. Now you can begin layering your cut pieces, putting the smaller ones on top of the larger ones and adhering the middle squares only. Once the box is together, you can decorate and embellish each layer as you want. I did it this way, and found that it might be easier to decorate each layer before you assemble it, but that’s a personal choice.

My box isn’t quite finished yet, I want to add some journaling in the middle of the box, and I haven’t decided how I want to decorate the outside of the box yet. But it worked up pretty fast, one evening, and it makes a unique gift.

Baby Backpack

Tuesday, January 23rd, 2007

judah-in-backpack-4.jpg 
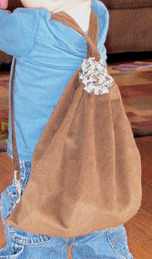
I made this bag for Candace’s son’s birthday. I am always trying to think up gifts for little boys that are not another toy, so I came up with this scaled down backpack to hold their toys. I chose corduroy for the outside of the bag which I wanted to be able to withstand a little boys’ abuse. The inside fabric is a cute print of wild animals. You could go in so many directions with this by choosing different fabrics or embellishments for a boy or girl.

1. Decide what size you want the bag to be taking into consideration the height of your child. I made this according to the length of my son’s jacket. Cut your lining fabric 2-3 inches longer than your outer fabric. I thought the corduroy might be too stiff for the drawstring so I made the top part out of the cotton print. I thought this was cute too, adding the colorful border.

2. Line up the longer and shorter piece of fabric evenly, place the right sides together of the two fabrics, and sew the seam up to the drawstring strip. Leave this open so the drawstring can be inserted. Then flip the lining fabric over, fold allowing for the width of the strap or ribbon you want to use for the drawstring/arm straps. Iron along the top edge to make a crease. Be sure to take into consideration that the lengths of the fabrics match at the bottom.

3. Line up right sides again and sew a seam along one long side. Center this seam just sewn and sew along the bottom of the bag.

backpack-inside.gif

4. Turn bag inside out. I cut the fabric at a slight angle where my drawstring opening was left unsewn and finished the holes off by sewing a blanket stitch around the edge. You could also use a button-holer to make finished holes.

backpack-front.gif

5. Measure your straps by calculating the width of your bag X 2 plus the length needed to reach from the drawstring hole to the bottom of the bag. I folded the corduroy with wrong sides together, turned the edge over, ironed my hem and sewed on top of the fabric. I ran this strap through and attached in the bottom corners with a button but this could be done in many different ways. The second bag I make like this will be much easier than this first one now that I have it figured out. I would make the strap of cotton fabric or heavy ribbon next time and perhaps embroider a name on before sewing the 2 fabrics together to personalize, but I still think it turned out cute!

judah-in-backpack-4.gif

backpack-spilling-1.gif

Quick and Easy CD Storage

Monday, January 22nd, 2007

As an avid scrapbooker, I’m always buying scrapbook albums on sale or receiving them as gifts. In the end, I always end up with lots of empty albums and I can never decide to just keep them for future layouts or use them for other things. I came up with a great idea to use a scrapbook album for CD storage, that keeps the CDs out of sight, and the scrapbook looks great sitting on a bookshelf or entertainment unit.

Closed…it looks just like a regular scrapbook album:

100_2029.jpg

Opened…its a storage secret - lots and lots of CDs:

100_2039.jpg

I started with an empty scrapbook album, an empty page protector and 2 pieces of scrapbook paper (for each page of CDs). I folded each of the 12×12 papers into quarters and then opened up. I put the papers into the page protector with the right sides facing out, and I sewed along the folds using my sewing machine. This separates the page into 4 pockets. I then used a ruler and a scalpel to cut about a half inch below the horizontal stitching, creating pockets to slide the CDs into. And there you have it - quick and easy CD storage that matches your decor, takes about 5 mins to make (per page) and holds 8 CDs.

This is a great project to get rid of some scrapbook paper you have laying around, as well as embellishments if you want. I chose to keep mine simple, but you could jazz the pockets up using embellishments, ribbon, colored thread…the options are endless!

Taggies

Wednesday, January 17th, 2007

I enjoy making this simple and inexpensive baby gift for the dozen showers I attend each year. I stole the idea from a costlier version in a local store. Inevitably, instead of enjoying his teddy bear’s cute face, my son turns the bear upside down and clings to the label. So I decided to indulge him with a small blankie of only labels.

1. I choose 2 fabrics of different texture, honestly with the mom’s taste in mind, since little one can’t say yet. I like flannel, corduroy, fleece, bright prints in fabrics that can take many washings. Or I like to pick a theme that would go with the family, like my son has a “Let’s Build It” taggie covered with tools in honor of my carpentry-skilled husband. Once you have stock-piled some fun fabrics and ribbon, the cost will feel next to nothing, literally like $1-2. The discount section of your fabric store is a great place to look.

taggie-fabric-stack-2.gif

taggie-ribbon.gif

2. Cut a 12 inch square out of your 2 fabrics. I made a cardboard template that I just lay down and draw the lines with a pencil for cutting.

3. Choose your ribbons and cut out in different lengths, usually 3-5″. Fold over to picture how long you want the ribbons to stick out. Line up right sides of fabric together. Fold the ribbon in half and tuck the folded end inside the 2 fabrics. I stagger the lengths a little and vary the width and texture of ribbon around the fabric.

taggie-all-pinned.gif

4. I leave one corner unpinned where I sew a long, wide ribbon, for a handle, caddy-corner after the other sides are sewn. Sew the other 3 sides up to the handle corner, removing each pin as you get to it and making sure the ribbons are straight.

5. Turn the fabric inside out, tuck in the 4th corner, insert the final ribbon and sew on top of the fabric. You can also embroider the child’s name to personalize it, or I usually sew a large, colorful button on top -just something else for them to play with.
This is a great way to use up any scrap fabric and scrap ribbon from other projects!

taggie-all-done.gif

OTHER EXAMPLES:
lucy-taggie-folded.gif

judahs-taggie.gif

iPod Cozy

Monday, January 15th, 2007

ipod6.jpg

My fabulously amazing husband and his parents got me an iPod this year for Christmas. However, what’s a fantastic piece of equipment like that without an equally fantastic cozy to keep it in? So I fashioned a felt (are you surprised?) iPod cozy that only cost about $.60 to make, and only took two hours from start to finish.

First, you’ll measure out how much felt you’ll need. Then you’ll cut a front and a back piece, making sure the back piece is longer than the front (so it will fold over and close).

ipod1.jpg

Next, you’ll decide on whatever shape you want (a flower, an animal, or just shapes of any kind) and pick your embroidery floss.

ipod9.jpg

Cut out your shape, and adhere it to the felt with a needle (to keep it in place while stitching) and then using the backstitch you’ll sew it to the felt. You could also use a blanket stitch if you like as well. You can place your shape anywhere you like, but make sure you don’t place it too close to the edge - you’ll need to allow some room there for the seam.

ipod3.jpg

Next, add any other imbelishments you like, (buttons, more embroidery or other shapes) and then attach the snaps to the tops of the two pieces, making sure they line up correctly so it will close correctly.

ipod4.jpg

To finish up the cozy, stich together the front and back pieces (using either a blanket stitch or a running stitch), and voila, a fabulous and functional iPod cozy.

finished-ipod.jpg