

Have you ever struggled with hand-knit socks that pinch your toes or slip down your heel? You’re not alone. In this article, I’ll show you how to use a sock calculator to create perfectly fitted socks every time.
You’ll learn:
- What a sock calculator is
- How to take accurate foot measurements
- Step-by-step instructions for using the calculator
- Tips for adjusting the results for your unique feet
After trying countless methods, I’ve found that sock calculators are the most reliable way to achieve that “custom-made” feel. Whether making socks for yourself or as gifts, this guide will help you create comfortable, well-fitting socks that actually get worn.
Say goodbye to the disappointment of unwearable handknits!
What Is a Sock Calculator?
A sock calculator is a tool that turns your foot measurements and knitting gauge into a custom sock pattern. Think of it as your sock-fitting assistant. Most sock calculators are free online tools.
You input a few key measurements:
- Your foot length
- Your foot width
- Your gauge (how many stitches and rows you get per inch)
The calculator then works its magic. It tells you exactly:
- How many stitches to cast on
- When to start your heel
- How long to take for the foot to decrease before the toe decreases
- How to shape your toes properly
Unlike standard patterns for an “average” foot, a sock calculator creates instructions for your feet. Ever wonder why store-bought socks come in just a few sizes, but feet come in countless shapes and sizes? That’s the problem sock calculators solve.
Some calculators even let you customize different sock parts, like adding extra room for high arches or adjusting for wide ankles.
How to Use a Sock Calculator?
Some calculators allow you to adjust different sock parts, such as adding extra space for high arches or widening the fit for larger ankles. Using a sock calculator is easier than you might think.
Let me walk you through the process:
Step 1: Gather Your Tools
You’ll need a tape measure, knitting needles and yarn, a gauge swatch (I know, making swatches isn’t fun, but it’s essential!), and access to a sock calculator (online or app).
Step 2: Knit a Gauge Swatch
This is non-negotiable! Knit a 4×4-inch square in the pattern you plan to use for your socks. Wash and block it just like you would your finished socks. Count how many stitches and rows you have in 1 inch. This is your gauge.
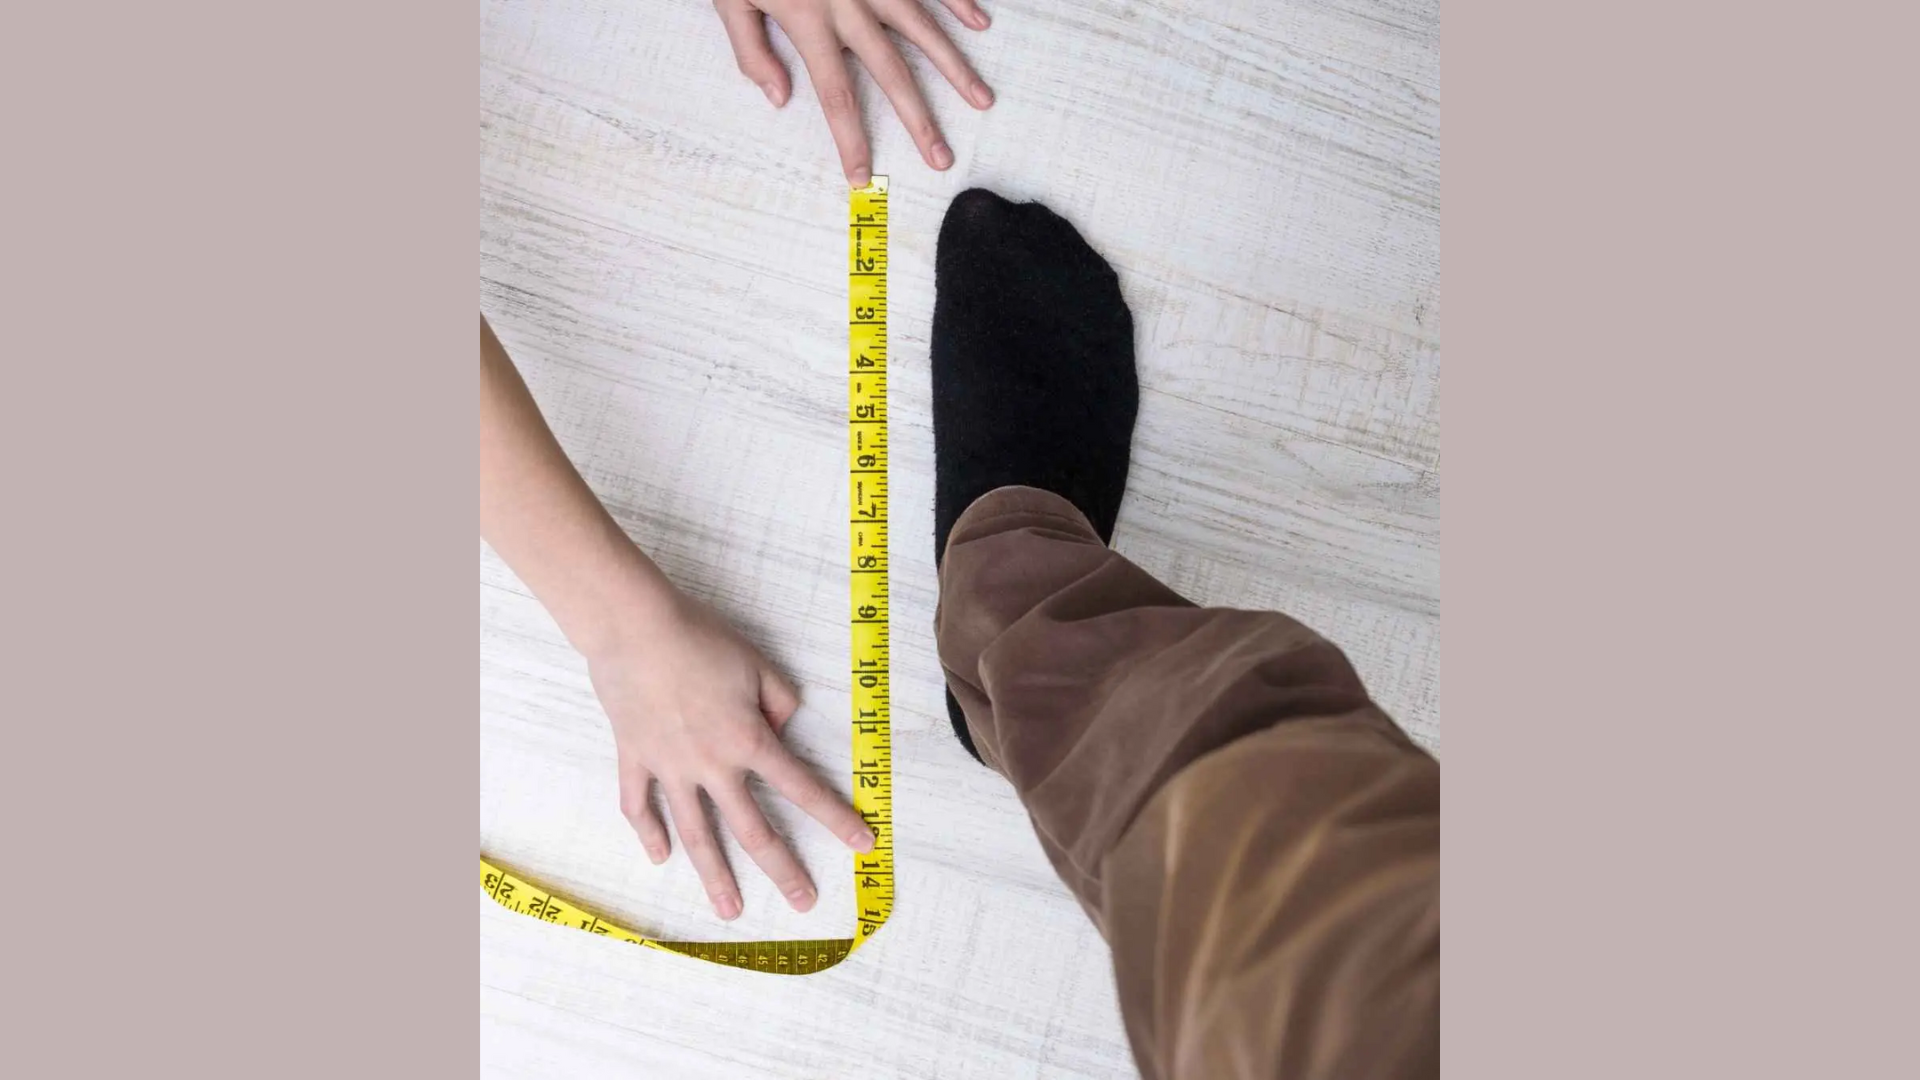
Step 3: Take Accurate Measurements
Measure your foot at its widest point (usually across the ball of your foot). Make sure the tape is snug but not tight. Then, measure from the back of your heel to the tip of your longest toe.
Pro tip: Measure both feet! Most people have slightly different sizes. I always use measurements from my larger foot.
Step 4: Enter Your Information
Go to your chosen sock calculator and enter your gauge measurements, foot measurements, and preferred sock style (ankle, crew, knee-high).
Step 5: Get Your Pattern
The calculator will generate your custom pattern. Please write it down or print it out. Some calculators even create row-by-row instructions. Others give you the key numbers to plug into your favorite sock pattern.
Essential Measurements for Perfect-Fitting Socks
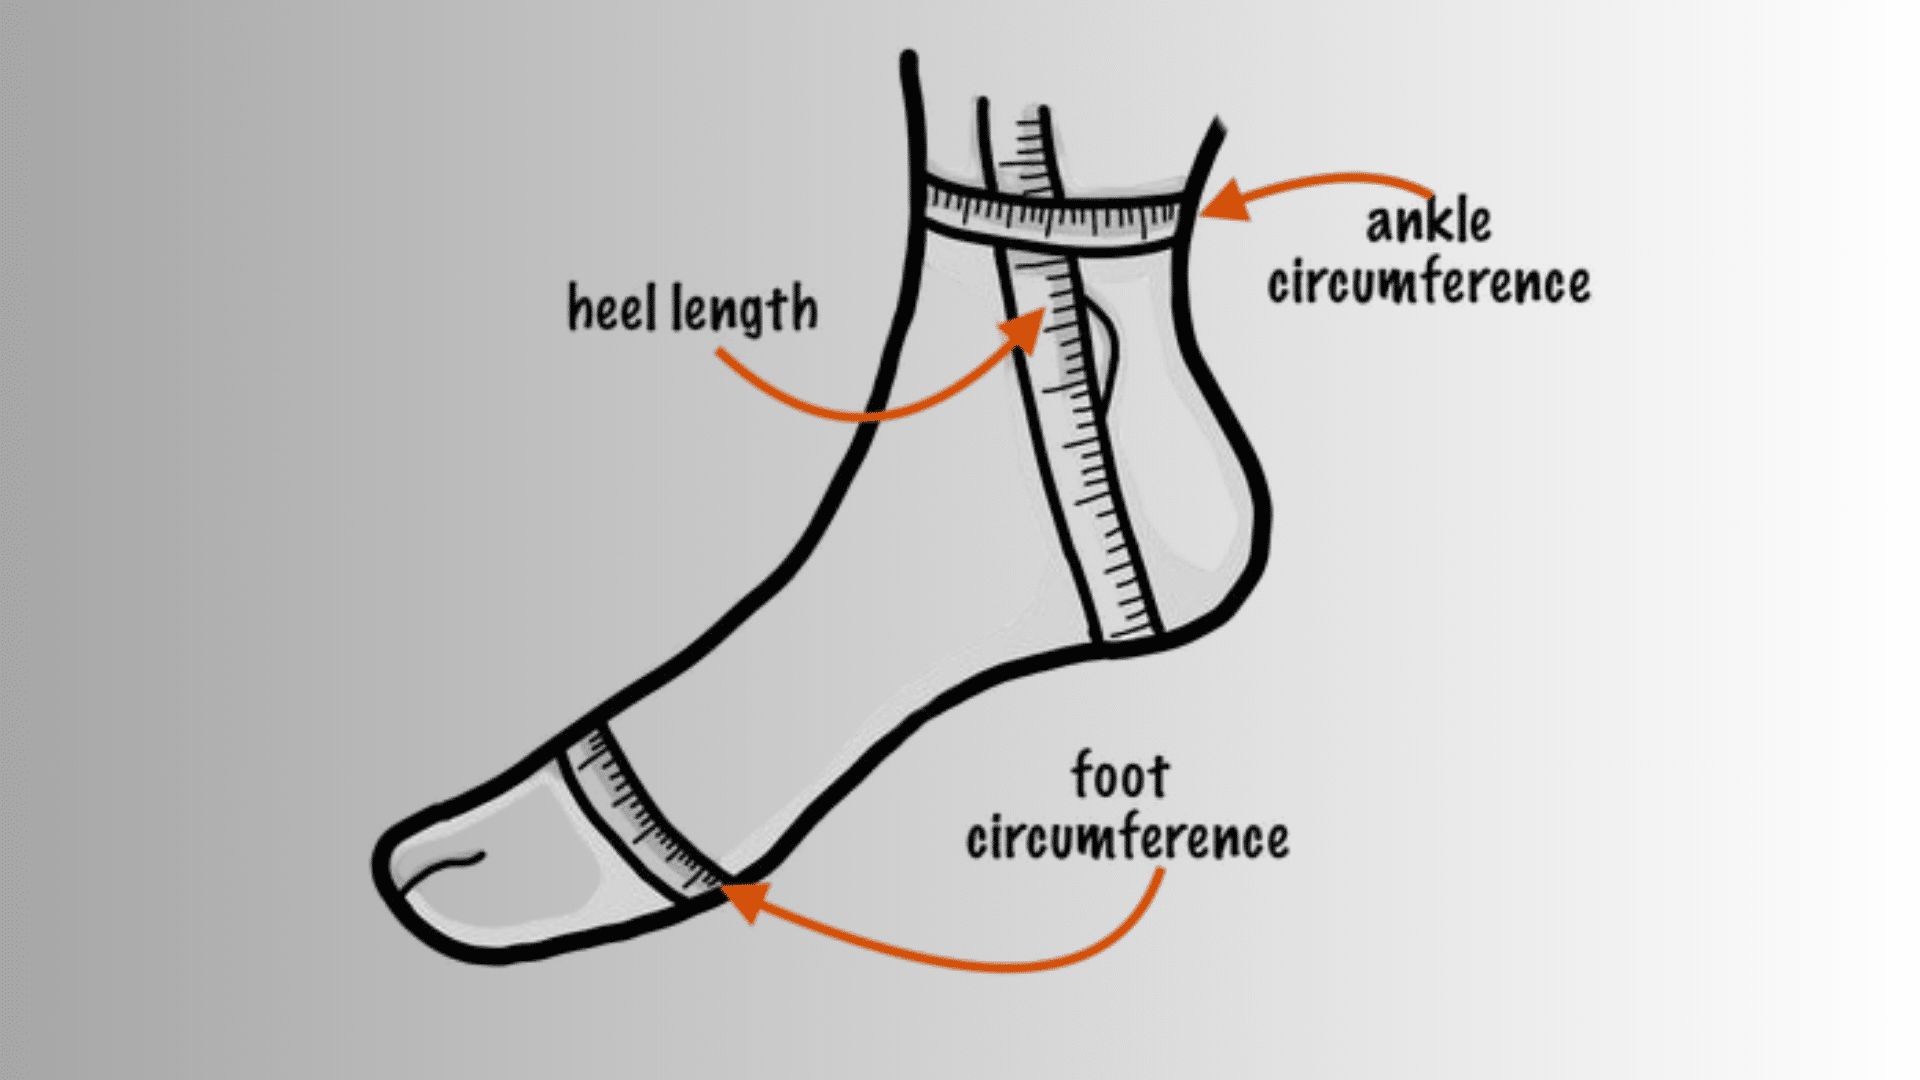
Measure your foot length, width, and ankle circumference to get the perfect sock fit. Accurate measurements help ensure a snug yet comfortable feel. Getting accurate measurements is the most important part of using a sock calculator.
- Foot Circumference: Measure around the widest part of your foot. Don’t squeeze the tape measure – it should be comfortably snug.
- Foot Length: Measure from the back of your heel to the tip of your longest toe while standing. Your foot spreads when bearing weight, so standing gives a more accurate measurement.
- Ankle Circumference: Measure around your ankle at the narrowest point above your ankle bone. This helps determine how many stitches you need for a comfortable cuff.
- Leg Length: Decide how tall you want your socks to be and measure from your ankle bone upward. This isn’t for fit calculations, but it helps you know when to start your cuff.
Remember, taking measurements in the evening gives the most accurate results. The feet tend to swell slightly throughout the day.
Benefits of Using a Sock Calculator
Using a sock calculator when knitting or crocheting socks offers numerous advantages that can enhance your crafting experience and the quality of your finished projects. This is why many crafters rely on these helpful tools:
1. Save Your Time
I know how it feels to run out of clean socks. You rush around in the morning, looking for matching pairs. A sock calculator helps you avoid this chaos.
You’ll know exactly when to do laundry. There will be no more last-minute washing or wearing mismatched socks, and your mornings will become smoother. Think about it. How many minutes do you waste searching for socks each week?
2. Reduce Waste
When you calculate your sock needs, you buy only what’s necessary. Less waste means less impact on our planet. I’ve seen too many forgotten socks in drawers. You won’t overspend on socks you don’t need. Your wallet will thank you. Sometimes, less is more.
3. Extend Sock Life
Knowing your exact sock requirements helps distribute wear evenly. Your socks last longer when you rotate them properly. I used to wear the same few pairs repeatedly. You can avoid this mistake with proper calculation. Extend the life of your favorite pairs. Quality over quantity works with socks, too.
4. Simplify Shopping
With a sock calculator, shopping becomes focused. You know exactly what to buy and when. I used to wander through sock aisles. You don’t have to repeat my mistakes. Buy with confidence and purpose. Imagine shopping with a plan!
5. Create Better Outfits
The right number of socks means the right types for different occasions. Your style improves naturally. I never had dress socks when I needed them. You’ll be prepared for any event, and your outfit coordination will improve from the ground up. Small details make big differences.
Tips for Getting the Best Results
Using a sock calculator can take your knitting projects to the next level by creating perfectly fitted socks. These are some practical tips to help you get the most accurate and useful results:
1. Enter Accurate Information
I’ve learned that honesty works best here. Tell the calculator exactly how often you wear socks. Your results will only be as good as your input.
Accuracy matters more than you might think. Don’t round down your daily sock changes if you actually change them twice. Be real with yourself. How many socks do you actually wear?
2. Consider All Activities
When calculating, think about your whole life. I forgot about my weekend hikes for months. You need different socks for different activities.
Running, work, and special events all count. Don’t forget seasonal needs like thick winter socks or summer ankle socks. One calculation doesn’t fit all seasons.
3. Add a Buffer Zone
I always add a few extra pairs to my calculation. Life happens unexpectedly, and its better to be safe than sockless.
You might spill something, lose a sock, or have a surprise activity. A small buffer prevents sock emergencies. Adding 3-5 extra pairs is usually enough.
4. Update Regularly
Your sock needs to change with your life. I update my calculations every few months. You should recalculate when seasons change or when your routine shifts.
New job? New workout plan? Time to recalculate. Habits evolve. So should your sock supply.
5. Check Sock Condition
Numbers alone don’t tell the whole story. I inspect my socks regularly for wear and tear. Your calculation should include replacing worn-out pairs.
Thin spots and holes mean replacement time, no matter what the calculator says. Quality counts as much as quantity.
6. Start Small
I made the mistake of buying too many socks at once. Start with the minimum and adjust as you go. You can always add more later.
Test your calculations in real life before making big purchases. Small steps lead to perfect sock balance, and patience pays off in perfect sock drawers.
Conclusion
I hope you’ve found this guide helpful! Sock calculators really do change the game when it comes to knitting perfect socks. Remember, you don’t need to be a math genius. The calculator does all the hard work for you! What matters most? Your comfort and satisfaction.
Think about it. No more too-tight socks, no more baggy heels, just custom-fit socks that feel amazing on your feet. Give it a try on your next project. I guarantee you’ll notice the difference.
Still unsure? Here’s what you can do:
- Start with a simple pattern
- Take careful measurements
- Trust the calculator
- Make small adjustments as needed
Your perfect socks are just a calculation away.
Happy knitting!
Frequently Asked Questions
Do I Need Special Math Skills to Use a Sock Calculator?
Not at all! The calculator does all the math for you. You need to know how to measure your foot and count stitches in your gauge swatch.
Can I Use a Sock Calculator for Children’s Socks?
Absolutely! Sock calculators work for feet of all sizes. You’ll get perfect results by entering the child’s foot measurements instead of your own.
What if I’m Using a Different Yarn than The Pattern Suggests?
This is exactly when a sock calculator shines! If you make a gauge swatch with your chosen yarn, the calculator will adjust all the numbers to fit perfectly.
How Accurate Are Sock Calculators?
They’re very accurate when you provide good measurements and gauge information. I’ve found them much more reliable than following standard patterns with set sizes.
Can I Still Use My Favorite Sock Pattern with A Calculator?
Yes! Use the calculator to get your key numbers, then apply those to any pattern you like. Most calculators give you stitch counts that work with any construction method.