


Want to make something sweet and simple with your crochet skills?
Pinecones might not be the first thing you think of, but they do charming little projects that bring some woodland magic to your home.
These small crochet creations are great for adding to Christmas trees, decorating fall tables, or making cute bag accessories.
The best part is that you can finish one in just a few hours, making them perfect for last-minute gifts or quick craft sessions.
In this guide, you’ll learn:
- A basic pinecone pattern that’s easy to follow
- Tips to make your stitches look like real pinecone scales
- Ideas for using your finished pinecones
I’ve made dozens of these little treasures, and I’m happy to share the best techniques.
Let’s start with the basics and get your first pinecone taking shape.
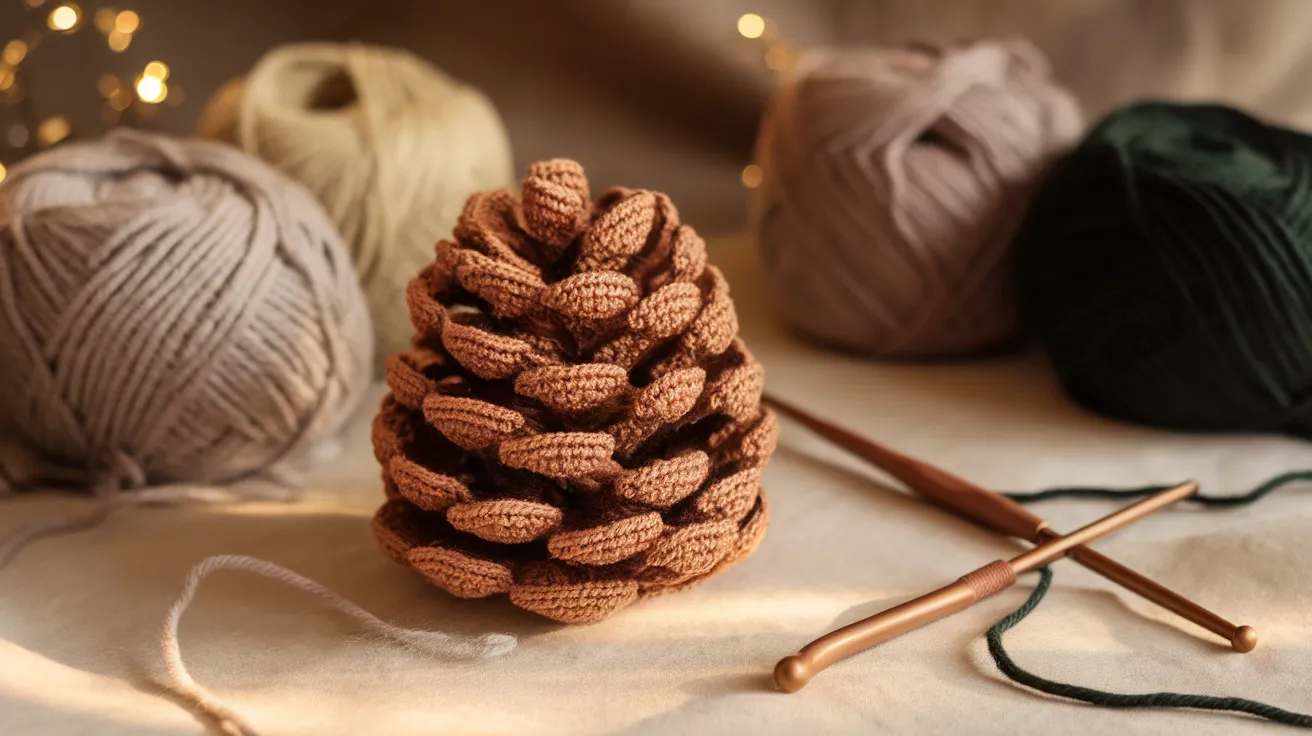
Materials and Tools You’ll Need
Let me share what you’ll need to create your own crochet pinecones.
I’ve kept the list simple and budget-friendly.
Basic Tools
- Size E/4 (3.5mm) crochet hook
- Scissors
- Yarn needle
- 2-3 stitch markers
- Stuffing (polyester fiberfill)
Best Yarn Choices
- Main color: Worsted weight (size 4) in brown tones
- I suggest coffee brown, nutmeg, or chestnut shades
- You’ll need about 50 yards for each pinecone
Nice-to-Have Extras
- Thin wire (20-22 gauge) to help keep shape
- Small wooden beads for the stem
- Ribbon or string for hanging
Pro tip: Pick yarn with a bit of texture – those tiny bumps and fuzzy bits make your pinecone look more true to nature.
Regular acrylic yarn works great, but wool blends give an extra special touch.
Common Abbreviations in Crochet Patterns
Let me help you understand the shortcodes you’ll see in patterns.
Think of them as texting shortcuts for crochet—they make patterns shorter and easier to follow.
Basic Stitches You’ll Need
- ch = chain
- sc = single crochet
- sl st = slip stitch
- rep = repeat
- st(s) = stitch(es)
- rnd = round
Quick Reference Table
| Short Form | Full Name | What It Does |
|---|---|---|
| mc | magic circle | makes a tiny ring to start |
| inc | increase | makes the work wider |
| dec | decrease | makes the work smaller |
| * | repeat | do what’s between stars again |
| ( ) | group | work these stitches together |
Reading Pattern Tips
- Read through once before starting
- Mark your spot with a pencil
- Count stitches after each round
Pro Tip: Keep this list near your work spot.
Soon, you’ll know these by heart, just like I do.
When you’re stuck, take a breath and read the pattern slowly.
Step-by-Step Guide to Crocheting a Pinecone
1. Start with the Base
The base sets up your whole pinecone, so let’s make it strong and neat.
Start with a magic ring – it gives you better control than a chain loop.
Making Your Base:
- Create a magic ring
- Work 6 single crochet stitches into the ring
- Pull the ring tight
- Mark your first stitch with a stitch marker
Quick Tip: If you find the magic ring tricky, I’ve learned that practicing with lighter-colored yarn helps you see the stitches better.
2. Building the Scales
Now comes the fun part – creating those little scales that make your pinecone look real.
Scale Pattern:
- Round 1: Make two single crochet in each stitch (12 stitches)
- Round 2: Chain 3, slip stitch in next stitch, repeat around
- Round 3-6: Repeat round 2, offsetting scales each round
Important: Keep your tension even. Loose stitches make floppy scales; tight ones curl too much.
3. Assembling and Finishing Touches
Time to bring it all together and make your pinecone look its best.
Final Steps:
- Stuff the pinecone lightly as you go
- Decrease stitches at the top for a natural taper
- Work a slip stitch to join each round
- Weave in ends with your yarn needle
Making It Last:
- Add a drop of fabric stiffener to keep scales perky
- Shape scales with your fingers while they’re damp
- Let it dry completely before handling
Remember: Your first pinecone might not look perfect – that’s okay! Real pinecones aren’t perfect, either.
Each one you make will look better than the last.
Creative Pinecone Patterns to Try
Let me show you how to mix pinecones with daffodil features for something special.
I’ve tried many color mixes, and these work beautifully together.
1. Base Colors to Use
- Bright yellow for daffodil petals
- Soft cream or white for highlights
- Light brown for the pinecone base
2. Making Petal Scales
First, work on your basic pinecone pattern using brown yarn.
Then add petal-like points using yellow yarn:
- Make longer chains (5 instead of 3) for petal scales
- Work these special scales only on the top half
- Space them wider than regular scales
3. Simple Flower Touch
Here’s a neat trick I found:
- Add six yellow chain loops around the top
- Pull them slightly forward
- Finish with a small white center
4. Mixing It Up
Try these fun spins on the pattern:
- Make mini versions for earrings
- Create a string of them for a spring garland
- Stack different sizes for a table display
Color Tips:
- Use matte yarn for the pinecone part
- Pick slightly shiny yarn for petals
- Mix in white stitches for a sun-bright look
Tips for Enhancing Your Crochet Pinecone
1. Playing with Different Yarn Textures
I’ve tried many yarns, each giving your pinecone a unique look. Here’s what I’ve learned works best:
Soft Yarns:
- Cotton blends make smooth, neat scales
- Fuzzy yarns create a soft, winter look
- Baby yarn works great for tiny pinecones
Stiffer Options:
- Wool holds its shape nicely
- Hemp yarn makes firm scales
- Mixed fiber yarns add natural-looking bumps
2. Adding Beads or Glitter for Extra Charm
Let’s make your pinecones sparkle! Here’s how I add shine without going overboard:
Best Places for Beads:
- Between scales (use small wooden beads)
- At the top point
- Along the bottom edge
Holiday Sparkle Ideas:
- Sew tiny glass beads on scale tips
- Add small bells for Christmas trees
- Work in the metallic thread with your main yarn
3. Stiffening Techniques for a More Realistic Look
Want your pinecone to keep its shape? These tricks help:
Simple Stiffening Methods:
- Mix equal parts white glue and water
- Brush the mix lightly on the scales
- Let it dry for 24 hours
Wire Support:
- Thread thin wire through the middle
- Bend it slightly to shape scales
- Hide wire ends in the stuffing
Blocking Tips:
- Shape while damp
- Pin scales open
- Air dry completely
Ways to Use Your Crochet Pinecones
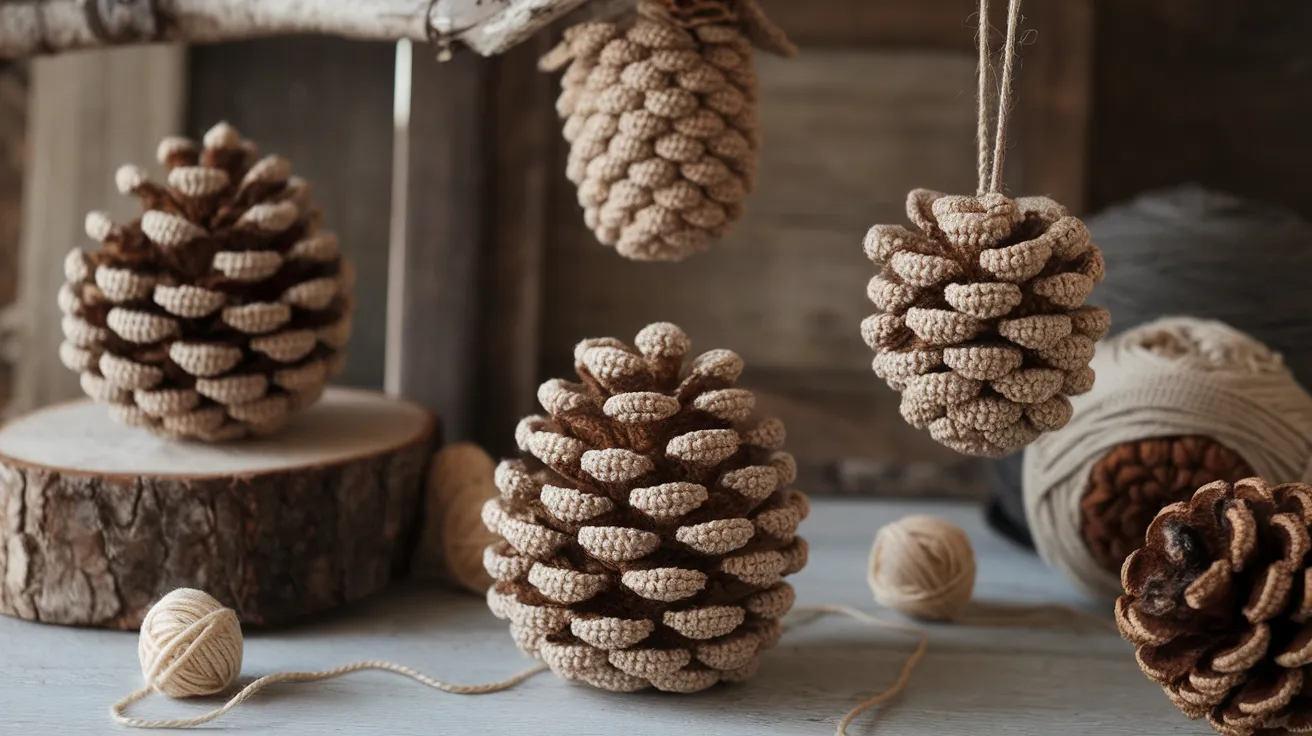
1. Home Décor Ideas
Table Displays:
- Mix with real pinecones in a bowl
- Place them around candles
- Scatter on a runner with fall leaves
Wall and Door Art:
- Add to a basic twig wreath
- String them into a hanging mobile
- Make a window swag with greenery
2. Wearable and Accessories
Quick Add-ons:
- Attach a pin back for a brooch
- Make a zipper pull for bags
- Create hair ties with mini ones
Outfit Ideas:
- Sew onto winter hat brims
- Add to scarf ends
- Make shoe clips
3. Unique Gift and Craft Ideas
Holiday Touches:
- Paint tips white for snowy looks
- Make tree ornaments with loops
- Create gift package ties
Special Keepsakes:
- Wedding table markers
- Baby mobile pieces
- Memory box treasures
Bonus Tip: Make sets of three in different sizes – they look sweet grouped together, and you can split them up for small gifts when needed.
Gift Packaging:
- Tie to gift bags
- Use as card add-ons
- Make mini ones for gift tags
Conclusion
You have all you need to create these sweet little crochet pieces.
Each adds something special to your home or gifts, from simple brown pinecones to bright daffodil mixes.
Start with the basic pattern, then add your touches.
Mix colors, play with scale sizes, or add small sparkly bits—there’s no wrong way to make them yours.
What’s Next?
- Make your first pinecone
- Try a new color mix
- Share what you create
I’d love to see what you make!
If you get stuck, drop a photo in the comments below or ask any questions.
Your crochet friends are here to help, and we’re eager to see your interpretation of these woodland-inspired treasures.
Frequently Asked Questions
How Long Does It Take to Crochet One Pinecone?
A basic pinecone takes about 2-3 hours for most beginners.
Once you’re familiar with the pattern, you can finish one in about an hour.
Can I Make Mini Pinecones for Jewelry?
Yes!
Use a 2mm hook and thin cotton thread.
The finished pinecone will be about the size of your thumbnail – perfect for earrings.
Will These Pinecones Hold Up Outdoors?
Not really.
Keep them inside or in covered areas.
Rain and direct sun can damage the yarn and make colors fade quickly.
What’s the Best Way to Clean Crochet Pinecones?
Use a soft brush to remove dust. For deeper cleaning, spot clean with mild soap and water, then reshape while drying.
Can I Make These Without Using Brown Yarn?
Of course! Try silver for winter decor, pastels for spring, or bright colors for kids’ rooms. The pattern works with any color.


