


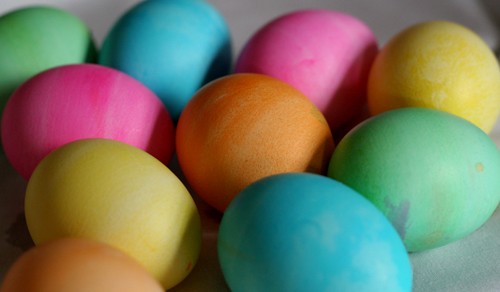
Hallowed Easter Eggs
March 28th, 2007 by CandaceMy brother and I used to make these eggs when we were younger and my mom liked it b/c they didn’t stink up the house after only a few days, like their hard-boiled counterparts. In fact, they’ll keep as long as you can keep from crushing them, since they’re made from real eggs.
They’re super easy, but b/c they take a bit of lung work and a gentle grasp, an adult should do the hollowing, leaving the decorating to the kiddies.
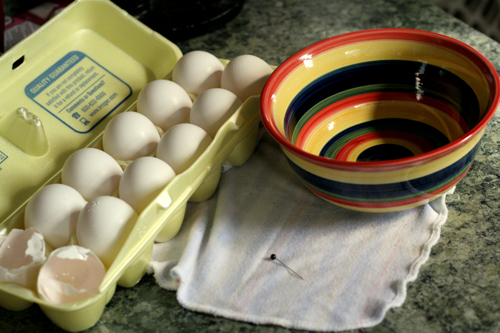
You’ll want to gently cleanse the eggs first. Then you’ll take a pin and puncture the top and the bottom of the egg.
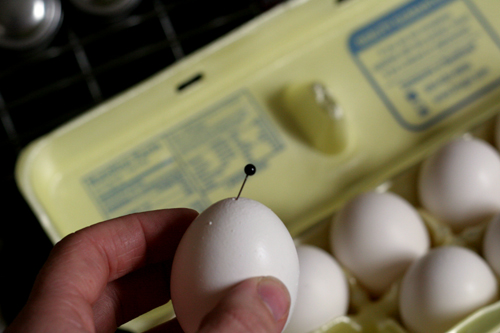
You’ll want to make sure the hole is large enough for air to go into the egg, and for the contents to empty. What I do, is make three pinholes close to each other and then connect them, making a larger hole.
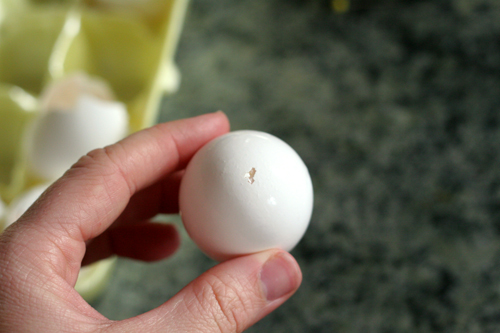
Then you’ll clean off the top of the egg that will touch your mouth. Hold the egg gently in your hands and blow through the hole, blowing the contents into a bowl (sorry, no picture for that, trust me, it’s quite disturbing). To make it easier, take the pin and insert it in the bottom of the egg, moving it around to break up the yolk. If you find you’re having a hard time, try and enlarge the hole some more, or shake the yolk around after you’ve broke it up. Once the egg is empty, run under cold water, and blow any excess water out. Let egg dry on a paper towel and decorate as desired, but be careful with the hollowed eggs – they are extremely fragile.


March 28th, 2007 at 4:47 am
I just did this with my daughter last week. I strung flower wire through each egg and attached them to my door wreath. Here’s a picture.
http://flickr.com/photos/25371733@N00/437520018
With respect to their longevity, we went to see my parents for Christmas and the eggs we had hung in the forsythia bushes 8 months earlier were still swinging in the breeze.
March 28th, 2007 at 5:08 am
Very cute! I love your little egg cups. I remember doing this with my mom as well, but believe it or not back when I was in grade school, we used the same technique. (Brave teachers!)
March 28th, 2007 at 8:54 am
Beautiful! I was going to do some of this so I could attempy some Pysanky. It doesn’t look like you have any holes on your FO. Did you patch it? What did you use?
March 28th, 2007 at 11:30 am
great tutorial candace! thanks so much!!
??can you decorate them first, then DeYok them??
March 28th, 2007 at 11:39 am
Very nice! What I used to do when I was younger was very similar, except I figured out a trick to cover up the holes in the eggs. I would wet a small piece of a paper towel, apply it over the hole, and then paint over that with white-out.
If you use my technique to cover the hole, you can actually make the hole a little bigger and then stuff some shredded colored paper inside (like confetti) and break the eggs later. That part was the most fun for me.
March 28th, 2007 at 11:58 am
Hey Candace – Thanks for checking my blog. I hope it is OK that I used your picture as long as I gave credit – I’m a little new at blog-etiquette! I did buy blown eggs on eBay. I admit it…
March 28th, 2007 at 12:09 pm
This can be done with a syringe too! Same results and a you don’t get soar cheeks!! I let my preschool class paint them with liquid watercolr paints.
March 28th, 2007 at 4:17 pm
What fun! When we were little we used to live in Germany, and it was always cold up until Easter. Mom would buy bunches of branches and force the flowers and we would hang these for decorations.
Thanks for bringing back such a good memory!
March 28th, 2007 at 7:04 pm
Those eggs look so pretty. I haven’t decorated eggs in years but I may have to this year trying your emptying technique.
March 29th, 2007 at 4:27 pm
Very nice article and the eggs look perfect! I like the one reply that say a syringe will work as my cheeks got quite tired!
March 29th, 2007 at 4:53 pm
Being a crafty sort, you might enjoy pysanky:
http://www.learnpysanky.com/
It can be frustrating at first (my mom always threatens to throw her egg at the barn because she thinks it’s so ugly), but very rewarding to see what you’ve created when you melt off all the wax.
I stumbled upon your site with Firefox’s StumbleUpon extension — lots of very cool stuff on here. Thanks for sharing!
April 4th, 2007 at 8:25 am
When you have a lot of eggs, or want to avoid blemishing both ends of the egg with a hole, try the tool of choice for one-hole, mouth-free egg blowing: the Blas-Fix!
http://www.allthingsukrainian.com/Supplies/Blowers.htm
April 4th, 2007 at 8:42 am
When I do pysanky, I leave the egg intact while decorating it, so that it won’t be too buoyant when I dip it into the dye bowls. Then, I blow the contents out afterwards. There’s a video on my blog of me blowing an egg. Yes, it is rather gross.
April 4th, 2007 at 5:02 pm
[...] Nat writes – Candace of Crafty Daisies has a tutorial on the delicate art of hollowing out your eggs to keep your easter eggs from spoiling. Make sure you get enough eggs in case of breakage! [...]
April 5th, 2007 at 4:12 am
[...] Crafty Daisies shows how to Hollow out and Easter egg for those that want some colored eggs that last much longer than their hard boiled counter parts. [...]
April 5th, 2007 at 10:13 am
[...] FYI, here’s a good explanation of how to blow out the innards of the eggs: http://craftydaisies.com/2007/03/28/hallowed-easter-eggs/ [...]
April 5th, 2007 at 11:21 pm
Make it easy. Enlarge the holes even more so the egg blows out easily. I used to raise finches who lay eggs a little larger than peas, and did it with them, in spite of their very thin fragile shells. The way to avoid breaking the shell is to make the holes larger. Then cut some pieces of white paper; or if using brown eggs, take a picture of one and print it out and cut out a piece of paper that has the right shade of brown – trial and error – if you are going to dye the eggs the color may not matter much. While you’re at it, make some loops of string big enough to go over the tips of the branches of your Winter Solstice tree; put the knot in the hole in the small end of the egg; push in a piece of paper and wiggle the string around until it is right, then put on a drop of Elmer’s glue. Smooth it down with your finger. On the other end, if you get lucky you can push and pull the pieces of shell that are probably still adhering to the edges of the hole so you only need to add a very small piece of paper. Put the glue on the paper before sticking it in the hole and maneuver it around with a toothpick or a pin until it is covering the hole from the inside. This is a bit tricky and if you want to, you can put the paper on the outside, but then the dye may not stick well to the glue. With some practice you will be able to make a hole in the big end that can be repaired just by pulling the shell bits into position. I do not recommend washing out the empty shell. Let the little bit of albumen that is left be the glue that sticks the pieces together in the hole.
April 5th, 2007 at 11:27 pm
It occurs to me that I should say two more things: First, I was not raiding the nests of my finches. Finches lay a lot of “practice eggs” that not only are not fertile, they don’t even have a yolk. You find out by “candling” the eggs.
Okay, the other thing I want to say is that I hope people will not be going out to rob birds’ nests to get the “cute little eggs”.
April 10th, 2007 at 12:38 pm
[...] Nat writes – Candace of Crafty Daisies has a tutorial on the delicate art of hollowing out your eggs to keep your easter eggs from spoiling. Make sure you get enough eggs in case of breakage! [...]
March 19th, 2008 at 7:48 am
?can you color them first? and then blow out all the stuff inside
March 19th, 2008 at 7:48 am
?can you color them first? and then blow out all the stuff inside by the way it turned out great!
March 19th, 2008 at 7:49 am
?can you color them first? and then blow out all the stuff inside, by the way it turned out great!
March 21st, 2008 at 7:12 am
I was at a garden center yesterday to buy my Easter lily and they had decorated the tree in front of the shop with blown eggs. They used a large needle with a big eye to thread thin ribbon through the blown eggs and then hung them from the tree. They told me that they rolled the blown eggs in a bowl of vinegar and then rubbed on food dye with a soft rag. They were very pretty. I’m going to do this for my urns on my front steps and hang the eggs from the pine bows left from Christmas. Hope my lungs are up for the task!
March 25th, 2008 at 12:00 pm
I used a very small drill bit to puncture the egg. If you can hold the egg and power drill steady enough, start by gently putting the drill bit on the end of the egg and pull the trigger slowly so that the bit carefully makes a divet in the egg. Then squeeze the drill’s trigger harder, making the bit go faster and exert just a little more force until it punctures the egg. It makes a slightly larger hole than a pin and reduces the risk of cracking the egg if done carefully.
Plus, I’m a guy and if I’m going to decorate fancy eggs I need to at least introduce a power tool.
April 1st, 2009 at 7:34 am
Yes Roney, finches lay a lot of practice eggs. My daughters finch has 9 eggs right now and only one candled a prospect. We are going to pull those eggs this week actually because they are now starting to dump them out of the nest! Never made hollowed eggs with them but I am going to try!
I make these chicken eggs every couple of years and have some from 18 years ago when my boys were little, now 21 and 20. My girls are 16 and 13 and they have made them also. If after you hollow them and dry them you can use little nail scissors to cut an oval in the front of the egg, use white glue and sugar glitter on the inside of the egg, then add some easter grass or such and a small easter bunny or butterfly etc. Around the hole of the egg you can use the zig zag border and apply white glue again and a different sugar glitter or glitters to the outside and have shadow box eggs. You can also paint polka dots or zig zags and then use a clear round sugar glitter to add sparkle but still see your design. We then use a pretty silk ribbon and a bead on the top to cover the hole and for hanging purposes. The hole on the bottom is not visible with the glitter on the egg. Gorgeous treasures for years to come. Using the glitter on the inside and the outside also makes the egg seem stronger! The sugar glitter is very fine. The “rounded” glitter is much harder to find as I have not seen it for a while. It feels like soft round balls.
October 3rd, 2009 at 4:34 pm
Another fun thing to do with the hollowed out eggs is to fill with confetti and cover each hole with little pieces of crepe paper glued on. We use them on New Year’s Eve and crack them over the kids heads and adults–it is lots of fun!!
March 4th, 2010 at 8:13 pm
[...] How to Design A Website from Scratch, … design, psd, step by step, tutorial, web design tools …Hallowed Easter Eggs | Crafty DaisiesMy brother and I used to make these eggs when we were younger and my mom liked it b/c they didn’t [...]
March 27th, 2010 at 3:08 pm
What a bunch of inventive people you are! And so willing to share your knowledge with others. Thanks bunches.
March 31st, 2010 at 6:43 pm
I had a couple slightly crack while I was poking the holes, so I just decoupaged them with some watered down elmers glue and pretty tissue paper! So cute!
May 27th, 2010 at 1:57 pm
Please, if you are interested in learning a MUCH simpler way to completely empty and clean out eggs (from Hummingbird to Ostrich) with just ONE hole the size of a hat pin in only ONE end, it is simple enough for a 5-year old, takes no ‘blowing’, and takes a fraction of the time you show. I’ve used it for 35 years – people are astounded at the results. Not only fun for the entire family, but you can make lots of omlets for dinner, too!
Call me at 928 445-5255 (Prescott, AZ) 8 A.M. to 8 P.M. MST
December 1st, 2010 at 5:46 pm
Added to my favorite list and added to my blogroll.
December 1st, 2010 at 5:47 pm
Nice post, keep up the excellent work
January 13th, 2011 at 6:32 am
[...] throw your eggshells away. You can carefully hollow out eggshells to decorate around Easter, use them to start seeds, or help control slugs in your [...]
January 13th, 2011 at 7:45 am
[...] throw your eggshells away. You can carefully hollow out eggshells to decorate around Easter, use them to start seeds, or help control slugs in your [...]
January 14th, 2011 at 12:02 am
[...] throw your eggshells away. You can carefully hollow out eggshells to decorate around Easter, use them to start seeds, or help control slugs in your [...]
January 17th, 2011 at 6:28 am
[...] throw your eggshells away. You can carefully hollow out eggshells to decorate around Easter, use them to start seeds, or help control slugs in your [...]
April 5th, 2011 at 5:51 pm
thanks for the tutorial! i linked to you on my blog today.
http://wifemomwoman.wordpress.com/2011/04/05/easter-egg-dying-and-decorating/
April 12th, 2011 at 6:29 am
[...] Ovos decorativos. São ovos de verdades, sequinhos, sem o que tem dentro, pintados. No blog Craft Daisies tem um passo-a-passo, mas está em inglês. Faz um pouco de bagunça, mas é bem mais fácil de fazer do que parece. É [...]
April 14th, 2011 at 8:07 am
the kids will love this! – thank you