


Make your own paper
June 28th, 2007 by CandaceHello. My name is Joanna and I’m a paper addict. I hoard paper of all kinds. I do not discriminate against any texture, type or color. I love it all and never knowing when I might need it for a project, I keep it all. When I can no longer keep track of all the scraps, I know I must do what any self-respecting paper addict must do – make more paper! Here’s how I go about it.
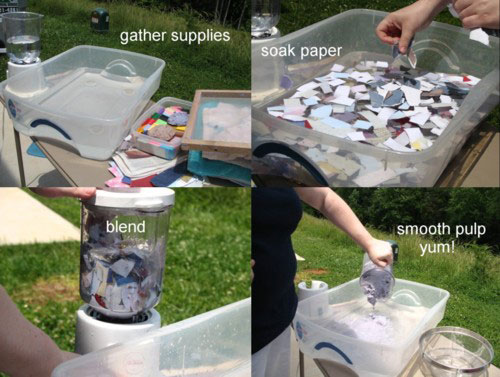
First, gather your supplies:
- ~ Paper scraps with a matte finish (newspaper, tissue paper, construction paper or junk mail but try to avoid the glossy ads)
- ~ Several towels you don’t mind getting dirty
- ~ Blender
- ~ Deckle (this is what you use to strain the pulp, more on that later)
- ~ Container large enough to fit your deckle (my deckle makes a letter sized sheet of paper so I have found a large plastic storage bin works for me)
- ~ Sponge
- ~ Iron (optional)
To begin, you have to make your pulp:
1. Fill your plastic container with several inches of water. You need enough to submerge the deckle completely.
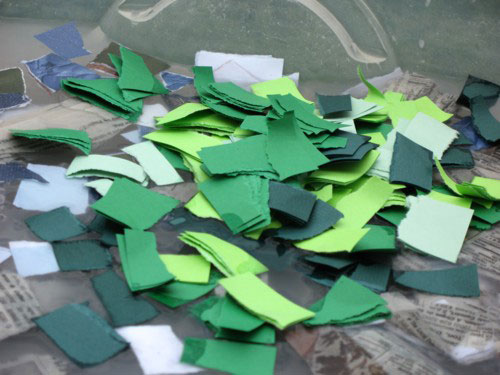
2. Tear your papers into small pieces about 1 inch square and add to the water.
3. Let soak until all of your pieces are completely wet. Any dry pieces will not break up entirely and will leave specks in your finished product. This can be desirable so feel free to vary your soaking times until you get the look you want.
4. With the blender 2/3 full of water, add your soaked pieces of paper and blend until smooth. This also varies the look of the finished product so feel to play with your blending times. Just remember that the smoother the pulp, the smoother the finished product.
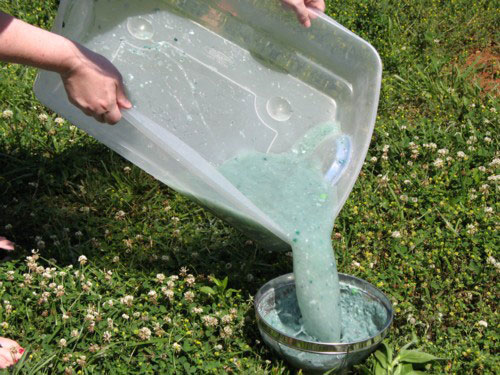
5. Return processed pulp back to the plastic storage bin, stir to evenly distribute.
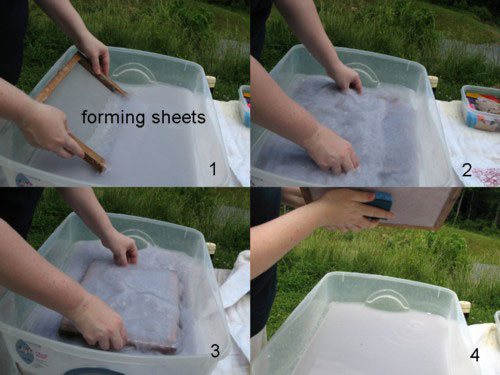
Next, you need to form the sheets. The shape of your deckle will determine the shape of your paper. I purchased mine at my local craft store but you can also make your own by using window screen stapled to a wood frame. I have never tried this so let me know how it turns out if you do!
1. Hold your deckle at an angle as you slide it into the pulp mixture. I go straight to the bottom of the container.
2. Swish it around while it’s submerged. This ensures an even layer of pulp covers the deckle.
3. Keeping the deckle horizontal, remove it from the water and let it begin draining. At this point you can move the pulp around if you need to.
4. Using the sponge, wipe across the screen side of the deckle to remove excess water. Take care how much you tilt the deckle as the pulp can still slide around.
5. I set my deckle on the side of the container to drain while I get the next step set up.
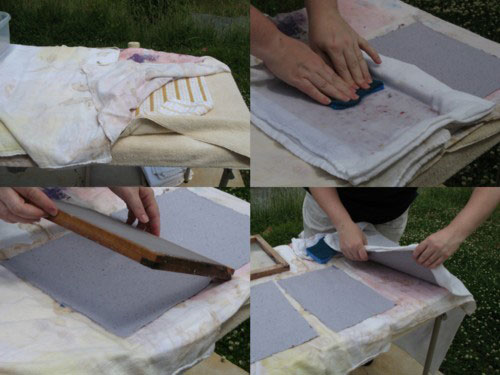
The next step is called couching (pronounced cooching)
1. Place a layer of towels on your surface.
2. Place the deckle screen side down onto the towels.
3. Lay another towel over top of the formed sheet (will be against the pulp) and press with your hands and the sponge to remove additional water.
4. Turn out sheet onto first layer of towels. Sheet should be dry enough to just fall off the deckle. If not, flip and press again. If this makes you nervous, leave the towel on the pulp and turn out the sheet onto it.
5. Layer sheets between towels and press to remove additional water.
6. Remove sheets and lay flat to dry.
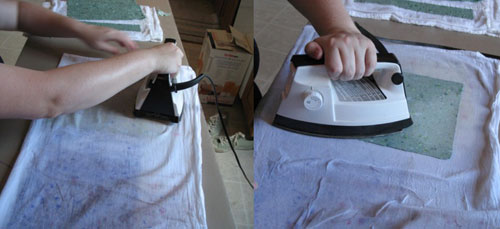
The last step is drying the sheets with an iron (which is optional). I like to iron my sheets dry not only because I’m horribly impatient but because the iron gives the paper a smooth finish.
1. With iron on high, start ironing the wet sheet while still sandwiched in between a towel.
2. Iron until towel starts to feel dry (enjoy the steamy facial in the process!)
3. Pull back top layer of towel and iron sheet itself. When the iron skips right across the sheet you’ll know it’s ready to be ironed directly. It will stick and pull the pulp if it’s not ready.
4. Iron until sheet is crisp and dry.
A note about colors:
The pulp will always be a few shades darker than the finished product. I like to use solid colored cardstock or tissue paper color the pulp. Since it’s heavier, the cardstock adds a nice speckle to the finished paper. Take care when using strong colors as the dyes can stain clothing.
Clean up:
I like to do this outside because I make a mess whenever I do anything crafty. Since I’m already outside, I just dump the any left over pulp mixture in the yard when I’m finished (the pulp hangs around for a bit so choose an out of the way place for this). If you’re inside, strain the mixture before dumping it down the drain. Even outside, sometimes I will still strain it to save the unused pulp, especially if I liked the color. Once strained, press the pulp to remove as much water as possible and then let dry. The resulting chunk can be broken up and added to your next batch or add some white glue and sculpt with it!
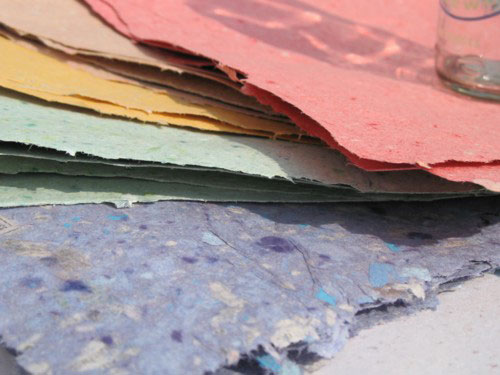
Here’s a sample of a few different textures and colors I’ve made recently. I simply varied the weight of the paper and how long it was processed in the blender.


June 28th, 2007 at 6:56 am
That is so cool! Excellent instructions and beautiful end result!
June 28th, 2007 at 6:58 am
p.s. where did you get the tool you “couch” with? Did you make it or buy it? I’m sorry if you already posted that. So cool!
June 28th, 2007 at 7:39 am
deb-thanks so much! I think what you see in the picture was a kitchen sponge I used to absorb some excess water…I did neglect to mention that!
June 28th, 2007 at 7:41 am
You don’t use a binder? We made paper in art class years ago. All i recall about a binder was my teacher saying a scoop of goop.
June 28th, 2007 at 7:51 am
Your instructions are very easy to follow and the bits of humor were much appreciated! Awesome results – beautiful paper!!!
June 28th, 2007 at 8:48 am
Love this! I can’t wait to try it out!
June 28th, 2007 at 9:09 am
sara-from what I’ve read, there’s enough binder or sizing already in the paper when you’re using recycled paper for your pulp so I’ve never bothered to add any…you certainly can add some white glue if you find the paper not durable enough for your use….if you are adding items such as pressed flowers or glitter you would definitely want to add some then….
June 29th, 2007 at 11:38 am
Can you use a paper shredder to make the pieces since they’re going to be blended?
June 29th, 2007 at 1:36 pm
lea-I have to laugh because that same thought just occurred to me last night after countless times of ripping paper by hand! I can’t imagine why not and the next time I’m going to try it!
June 29th, 2007 at 3:37 pm
My daughter and I have made lots of paper this way. I made the deckle by taping and stapling window screen onto old picture frames. We used a clean kitty litter box to hold the pulp and water (in fact, I didn’t have to buy any of the supplies). It works great for us. Also, I always shred the paper, so much easier (especially with a cross-cut shredder). If you happen to use paper scraps which aren’t adhering well together (usually this isn’t a problem) you can add a little tissue paper, toilet paper, or corn starch before blending. The leftover paper pulp can be poured directly into your compost box.
June 30th, 2007 at 10:53 pm
Beautiful paper! I just started doing this myself and wish this tutorial had been up then. I’m really grateful to learn that I can dry the pulp to save it for later… now I can get all the bins and bowls of different colors off my patio! I’ve found that, missing a strong stapler, a glue gun works great for attaching screen fabric to the insides of picture frames. I went to thrift stores and got a range of sizes from 2×3″, 5×7″, 8×10″ & 11×14″, plus a small square and a small rectangle. Embroidery hoops work great, too, for instant deckles and you get adorable, round pieces of paper. I’m going to add the link to this tutorial to my list with the others. Thanks!
July 1st, 2007 at 2:44 am
long ago i remember i gave it a try and resulting papers was too thick just because i wasnt paying attention and as i remember i wasnt having a proper deckle… now i am willing to try out but now the problem is i dont have a blender! i do have a hand belnder but i am not sure if it is strong enough.. any ideas?
July 3rd, 2007 at 4:03 am
nihal-your papers may have also been thick because of the amount of pulp in your vat…try using less pulp the next time you think your sheets are turning out too thick…I think the hand blender should work just be sure to soak your paper scraps until they are good and soft…newspaper and tissue paper would be a good place to start since they fall apart quickly in water…good luck!
July 10th, 2007 at 10:42 am
A smaller deckle could also be fashioned out of wire coat hangers and old pairs of pantyhose/stockings. A good way to recycle, not just the paper! Great idea! Definitely going to bookmark this website!
July 14th, 2007 at 7:19 pm
Very interesting this job. Congratulations!!
July 14th, 2007 at 9:19 pm
Joanna, this is so freeking cool i love it! well done! I can’t wait to try this sometime. Great instructions too!
July 15th, 2007 at 8:24 pm
Joanna, thank you for sharing!
It will no doubt inspire many DIY addicts!
I’v translated your lovely tutorial into Chinese. See here:
http://www.1idea1day.com/archives/670
November 15th, 2007 at 8:06 am
[...] Your Own Paper, with Crafty Daisies and Mainly Zaz Check out this Making Paper Tutorial And this Making Paper [...]
March 11th, 2008 at 5:33 pm
I saw an earlier posting stating she wished she had seen this piece earlier. I share that wish. My granddaughters (10 & 11) and I have surfed quite a bit and this is by far the clearest and most informative site.
We want to make the invitations for a wedding. I was told flower seeds could be incuded in the pulp. The recipient of your card can then plant them. We are seting up to do that.
Thanks for the info.
June 24th, 2008 at 6:36 am
Thank you so much for the wonderfully detailed tutorial! I’m hoping that my little crafting group will want to play with this and, if not, I’m going to do it myself!
June 29th, 2008 at 11:58 am
Thanks for the instructions. I have been loking for a kit that allows you to make aper but have benn unsuccessful. I have tried both Art stores and comercial craft stores. I guess I need that screen. Where did you find it? IS it like the silkscreen stuff used for images?
September 5th, 2008 at 4:56 pm
WOW! This will help the environment!!!!
January 11th, 2009 at 9:43 pm
Identity theft has brought great tensions to the corporate world causing many companieslosses each year. Everyone is scared of their personal information not leaked out tosome strangers. Not only offices but individuals at home should also purchase onefor safety.
January 16th, 2009 at 9:01 pm
In a civil case, a judge can allow the jury to question a document-destroying party’s intentions. For example, judges in certain cases will tell jurors they should assume missing documents are harmful simply because they were destroyed–even if they never see the contents.
March 31st, 2009 at 1:20 pm
I know this is an old post but I just found it on StumbleUpon. I just was wondering if the water that you use to soak your scraps of paper should be left in the bin when you pour the pulp in? Does it matter how watery the pulp is?
Also, the seeds in the paper idea is so cool!
April 1st, 2009 at 1:34 pm
the only thing is that the end result cracks real quick, it doesn’t have the “elasticity” of a normal paper. i tried this thing couple of years ago, an it looked very ok, but when i tried to bend it, it braked:(…
May 31st, 2009 at 8:24 pm
Hi, interesting post, I was browsing around the net for some posts about shredders. I enjoyed reading your post. I am a junior manager in a business corporation and looking around for some great shredders
August 12th, 2009 at 10:17 pm
I used to do this as a kid with my sister all the time, I’ve been wanting to get back into it. I’ve heard you can use dryer lint. Has anyone tried this???
March 2nd, 2010 at 8:34 pm
[...] in the World is The Roving Photographer? Departments. Recent Photoshoots. Prague Fotomodels …Make your own paper | Crafty DaisiesHello. My name is Joanna and I’m a paper addict. I hoard paper of all kinds. I do not discriminate [...]
April 21st, 2010 at 9:46 pm
Stumbled on this and added it to my favorites. Can’t wait to try it
February 4th, 2011 at 2:40 am
Wow.. cool article
So, i can make my own paper on my home now
i can`t wait to try this one
February 7th, 2011 at 5:20 am
[...] Photo by Joanna [...]
February 27th, 2011 at 9:42 am
Great article!! I love making paper! You can add seeds to the pulp, so people can plant the paper. Paper napkins that are coloured also are great to colour the pulp, and you can get a big pack from doller stores!
April 21st, 2011 at 9:06 pm
resalikescolors: Dryer lint does work if mixed into the paper pulp, not by itself. It is more of an additive for interest. If you have dogs or cats there will be hair in the lint which is not very pleasant if you use an iron to dry the sheets.
One other note from experience, do not use the adhesive portion of paper, like envelopes and box seams, only the clean paper. The adhesives DO gum up the iron and cause the paper to pull apart when ironing.