


Pressed Flowers
August 9th, 2007 by CandaceOne of the best things about summer is the flowers, don’t you agree? A fun way to keep them around past the peak bloom point (and for those in cold climates to remember the lovely summer colors) is to press them. You can easily make your own flower press, and here’s how.
Start with 2 squares of wood (approximately 8″ across), 4 bolts (approximately 4″ long), 8 coordinating washers, 4 coordinating wingnuts, and several squares of cardboard and felt, with the corners trimmed. I have 7 cardboard pieces and about 10 pieces of felt – these are used to separate the layers of the flowers you press and to provide cushioning.
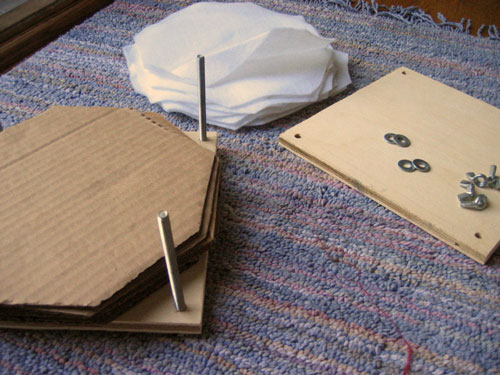
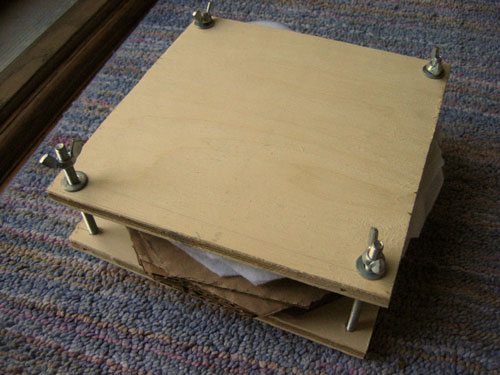
You simply drill 4 holes near each corner of each square and assemble: bolt, washer, one square of wood, cardboard, felt, paper, flowers, paper, felt, cardboard (etc), board, washer, wingnut. You add layers of plain white paper around the flowers to prevent them sticking to the felt, and it also allows for easy storage later on — I keep mine either in a folded piece of paper or inside envelopes. Screw the wingnuts on tight to press the layers together and compress your flowers. Then you wait for a week or so to allow the flowers/leaves to dry and flatten.
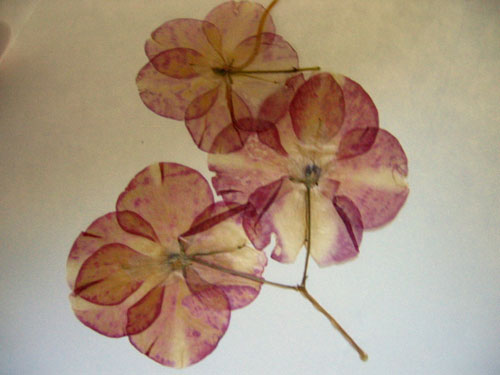
Pay attention to the layout of your flowers and leaves when you are pressing – you want to make sure that it will look how you want it to when it’s flat. Leaves are easy, but be careful with multiple petal layers – sometimes they bend oddly when you press them, and the result is not pretty.
Simple flowers work well though. Pansies are gorgeous:
I’ve also done marigolds, lilac, roses, several kinds of leaves, irises, even a butterfly. If your garden is large, you can have lots of fun playing around with the press and trying different layouts.
Once you have your array of pressed flowers, you can paste them into a frame:
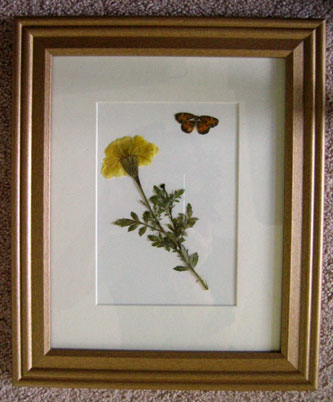
I just used regular Elmer’s and glued the marigold and the butterfly onto thick white paper (I think mine is designed for painting). Tweezers can be helpful in arranging delicate pieces, such as the butterfly – sometimes your fingers are just too sticky. These flowers would be lovely on cards, too, if you enjoy making your own. Let me know of other fun ways to use them – I’m just beginning my foray into paper crafts ![]()
This guest post comes from Gina – thanks so much for your contribution, Gina!


August 9th, 2007 at 10:02 am
Very pretty indeed
August 9th, 2007 at 1:58 pm
How pretty that’s a fun project.
August 9th, 2007 at 4:53 pm
awesome tutorial! look for it to be featured tomorrow at 10am CST on craftandfound.com!
August 10th, 2007 at 4:02 am
I’ve also glued them to glass, e.g., a small fish bowl from the pet supply store, and then varnished the whole container to protect the flowers.
August 10th, 2007 at 9:55 am
Very pretty picture.
August 10th, 2007 at 10:28 am
Beautiful picture! If you are in a hurry, the Microfleur microwave flower press great – it presses the flowers in 90 seconds and the flowers retain their brilliant color really well.
August 12th, 2007 at 2:33 am
You can make very pretty wall-hangings, trays, coasters etc. by sticking the flowers between two glass sheets and framing them accordingly.
August 12th, 2007 at 2:35 am
Elizabeth, can you send me in detail how to press using microwave?
pritadheer@rediffmail.com
August 12th, 2007 at 2:00 pm
[...] it’s a craft that even us somewhat craft-impaired folks can manage to make look fantastic. Pressed Flowers [Crafty [...]
August 12th, 2007 at 2:34 pm
I like both this and your crayon tutorial, thank you for sharing both!
August 12th, 2007 at 4:19 pm
That seems like an easy enough task. It also seems a lot more planned out than the way that I’ve done it with just putting a flower somewhere and stacking heavy books on top. Very nice!
August 13th, 2007 at 1:37 am
[...] it’s a craft that even us somewhat craft-impaired folks can manage to make look fantastic. Pressed Flowers [Crafty [...]
August 13th, 2007 at 6:08 am
Back in the day, I used telephone books.
It worked pretty well.
August 20th, 2007 at 9:29 pm
That press looks great! Will certainly have to try and make one someday. Pressing flowers is a lot of fun! I never thought of pressing readymade layouts of them though, as you did. And a butterfly! How did you manage to do that?! :-O It looks grand though!
August 30th, 2007 at 8:46 pm
this was very precise, some sites are very limited to info. would you please tell me how you do your roses, small buds seems to turn out fine, but unable to do large rose without taking off petal for petal. would like to press a full size rose closed, rather than open, if that makes sense…as they would come from a florist . thanx so beautiful. paula
October 25th, 2007 at 9:55 pm
I might just try this one out, thanks!
October 26th, 2007 at 12:52 pm
do you hang it for 2 days?
October 29th, 2007 at 7:27 pm
I have been pressing flowers for quite a while in a terra cotta press in the micro wave but I sometimes have to finish drying them flat in books and your very simple to make press is just what I need. Thank you for sharing. And for Paula I take rose buds and very carefully slice (with a very sharp knife) the back half of the bud off and then press. It comes out beautifully, it’s not too thick and dries quickly.
November 9th, 2007 at 9:17 am
i think it is pretty but you need to get a new hobby that is ugly kind of like me
January 27th, 2008 at 6:24 am
Hi!
I’m really new at this flower-pressing thing and I need some help.
I’ve tried to press some beautiful frangipani flowers in a notebook with a heavy bookstack on top, but at the end of the week, the flowers have all turned brown. Why is that and how do I retain the colour of the flowers? Please help!
April 17th, 2008 at 7:44 pm
hi, i have made some greeting cards using cogon grass (handmade paper) and pressed flowers as design. look it up at MY SPACE (choiaxe@yahoo.com.ph).
August 22nd, 2008 at 1:47 am
bilgi için çok teşekkürler very very thankss
September 20th, 2008 at 9:13 am
Thank you
March 19th, 2009 at 1:39 am
thanks
March 19th, 2009 at 2:09 am
all things nice
July 22nd, 2009 at 4:08 am
perde:Nice articles, helped me a lot thanks
August 21st, 2009 at 4:59 am
web tasarım: Good post, thanks for share.
September 9th, 2009 at 4:36 am
Beni, bu fikirleri Inda Dizy çiçek çok yardımcı teşekkür
December 18th, 2009 at 11:57 am
Thank you
January 26th, 2010 at 7:25 pm
I would like to get your permission to use the image of the pansies (three of them, the first image under the presses) as an element in a competition I am entering for designing a scrapbooking kit. I will not be using the image commercially; it will only be used one time in the competitions. If you are agreeable, can you please contact me by email? Thank you so much.
February 19th, 2010 at 5:27 am
hi very good flower blog wery thanks istanbul order lowers
March 17th, 2010 at 8:20 am
thanks
April 17th, 2010 at 11:39 am
Thanks for you sharing.
May 20th, 2010 at 1:09 am
Thanks…
June 2nd, 2010 at 11:08 am
Hello Reis ..
Nice articles, helped me a lot thanks
order flower istanbul Turkey
June 17th, 2010 at 2:21 am
thank you very much succesfull article
September 3rd, 2010 at 10:10 am
thanks
September 5th, 2010 at 5:40 am
Online çiçekçi
September 12th, 2010 at 4:28 am
bilgiler için teşekkürler
October 6th, 2010 at 12:52 pm
Thank You Good Blog
November 2nd, 2010 at 3:01 am
Nice post, congratulations
November 10th, 2010 at 3:36 am
thank you nice article
January 7th, 2011 at 11:24 am
teşekkürler herkese
January 19th, 2011 at 2:43 pm
thank you nice blog
January 27th, 2011 at 4:50 am
thanksyoou
admin
March 2nd, 2011 at 12:54 pm
merhaba hello
March 11th, 2011 at 5:27 pm
thanks…
March 22nd, 2011 at 6:34 am
thank you babyu
March 22nd, 2011 at 6:36 am
napiyorsunuz lan malaklar
March 22nd, 2011 at 6:36 am
lan ekle ekle doymuyor adam
March 22nd, 2011 at 6:37 am
eklemeye devam edelim.
March 22nd, 2011 at 6:37 am
lan sevdim bu işi haaa
March 29th, 2011 at 12:02 pm
Day pass is the result of a new research, have a negative impact on human health than smoking duymayalım has discovered. In particular, studies in recent years, pregnant women, infants and children, second-hand smoke exposure for passive or even an enormous amount of damage is revealed.
Ignoring these facts, both to ourselves, as well as adults around us, let’s not forget that we have pregnant women and harm to children. Let’s read and quoted from various sources around the scientific facts that explain in addicts.
March 30th, 2011 at 1:00 pm
I like both this and your crayon tutorial, thank you for sharing both!
March 31st, 2011 at 1:18 am
thank you babyu
March 31st, 2011 at 1:19 am
Thanks for you sharing.
March 31st, 2011 at 1:19 am
very good
April 2nd, 2011 at 3:28 am
thanks for share.
April 8th, 2011 at 6:26 am
Orjin Krem Bitki özlerinin mikro ölçülerde birleştirilmesi ile elde edilmiş naturel bir üründür.
Orjin Krem Emilimi çok güçlü olduğundan etkisini dakikalar içerisinde gösterir.
Orjin Krem Bitki özleri sayesinde kasların rahatlamasına ve gerilimin giderilmesine yardımcı olur.
Orjin Krem 100 ML ve 25 ML set olarak satılmaktadır.
Orjin Krem iki kutu bir arada bir kutu içerisindedir holagram bulunmaktadır.
Orjin Krem alındıktan sonra bandrollü sayesinde sahte olup olmadığını kontrol edebilirsiniz.
April 11th, 2011 at 1:41 pm
Yaşadığınız mekanlarda dekorasyon için yatırım yapıyorsunuz. Bu yatırım evinizde veya işyerinizde prestij sağlaması ve rahat mekanlarda yaşama isteğinizden kaynaklanıyor. Bu önemli bir konudur ve usta ellerden çıkması gerekir. Dekorasyonda duvar kağıdı kullanarak bambaşka mekanlar yaratabilirsiniz.
April 12th, 2011 at 12:25 am
I just wanted to comment your blog and say that I really enjoyed reading your blog post here.
It was very informative and I also digg the way you write!All of them make sense and are very helpful. Keep posting.
April 12th, 2011 at 6:23 am
I would like to get your permission to use the image of the pansies (three of them, the first image under the presses) as an element in a competition I am entering for designing a scrapbooking kit. I will not be using the image commercially; it will only be used one time in the competitions. If you are agreeable, can you please contact me by email? Thank you so much.
April 13th, 2011 at 12:19 pm
Orjin ağrı ve romatizma kremi ; aprı olan bölgeye masaj yolu ile deriye iyice nufuz edecek şekilde uygulanır. Yanık ve yaralı bölgelerde kullanılmamaktadır. Romatizmal ve kireçlemeye bağlı ağrılarda bir ay düzenli olarak sabah-akşam uygulanması önerilir. Kronikleşmemiş ağrılarda sabah ve akşam 7 gün uygulamak yeterlidirorjin krem http://www.orjinkrems.net
April 13th, 2011 at 12:20 pm
Ozoderm gray away, Saçımıza renk veren pigmentlerdeki melanin salgılanmasında artış meydana getirerek beyazlamış, kırlaşmış saç tellerimizin doğal rengine ,eski haline dönmesine yardımcı olur
April 13th, 2011 at 12:21 pm
Vibro Shape titreşim Ve masaj hareket yoluyla, karın kaslarınızı forma sokmak için kullanılan yüksek performanslı bir cihazdır.
Vibro Shape titreşimli zayıflama kemeri Ne Yapar?
• Vibro Shape sindirim esnasında gıdaların iyi emilimine yardımcı olur
• Vibro Shape karın kaslarınızdaki büyük kas gruplarını çalıştırarark forma girmenizi saglar http://www.vibroshapesatis.com
April 17th, 2011 at 2:17 pm
SPRING struggle with fatigue, not to rest more than the best treatment was reported to be mild and regular exercise.
April 21st, 2011 at 6:24 pm
Unionflora uluslarası çiçekçilik dış ticaret limited şirketi, İstanbul’da 10 farklı ilçede faaliyet gösteren sektör deneyimli,tecrübeli, işine özen gösteren, çiçekçiliği meslek edinmiş dokuz firmayı birleştirmiştir. Kurumsal firmamızın tek hedefi tüm Türkiye ve dünyadaki müşterilerimizi memnun edebilmektir. Unionflora uluslarası çiçekçilik zamanında teslimata, kaliteye, müşteri menmuniyetine önem veren bu değerleri para kazanmanın üstünde tutan bir firmadır. Müşterilerimizin verdiği çiçek siparişlerinin canlı,taze ve en önemlisi zamanında teslim edilmesi ilkesini göz önüne alarak bir araya gelmiştir. Hedefimiz: ağımızın genişlemesi ve verilen siparişin en kısa sürede, en uygun fiyata ve en kaliteli şekilde teslim edilmesidir
April 21st, 2011 at 6:34 pm
Çiçekabla ile internet üzerinden tüm Türkiye ve tüm dünya ülkelerine çiçek
siparişi verebilirsiz. Anneler günü için tasarlanan modellerimizi ve fiyatlarımızı
görmeden karar vermeyin.
May 1st, 2011 at 8:46 am
cam balkon
May 4th, 2011 at 2:53 am
super thanks admin
May 5th, 2011 at 2:17 am
Look forward to exciting innovations with a nice article
May 10th, 2011 at 10:19 am
Beautiful picture! If you are in a hurry, the Microfleur microwave flower press great – it presses the flowers in 90 seconds and the flowers retain their brilliant color really well.