


Embroidery: Lesson 1
August 14th, 2007 by CandaceThanks to everyone who expressed interest in learning how to embroider. This school will last six weeks, and we’ll go over all the basics of materials used and most common stitches. For those who know a lot about this know that there are over 400 embroidery stitches, so needless to say we won’t be covering every one of those. But we will be learning the ones you’ll see (and use) most, and in doing so it will also be giving you the confidence to continue learning them if you choose to do so. Anyone who sends me a finished embroidery project at the end of the school will recieve a goodie box full of embroidering fun. So without further ado, lesson 1.
What is it and Why do it?
Embroidery is the art or handicraft of decorating fabric or other materials with designs stitched in strands of thread or yarn using a needle. My grandmother taught me how to embroider when I was about seven years old, and I would often watch her hand-stitch designs on the many quilts she completed. There really is something beautiful, unique and romantic about embroidering by hand, so while you can have a machine stitch something up for you beautifully, if you have the time (and the patience) and are willing to give it a go, you really should try it.
General tools needed and used
Embroidery can be an inexpensive craft to learn, but so are most things. You can certainly get caught up in the cool new gadgets that are out there, but the only things you really need are material to stitch, a hoop, a needle, a pair of scissors, and embroidery floss. Depending on what you already have, you will only spend about $10 to get started.
Needle: Any needle that will accomodate your thread will do. In our lessons, we’ll be using 6-stranded embroidery floss, so a basic embroidery needle will be fine.
Hoop: This can be a cheap wooden hoop, or a heavier plastic. And it’s actually two hoops: one side is adjustable, the other is not. You will stretch your fabric across one piece and secure with the other, tightening or loosening it if neccessary. You don’t need to work with a hoop (and in some instances it will be almost impossible to use one) but I assure you it will make it so much easier to stitch, and it will keep your stitches from puckering up.
Scissors: Again, any that you already have should be fine. However having a small pair of embroidering scissors on hand that will help you cut easier and with more precision when you need to snip around stitches.
Embroidery Floss: The easiest floss to work with is 100% cotton, colorfast (meaning it won’t bleed when you wash it), and is six-stranded. You can buy this at any craft store anywhere from $.20 to $.40 a skein. You can also find it in almost any color, giving you another reason to love embroidering.
Material: I am a firm believer in you can stitch on just about everything…just be prepared for a fight at times. For this course, however, I suggest using any kind of 100% cotton fabric that does not have a tight weave (i.e. linen, flour sacks, tea towels, pique, and muslin, which I highly recommend since it is easy to work with and is very inexpensive). You’ll want to wash your fabric first, and iron it if necessary. If you have any scrap fabric lying around, you most certainly can use it, esp. for practicing and save the nicer pieces for projects you want to display.
Water-soluble or vanishing ink pens: You’ll find these in the quilting department of any craft store, and while they can be harder to use on some fabrics, they can be your best friend when you can’t find a pattern you like. You can draw on the fabric and depending on which you get, you just remove the ink with a wet washcloth, or wait 24-36 hours for the ink to disappear. They aren’t that expensive, so while this is an optional tool, I recommend it if you have some original designs in mind but don’t trust yourself to stitching free-hand.
Optional Items:
Thimble: These things drive me bananas, so you will not see me using one. However some people insist on them, so I’m just putting this out there that you might want to try using one. If your finger does get sore from pushing and pulling the needle and a metal or porcelain thimble doesn’t work for you, you can always try a rubber one, which feels a little more natural and comfortable to use.
Needle threader: You can get a pack of these for around a dollar at most fabric and craft stores and they can be incredibly useful. It does exactly what it says: it’s threads your needle by sticking a bendable “eye” of the threader through the eye of the needle. The threader “eye” is large enough so you just slip your thread through it and pull it back through the eye of the needle and voila! A threaded needle. I tend to get overzelous and excited when starting a new project and end up breaking them, so it’s just a step I like to skip. However, if this is the part you hate the most, then by all means invest in some of these beauties and skip the frustration all together.
Fusable interfacing: Honestly, I never use this stuff. I tried once and it just irritated me so badly, but truth be told I’ve never been taught how to correctly use it. I do know that it has a purpose (to smooth out your project, make it sturdier, and prevent knots from unraveling), but I also know it’s more trouble than it’s worth (over time will stain the fabric, become brittle and break off, and will pucker at certain places in your work). So why include this if I’m not going to even talk about it or suggest you use it? Good point, I don’t know. I just didn’t want anyone who believes that this stuff is the holy of holies to think ill of me that I didn’t mention it. And on that note, if anyone wants to make an argument for why this stuff should be used, please let me know and we’ll put it in this section.
Now it’s time to begin!
1) Position your fabric within the hoop. You’ll need to seperate the pieces and lay the piece that does not have the adjustable part on it on your work space. Place your piece of fabric overtop, then place the other piece of the hoop over it and push down on it so it stretches the fabric over the bottom piece, much like the head of a drum. You can tighten or loosen the top piece as much as possible, and you’ll want to pull the fabric taut so it creates a smooth, even work space.
2) Cut your thread to 12″ or 13″. This may not seem like much, but you can always use more when you run out, and working in smaller increments will keep your thread from tangling and will keep you from raising your arm high above your head to pull all the thread through the material.
3) Thread your needle. You can use a needle threader or you can do the spit-and-flatten technique (not an actual technical term, but it’s pretty self explanatory) – lick the end of the thread and flatten it with your fingers (to stick all the strands together), thread your needle, then knot the other end. Doesn’t have to be any fancy knot, just something large enough not to pass through the material and small enough so it won’t create a large bump under your fabric.
Now it’s time to stitch!
The stitches we will be covering today are super easy and three of the most basic stitches you’ll see in embroidery. Please forgive the coloring of the photo’s – I took them at the worst part of the day, in a room with bright yellow walls, so if they’re blown out or miscolored on your monitor, please let me know and I’ll try to fix them.
Stitch #1 Running Stitch
This is the easiest stitch to complete. You can use it to outline items or run along an edge, and there are two ways you can do it.
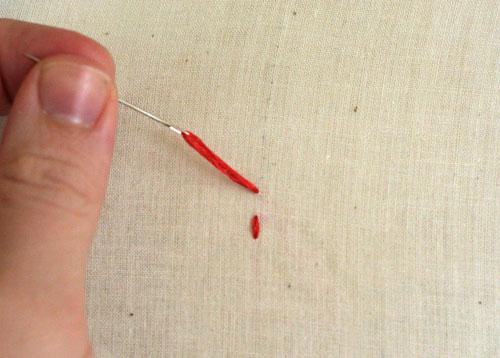
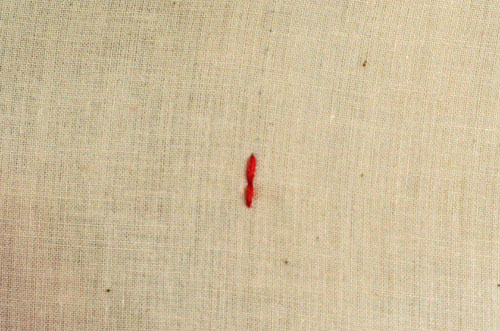
First, you bring your needle up through the material at point A and then back down through at B. You do this again (coming up at C, down at D), however you’re leaving a space in between each stitch, creating a dotted-line effect.


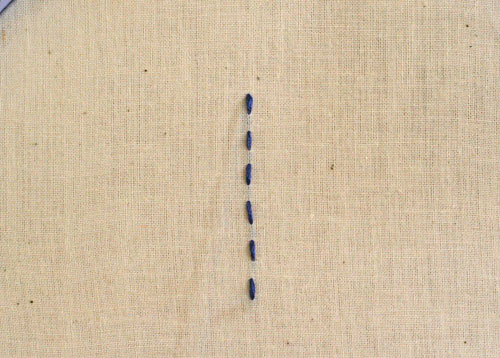
The back side will look exactly as the front
The other way to complete this is to gather your material and run the needle through in one seamless motion.

If you’re new to embroidery and unsure of yourself, you’ll probably be most comfortable with the first way. However, if you’re feeling adventurous or are more confident in your stitching, or want to create something that looks a little uneven but unique, then the second technique is the way to go.
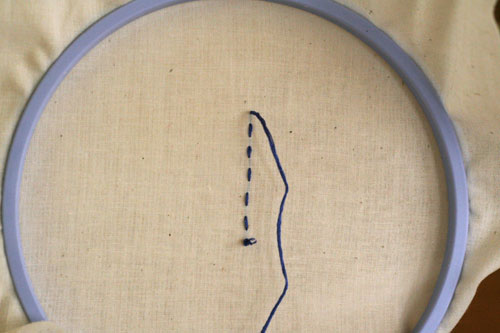
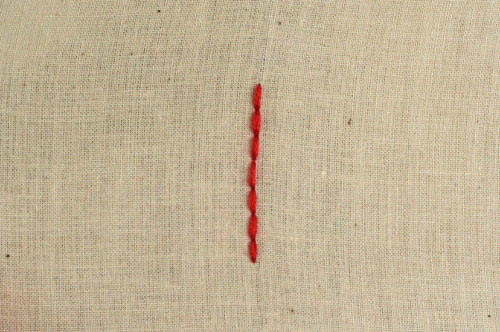
Stitch #2 Back Stitch
This stitch is my personal favorite. Not only because it is quick and easy, but because it looks great (and clean) any way you use it. It’s also a great stitch to complete lettering with. The one thing to remember with this stitch is you’re almost working backwards, in a sense.
First you’ll bring your needle and thread up through the material, but at point B instead of A
Then you’ll bring it back down through, but in the opposite direction you’re wishing to go (hense the backwards part I was talking about), putting it at point A.

You’ll then keep going in that direction or bringing your needle up at point C, then back through at B, then up at point D then back through at C, etc. etc.

By the end you’ll have a seamless looking line and your stitches will connect beautifully.
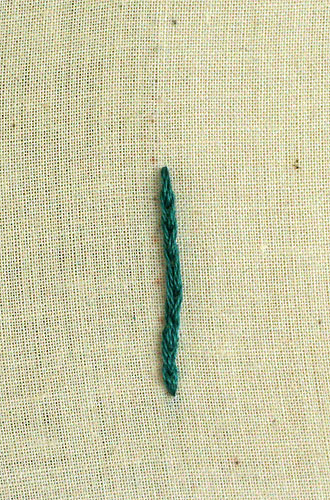
Stitch #3 Split Stitch
This stitch is easy and a decorative finish when you want something a little more punchy than the running or back stitch.
You’ll bring your needle up through your material at A and back through at B (like a regular stitch).
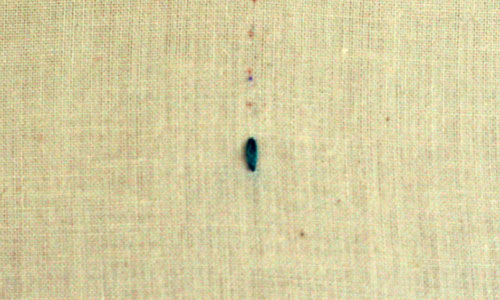
Next you’re going to split the stitch in the center (at C), so you’re splitting the threads evenly (or as evenly as you can)
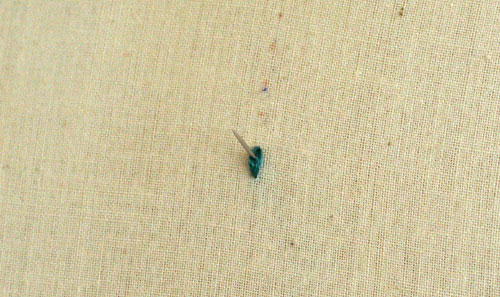
Then you’ll bring it back down at the desired point (D).
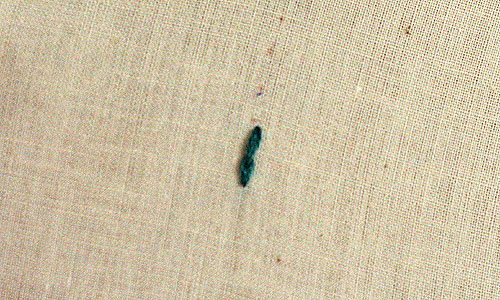
You’ll continue splitting each stitch, until it looks like this
One thing to remember about this stitch, is it’s easy for your thread to get tangled on the underside while you’re splitting the stitch. So this is very important that you work a little slower, and don’t use too long of thread.
You can also work this stitch a little differently, like the backstitch (calling it the split backstitch), by bringing up your thread at C and then splitting the stitch on the way down (from the top side of the frabric as opposed to the underside). Either way is fine, it just depends on which you’re more comfortable with.
My photo’s for this stitch are a little blurry, so hopefully this diagram will explain it where my picture lacks detail

If you’ve hung on through all that jibber jabber that’s great! I can promise you the next lessons won’t be so wordy, we just had to get the intro out of the way. If at anytime you have any questions or think I need to clarify a little more, you can leave a comment or feel free to email me at candace@craftydaisies.com.
Homework for Lesson 1:
If you have any scrap material, you’ll want to use it for practice this week. Draw a circle, a square, and any other shapes that you want on your material of choice and practice each stitch. If you haven’t gotten your pens yet or choose not to, you can use a regular pen or pencil, or do them free-hand. If you’re feeling confident enough, try stitching other images and letters using these stitches. It may sound simple enough – and it is – but like you’ve heard before, practice does make perfect. Next week we’ll go over three new stitches and I will have a PDF you can download and transfer onto your material to complete.


August 14th, 2007 at 3:53 am
This is brilliant!! Thankyou so much for putting it up!! Cant wait until next week!! xx
August 14th, 2007 at 4:47 am
Thank you for posting these lessons. I never learned to “properly” do the stitches so this will be a big help to me.
August 14th, 2007 at 4:51 am
Oh my, Candace! I’m trying not to be afraid. I’m going to Michael’s today then I’ll be back to learn!!
August 14th, 2007 at 5:06 am
Thank you! I’m so excited to learn, never learned properly and you’ve explained and showed everything so nicely!! This is great!!
August 14th, 2007 at 5:08 am
This is great! I am so excited that I have everything but the vanishing ink pen. Once I get that I’ll be good to go. Thanks for doing this.
August 14th, 2007 at 5:15 am
Wow! what a great tutorial on embroidery. Embroidery is easy but so many people don’t know where to start. Thanks for sharing!
August 14th, 2007 at 6:07 am
Your photos are just lovely, and the time and effort you’ve put into this (as usual) are much appreciated and admired. You’re fantastic, and really providing a valuable resource. I’ve been embroidering a lot lately, but I’m still going to dig up a piece of muslin and play along… can’t get too much practice! Thanks again.
August 14th, 2007 at 6:12 am
Oh I am so excited about this one!!! Thanks Candace!
August 14th, 2007 at 6:48 am
Yay! So excited to start…
August 14th, 2007 at 7:09 am
[...] To Do: Embroidery School August 14, 2007 Filed under: Uncategorized — wiscjennyann @ 10:09 am From teachers of Crochet School, welcome to Embroidery School! [...]
August 14th, 2007 at 8:12 am
Great lesson! I think my favorite so far is the backstitch. I love the clean lines it makes.
August 14th, 2007 at 9:59 am
Hey – I was just thinking about embroidering something and here you are with the tutorial. Thanks! I especially appreciate it because I am finding I didn’t know as much as I thought I did (that split stitch is very nice!). Hard to imagine that there’s more to come.
August 14th, 2007 at 10:07 am
[...] Sewing (every time I make a halloween costume I have at least one crying fit – this is ridiculous) Basic Embroidery [...]
August 14th, 2007 at 10:38 am
Thank you for doing these lessons! I have a green army style cap that is in need of some fun and after I complete your lessons I am sure to be able to embroider with condfidence!! thanks again! looking forward to next week!
August 14th, 2007 at 11:12 am
Is it too late to join this? I know some basic stitching, but I sure would love to brush up on my fundamentals and learn some more difficult stitches.
Thank you again for doing the crochet lessons. I finally understand how to do the basic stitches and have been happily crocheting dishcloths all summer!
August 14th, 2007 at 11:46 am
this is so awesome! thank you!!
August 14th, 2007 at 12:42 pm
Wow! I love this! What a great demonstration on how to do this- I love the photos! Thank you for taking the time to show others how to learn this craft! I am so excited about next week’s lesson!
August 14th, 2007 at 12:50 pm
This is fantastic. I’m flying next week to spend time with my grand daughters.
I will use your tutorial to teach them how to embroider. Thanks for spending the time to do this.
August 14th, 2007 at 1:11 pm
What a great tutorial. Great sharp clear photos. I’ll definately be dropping by again.
August 14th, 2007 at 3:29 pm
Another great tutorial thank you for sharing!
August 14th, 2007 at 3:30 pm
[...] http://craftydaisies.com/2007/08/14/embroidery-lesson-1/ [...]
August 14th, 2007 at 3:52 pm
I just wanted to say how incredibly sweet you are to do this for all of us. The time you take to share your talent is not taken for granted. Not everyone in this dog eat dog world realizes that it is the kindness in life that matters most. So I wanted to say thank you!
Shelley
August 14th, 2007 at 5:22 pm
It is so nice of you to do tutorials for us. Thanks so much.
August 15th, 2007 at 2:08 am
[...] If you loved Crafty Daisies’ series on learning how to crochet, you’ll love there new online series starting today where you can learn the basics of embroidery. In this lesson find out all about the supplies you need and learn how to do the running stitch, back stitch, and split stitch. Link. [...]
August 15th, 2007 at 2:17 am
Thank you so much for the embroidery tips. You’ve made things much clearer.
August 15th, 2007 at 7:03 am
This is so great!
I have been wanting to have a go at embroidery for ages and this is such a great way to get me started.
August 15th, 2007 at 4:41 pm
Thank You Thank You thank You thank you!
I have been trying to work on this for ages and all of the instructions usually frustrated me, you’ve made it simple and fun like I THOUGHT it was going to be!
August 15th, 2007 at 9:10 pm
i did my lesson today.
thank you so much for your effort and clear explenations.
the pictures are excellent.
of course mine does not look like your lovely stitches, but i will practice.
August 16th, 2007 at 10:34 am
bought my supplies today & can’t wait for my material to come out of the dryer so i can get learning!!!
August 16th, 2007 at 11:08 am
I have embroidered before and these lessons are very clear and easy to follow. I am looking forward to next week
August 16th, 2007 at 3:32 pm
I am sooooo happy with this as I have been trying to learn how to embroider. When I get good at this it is on to ribbon embroidery. Thank you again.
Mom Raggs
August 18th, 2007 at 8:12 pm
What a great tutorial – how generous of you!
What are your thoughts on using punch embroidery tools?
August 19th, 2007 at 7:40 pm
[...] what I joined? You can’t. Not in a million years. So, I’ll give you the answer. Ahhh yeah, just wait till I’m done. I might have my own etsy shop! [...]
August 21st, 2007 at 10:00 am
These lessons are wonderful, thank you. Would they by any chance be downloadable? I’d love to use them as reference. I hesitate to ask since it’s so generous of you to take the time to do this at all I feel bad asking for more . . . Thank you! *Ü*
August 23rd, 2007 at 10:20 pm
Great info thanks for sharing.
September 11th, 2007 at 10:50 am
Just stumbled upon your tutorial as I was scouring the net looking for an easy way back into needlecraft. Thank you so much for the clear, easy-to-follow tutorial and the close-up photos (much easier to grasp than line drawings!). You’re helping to launch me back into embroidery after a 15 years’ hiatus.
September 20th, 2007 at 3:31 am
[...] Lesson 1 Lesson 2 Lesson 3 Lesson 4 Extra Homework [...]
September 29th, 2007 at 4:16 am
i want to now what material you used for stitching
September 29th, 2007 at 4:19 am
i want to now what material you used for stitching & teach me more stiches
October 7th, 2007 at 6:59 pm
Thank you for the easy to read and understand lesson. I am teaching Nepali women to embroider and quilt. This will help tremendously. There aren’t any resources here yet. How can we get the rest of the lessons? Sincerely grateful, Bobbie Clinton
October 7th, 2007 at 6:59 pm
Thank you for the easy to read and understand lesson. I am teaching Nepali widows to embroider and quilt. This will help tremendously. There aren’t any resources here yet. How can we get the rest of the lessons? Sincerely grateful, Bobbie Clinton
October 22nd, 2007 at 1:20 pm
I love you so much it hurts. There is so much I can do just based on this one lesson and I haven’t embroidered in 20 years and just now want to pick it up again.
December 22nd, 2007 at 8:15 am
THANKS YOU SO MUCH! I WORKED WITH EMBROIDERY STITCHES A LONG TIME AGO, YOU REALLY HELPED TO REFRESH MY MEMORY
January 31st, 2008 at 9:00 pm
Thanks for sharing
February 8th, 2008 at 10:36 pm
I’d prefer reading in my native language, because my knowledge of your languange is no so well. But it was interesting! Look for some my links:
April 7th, 2008 at 12:27 am
Hi
this is great – you are brilliant to do this. I am a cross stitcher who has wanted to learn embroidery for ages but its so difficult to follow in the books. How do i sign up for lesson 2 etc? Am i too late?
Ramona
April 13th, 2008 at 11:48 am
Thank you!! This is great, I’m a 20 year old college student, and my mom has taught me what she can about how to embroider, but it’s great to have pictures and clear explanations of the different stitches!
June 18th, 2008 at 8:54 am
hey this is very is to learn thanks a lot tomorrow i’ve the exam of it so thanks a lot……
July 9th, 2008 at 12:39 am
that was lovely and clear way to teach embroidery….it was crystal clear
August 8th, 2008 at 5:35 am
how do I join this group to learn how to do the different embroidery stitches? I am a beginner and self taught as I have a LD and it inhibits my learning ability by just reading instructions. So when I seen this site it intrigued me and I can actually learn from the photo’s on here.
Thanks
Dolly
dahat92@gmail.com
August 23rd, 2008 at 9:37 am
Thank you so much for posting this lesson. The directions are incredibly clear, and I love the photographs. So easy to follow! Being a good teacher is such an important thing to be. Thank you again for your help.
October 1st, 2008 at 6:16 pm
Thank you for this series. I plan on following it myself and teaching my girl along the way. We blogged our first lesson with a link back to your sight, of course. I saw somewhere else on your blog that you mentioned a learn to knit series and wanted to let you know I would be interested in following that as well!
January 21st, 2009 at 8:32 pm
amoxicillin for amoxicillin working
April 9th, 2009 at 7:18 am
Wow!
i was jus going nuts with lot of free time around!
Thanks a lot for a wonderful start.
Waiting for lesson 2.
July 24th, 2009 at 5:47 pm
Hi there. I am so excited, I have wanted to learn to embroider by hand for a long time and get so confused with the instructions. Your lesson 1 was wonderful, I am practicing everyday. When will we get lesson 2??
September 13th, 2009 at 9:59 am
u r realy great.may god bless u
May 8th, 2010 at 4:19 am
Hi. I am teaching a church group where can I find the next lessons?
May 28th, 2010 at 10:34 am
Super great post. Truely!
May 30th, 2010 at 12:48 am
Hah I am honestly the only reply to your great post?
May 30th, 2010 at 8:50 am
If only more people would hear this.
June 1st, 2010 at 5:55 am
Wow am I literally the first comment to your amazing article.
September 22nd, 2010 at 7:02 pm
literally the first comment to your amazing article.
September 27th, 2010 at 10:40 pm
I literally the first comment to your amazing article.
November 15th, 2010 at 7:36 pm
The article is very wonderful. You analyse in the round. I will go on to attention your other wonderful posts. Thank you.
April 29th, 2011 at 1:55 am
very useful. i always wanted to do some basic embroidery designs in my kids dress. now i can really make some cute designs which they like very much.. thank u so much