


Make Your own Fabric Buttons
October 14th, 2007 by Jen LoveI know I may be way behind the times but I still keep finding gadgets and ideas at the craft store that amaze me. This week I tried out the fabric button makers I had bought 6 months ago. They were very simple to make and now I want to look around the house and see what keepsakes I could make buttons out of. I am considering: an old, favorite shirt or baby shirt, vintage towel or handkerchief, old ties, prom dress, etc. to make a button for a bag or pillow that would be better used there than thrown out. What a sweet memory to carry a bag with a peice of baby’s first clothing! I can’t wait!
So, first, using the pattern on back of package cut out pattern. I cut my circle out of the paper so you can perfectly center and choose the picture that you want.
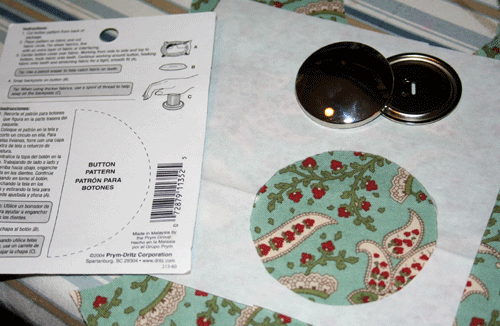
Cut out fabric circle and center around button half with teeth. Press around the circle, catching the fabric on the teeth all the way around.
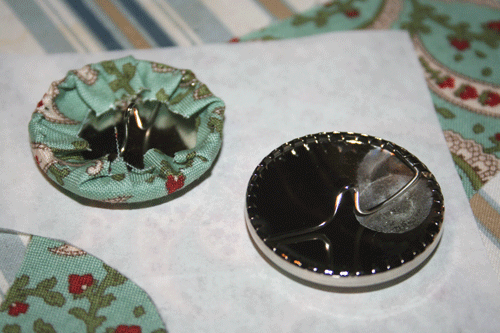
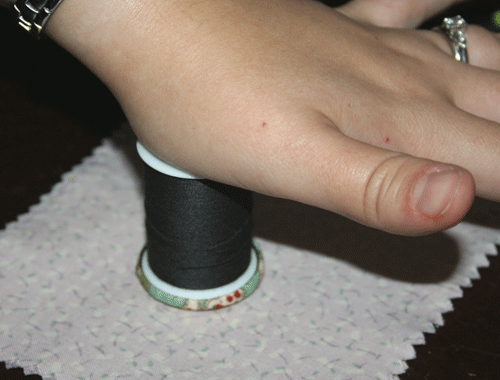
Next, put the flat button half down on top of your fabric button and press into place by pressing down with a spool. Be sure to put the side down that sticks out farther.
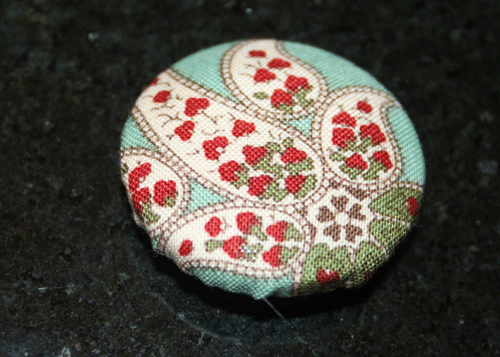
All done! 2 minutes! And now you have a button that perfectly matches what you have sewn!
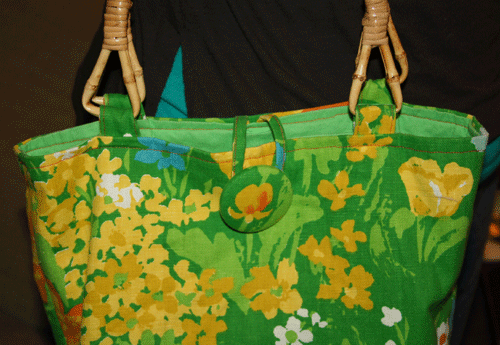
This was my favorite example of this- a bag I received in our Summer swap. LOVE it!
A few tips:
Be careful, you can hurt your fingers on those teeth!
If you fabric is too thin, use iron-on interfacing so that the silver button cannot be seen through the fabric.


October 15th, 2007 at 6:51 am
BTW, the round bag in the recycled plastic bag posting from July http://craftydaisies.com/2007/07/18/recycling-plastic-bags/ also features a covered button. This was the biggest button size I could find and I used it to cover up the center hole of a crocheted circle.
October 15th, 2007 at 3:13 pm
I always wondered how those things worked! Now I want to make buttons!
October 15th, 2007 at 3:14 pm
this is a fabulous idea to use the fabrics as sentiments on buttons.
October 16th, 2007 at 2:17 pm
you mean you don’t need a special tool? That’s refreshing! Thanks!
October 21st, 2007 at 2:00 pm
Here’s another tutorial for fabric covered buttons that doesn’t require any special parts. Check it out. http://www.craftster.org/forum/index.php?topic=181926.0;topicseen
October 27th, 2007 at 5:27 am
What a great memory! We used to make covered buttons when we were little with Mom!!
November 7th, 2007 at 9:18 am
Hi, I have been searching everywhere for a tutorial on making fabric covered rings. This is the closest thing I’ve found. Any suggestions on turning it into a ring? Also, where did you get your kit? Thank you!!
November 7th, 2007 at 11:29 am
Amby,
I think this is what you use for fabric rings too. Maybe you clamp the button ring with what you are using for the finger ring; position oppositely and make the button ring tight around it. I have seen a lot of fabric rings and fabric covered rounds on girls hair bands too alot on etsy and wanted to try it out. I got these kits at Jo-ann’s fabric store and at W-M.
July 29th, 2009 at 3:28 pm
WOW! I was also wondering how that was done as I want to cover the fabric with beads. Now I just have to find the kits. Thanks a lot. Kathy
February 9th, 2010 at 6:16 pm
I have tried to make smallish buttons like this using burnout velvet and cannot get the fabric to hook into the teeth. I know there is a way to make small spherical buttons out of fabric; any suggestions of how to do that? Thanks! Robyn
March 30th, 2010 at 9:29 am
Where did you find the supplies to do this without a button machine? I’ve looked at Joanne Fabrics and Michaels and neither store carries anything like it! HELP!
April 12th, 2010 at 9:36 pm
Hi Audrey,
If you go to etsy.com and type in “self covering buttons” a list of sellers will come up that supply the buttons as well as tools to make them with.
Good luck!
June 8th, 2010 at 10:19 pm
ขอวิธีทำกระดุมจีนด้วยคะ
November 17th, 2010 at 7:45 am
were can i get the fabric button cover tool, did u sell it
December 6th, 2010 at 9:55 pm
Maybe you can go to wholesale lots to have a see.
December 29th, 2010 at 12:38 am
think I must visit Bohol pretty soon…hope I’ll get a chance.
January 3rd, 2011 at 10:46 pm
All of the schools are bagua and rumor breeding of fertile land.
FeiDuanLiuChang according to the speed of light, and spreading gossip in the spread of time, like be like nuclear radiation, change that gives all sorts of ugly appearance.
January 5th, 2011 at 7:14 pm
Thank you very much !! You have shared very good information with us. I will also tell about it to my friends also in fact all the people known to me.
January 9th, 2011 at 5:38 pm
I really like this website , and hope you will write more ,thanks a lot for your information,[url=http://www.longchamp-bags.com]longchamp bags[/url],thank u very much.
January 9th, 2011 at 10:32 pm
A scathing report published Wednesday by the British Medical Journal stated that Dr.longchamp bags Andrew Wakefield, the lead author, falsified the medical histories of all 12 patients in his study and that he was “longchamp outlethoping to sue vaccine manufacturers and to create a vaccine scare.”
January 16th, 2011 at 7:47 pm
prada
bags
Currently, Prada Group has a Prada, Jil Sander, Church’s, Helmut Lang, Genny and Car Shoe and
other prestigious international brands, but it also has the brand Miu Miu exclusive license.
All Prada Group, the processing arm of the products are from Italy’s Prada Spa jurisdiction
Tuscany region, this region has been recognized as the most high-end leather goods and footwear
manufacturing process and technology. For mass production, Prada requirements for product
quality did not let up, never compromise on the quality point of view has become Prada’s
corporate philosophy.
January 18th, 2011 at 5:40 pm
Christian louboutinEnd of each year, a wide range
of annual meetings, dinner place will be followed, in order to address these occasions the
party, OL were all out to do magic to show charisma. And a pair of shoes full of personality is
a thing they must battle. Tall, charming and was thin, even in winter can also wear clothing
dress sexy and beautiful.
January 19th, 2011 at 10:41 pm
I really like this website , and hope you will write more ,thanks a lot for your information,[url=http://www.guccioutletbags.com]Gucci Outlet[/url],thank u very much.[url=http://www.guccioutletbags.com]Gucci Outlet Online[/url]
January 19th, 2011 at 10:46 pm
Gucci Outlet rushes to purchase quickly, crossed this village not to have this shop, Gucci Outlet This is a really quality post.I find this information through Google.Gucci Outlet Online
January 19th, 2011 at 11:28 pm
For many experts, a more significant test is whether the law will slow the growth of healthCoach Outlet costs and provide greater value to consumers, taxpayers and employers in Coach Bagsreturn for the $2.5 trillion a year they spend on health care.
January 24th, 2011 at 7:45 pm
I just finished an old Woody book which was a hoot and I do miss his earlier films which were lighter if less dramatic.
February 8th, 2011 at 4:50 pm
Pick a Color for your Bridesmaid Dresses.
February 10th, 2011 at 9:55 pm
If to “disco” dance hall to dance oneself carry cola to, Daily walk home by bus, so that the money saved, the day is not as before. Second, you make a sell shoes miss a good feeling so and make her feel that in this world there are a man once because of her kindness and be able to siege, someone will therefore appreciate her lifetime, how great!
February 14th, 2011 at 6:46 am
Upon me you will only see quality goods “blue jeans and American song” original import of leather short coat, will never have any counterfeit “green” song jeans, or roll a white coat. People concoct Although our house is not rich,
February 25th, 2011 at 4:01 am
On this web site you will find thousands of Mulberry HOBO Bags at affordable prices. Both new AND pre-owned bags are on sale where you can make massive savings compared to buying a Mulberry Clutch Bags from a high street store or luxury boutique.
February 28th, 2011 at 1:17 am
Bailey achievements in addition toMinnesota
Vikings jerseys his number one status in the 22-year football career goals, the
most important natural is the World Cup. Sweden in 1958, people saw on TV a young
face, the 17-year-old boy to turn around and vote in the camera darts show,
surrounded by the beauty was quite shy, this is the fledgling Bailey. The beginning
of this competition, Pele is Brazil’s bench, not playing the first two games, the
group 3 although the battle field to the Soviet Union, but not impressive.
March 2nd, 2011 at 7:03 pm
Oilpaintingandframe.com, online destination of oil paintings and art frame for sale, online shop provide wide selection for art, oil painting reproduction, frames and framed oil painting direct sourcing from manufacturer at unbeatable offer
oil Painting
oil Paintings
oil Painting Art
March 3rd, 2011 at 12:13 am
order to ensure quality, Gucci will brand name in their products in the world, this is the first saw fashion history in the world.
From 1921 began, Gucci walked is nobility route, the attitude is costly and slightly hale masculinity. In 1947 Gucci bamboo hand bag, then the slubby advent, founder
March 7th, 2011 at 7:50 pm
High-heeled shoes is necessary for the girl who love of beauty.
Looking at the street of all kids ofHigh Heels shoes high-heeled shoes, the 21st century girl for the pursuit of beauty is higher and higher.The invention of the high-heeled shoes to found an excuse, certainly everyone has love beautiful.High-heeled shoes can highlight female figure, for model body, figure curve is helpful.
Wear high heels requirements demanding with foot , and to the shoe and foot fit is very strict.The high-heeled shoes don’t fit is a kind of damage,girl must pay special attention to this point.The girl wearing high-heeled shoes often meet some boys despise eyes, then you should have confidence, since wear high heels should give yourself enough confidence, which will show the advantages of high-heeled sheos.
March 9th, 2011 at 12:11 am
Are those nasty cockroaches giving you bad dreams at night? Bedbugs NYCAre you dreaming about bedbugs because, Mold Removal in home NJwhile you sleep, half a dozen of the vampire insects are bleeding you dry? That’s the sort of thing that could drive you insane, and one call to a professional exterminator in NJ can eliminate the problem. Silverfish, termites, carpenter ants, fleas or whatever – all these multi-legged creatures are driving you batty. Don’t call a pricey shrink, call an exterminator in NJ. It’s your home and you don’t have to share it with uninvited house pests. Mold Remediation NJNot in this day and age when an exterminator in NJ has whatever is needed to end the problem. Bedbugs BrooklynFrom rodent to bug infestations, a fully licensed exterminator in NJ has what it takes to end your misery. Forget the psychologist and those costly sessions on their couch, save time, money, and your sanity Custom embroidered patchesby calling a professional exterminator in NJ. Don’t call a shrink, call an exterminator in NJ today!
March 13th, 2011 at 1:17 am
Have such a woman, she always has a beautiful story, beautifulwomanshoesheart is not only the colorful fashion and elegant dress, beauty is not only a comely dark curls and sweet smile, and static she has been loving the high-heeled shoes. The pairs a leisurely filled her shoe. But she most like those were her call “crystal shoe” follow sandal high. The white dotted with colorful with high in the window, shoe body also is dotted with colorful transparent in the window, vamp set a white flowers, sheet is looking at it is like a beautiful handicrafts enjoy one.
March 14th, 2011 at 7:11 pm
This was a lot of work actually to get to work.
March 14th, 2011 at 7:12 pm
I know there is a way to make small spherical buttons out of fabric.
March 14th, 2011 at 10:53 pm
Nice to be visiting your blog again, it has been months for me. Well this article that I’ve been waited for so long. I need this article to complete my assignment in the college, and it has same topic with your article. Thanks, great share.
March 17th, 2011 at 9:08 pm
It is obviously that selling informative products online is perfectly fit to the affiliate marketing business.
March 17th, 2011 at 9:08 pm
To solve this possible drawback, that is why you have to offer your expert services along with those products
March 23rd, 2011 at 10:31 pm
NIKE intent refers to the Greek goddess of victory in English.nike shoes NIKE is the world’s leading sports brand, Nike translated into Chinese. The company is headquartered in Oregon, Beaverton. The company produces all-inclusive sporting goods: clothing, footwear, sports equipment and so on.
March 27th, 2011 at 11:17 pm
THE loss watches replica of her husband had a profound effect on Angeline Fowl. She had retreated to her room, refusing to go outside. She took refuge in her mind, preferring dreams of the past to real life. It is doubtful whether she would have recovered had not her son, Artemis the Second, done a deal with the elf Holly Short: replica rolex watches his mother’s sanity in return for half the ransom gold he had stolen from the fairy police. His mother fully recovered, Artemis Junior focused his efforts on locating his father, investing large chunks cheap nfl jerseys of the family fortune in Russian excursions, handbags great local intelligence and Internet-search companies.
Young Artemis had received a double share of Fowl guile. However, with the recovery of his mother,cheap nhl jerseys
a moral and beautiful lady, it became increasingly difficult for him to realize his ingenious schemes. Schemes that were ever more necessary to fund the search for his father.
March 27th, 2011 at 11:18 pm
This was a lot of work actually to get to work.
March 28th, 2011 at 12:48 am
Louis Vuitton is women bags the history of France’s
most outstanding designers of leather goods. In Paris in 1854 opened his own name the first
suitcase store. A century later, Louis Vuitton luggage and leather goods to become one of the
best areas of the brand, and became a symbol of high society. Today, the Louis Vuitton brand
has not only limited to the design and sale of high-end leather goods and luggage, but to
become involved in fashion, accessories, shoes, bags, jewelry, watches, media, wine and other
fields of the giant trend indicators.
April 1st, 2011 at 2:37 am
It’s one of my favorite post. Thanks for sharing informative information.
April 1st, 2011 at 7:48 pm
Fendi bags FENDI, the French brand. In 1925, the Fendi brand officially founded in Rome, specialized in producing high quality fur products. Fendi in 1955, held its first fashion show. Then the company has grown, the business scope expanded to knitwear 、 swimwear 、 lower prices of clothing other category, and even developed a jewelry 、 men’s perfume, but still the Fendi fur apparel brand in the fashion world renowned.
April 10th, 2011 at 12:17 am
http://www.nikeyeezy2011.com Nike Air Yeezy 2011
April 11th, 2011 at 4:24 am
There are may person searching about that now they will find enough resources by your post,
April 13th, 2011 at 12:02 am
Christian Louboutin Once put on high heels, the body’s center of gravity will naturally upward traction, back straight, it looks a lot higher also. Therefore, the whole body seems to have become more slender profile, and aspect ratio adjustment to make you look oh look a lot thinner.
April 13th, 2011 at 4:33 am
Global Online Shoppingthis is a fabulous idea to use the fabrics as sentiments on buttonshttp://www.amandamall.com/cell-phones_c1
http://www.amandamall.com/cell-phone-accessories_c16
http://www.amandamall.com/cell-phone-bags-cases_c1041
April 14th, 2011 at 7:03 pm
I know there is a way to make small spherical buttons out of fabric.
April 17th, 2011 at 10:12 pm
I’m a watch addict who likes to share any information and design toward Tag Heuer Replica Watches, if you are looking for a great watch then consider going to the best online store.
April 19th, 2011 at 1:19 am
Quite interesting.Thanks for the sharing.
April 19th, 2011 at 1:21 am
This is really one?good one
April 19th, 2011 at 1:23 am
Yeah I knew about it…
try to uploading more frenquently in here
April 19th, 2011 at 1:26 am
This has made my entire freaking year. Seriously.
April 19th, 2011 at 1:30 am
They are beautiful!
April 21st, 2011 at 8:18 pm
Many movie directors love to employ certain luxuries in their products, so as to make the heroes much more attractive and elegant to see and this will also bring these products much greater reputation. For example, Ray Ban sunglasses are always widely employed in many movies and operas. This is because Ray Ban is such a topmost brand in the world that many people want to have a try. ray ban sunglasses RB3275 – Glass Metal
April 22nd, 2011 at 7:51 pm
I really like this website , and hope you will write more ,thanks a lot for your information.
April 23rd, 2011 at 6:48 pm
One unique, historical tidbit is that the term “handbag” did not come about until luggage bags were carried by men during the cheap fake handbags early 1900′s. This led to a new outlet for cheap wallets women, which included bags with internal compartments, fasteners and even locks. This was also the time when cheap handbags special places were made for everything Cheap Replica Handbags from glasses to hand held fans. With this new invention, the purses of today began to form. Every decade after this saw ingenious ways to make them even more fashionable.
April 24th, 2011 at 6:13 pm
Nice article , thank you for sharing your article. I genuinely enjoyed it. I place a url to my website to right here so other group men and girls can research it.
April 24th, 2011 at 11:37 pm
I am great to see this blog, I hope many people can research it.
April 25th, 2011 at 4:07 am
A great post but How to select a cool handbags. we sell cheap handbags We are the best store provided various cheap designer handbags but only a little white to make coach handbags online
April 25th, 2011 at 7:17 pm
Christian Louboutin et’s fantasy that a woman who dresses a red bottom shoe walks staggeringly in the street and makes rhythmic sound, how nice it is.if the women who wears a high-heeled shoe can dress a miniskirt, when wind blows her miniskirt and hair, how charming she looks like? The famous shoes designer Christian Louboutin once said: “exactly high-heeled shoes make a woman has health, because high-heeled shoes lets them slow their steps.the difference, like driving is different from the ride. at least cycling can enjoy the scenery on the way. the women wear the red shoes in order to do not miss the street landscape, but, when women appreciate the scenery, they also become the scenery.
April 29th, 2011 at 12:56 am
hem slow their steps.the difference, like driving is different from the ride. at least cycling can enjoy the scenery on the way. the women wear the red shoes in order to do not miss the street landscape, but, when women appreciate the scenery, they also become the scenery.
April 29th, 2011 at 3:24 am
I am so fascinated and I believe you are marvelous at your work. Keep writing
May 5th, 2011 at 12:44 am
Christian Louboutin Red soled shoes are Christian Louboutin’s signature logo, highlighting women’s lovely, beautiful and not play mature sexy.
May 5th, 2011 at 2:10 am
These kind of post are always inspiring and I prefer to read quality content so I happy to find many good point here in the post
May 9th, 2011 at 7:48 pm
Thank you for sharing so useful informations!
May 9th, 2011 at 11:06 pm
In the modern time, pets become more fashionable. Because the human beings want to dress their pets up to make them look more adorable. So we wrack our brains Jimmy Choo обувь and try every way to make clothes for our pets. Several years ago, the pets’ clothes seemed to be rustic and naive. But nowadays, it changes a lot. The pets wear their clothes just like us, with different types of colorful Туфли на высоком каблуке clothes. Even sometimes, they will wear their clothes to participate in the pets beauty competition. In some present hot Hollywood pets movies, it is a commonly seen that the dog and cats wear skirts or gowns and earrings. That this is the case how people pay much attention to their pets. What’s more, some maverick individuals let a male dog and a Jimmy Choo female cat wear the wedding dress. and solemnly hold the wedding ceremony. That is just so funny. Though the pets in the movie seems to be very fond of wearing clothes, however, in the real world, we can’t assert that the pets will appreciate being dressed up. Scientifically speaking, animals have got used to the wild world without wearing anything. Perhaps they are reluctant to be covered with something on their bodies, although their джимми чу facial expression can’t tell us anything. More seriously, it is possible to hurt their skins through spoiling the inner fiber organs by wearing clothes just because of the maladaptation.
May 10th, 2011 at 1:51 am
In this great design of things you actually get a B- for effort. Where exactly you actually misplaced us was in all the details. You know, it is said, details make or break the argument.. And it couldn’t be more true right here. Having said that, permit me inform you what exactly did do the job. The writing can be highly powerful and this is possibly the reason why I am making an effort in order to comment. I do not really make it a regular habit of doing that.
May 11th, 2011 at 10:44 pm
There are many online stores having Coach handbags, i believe you gonna like it! Yesterday, my friend bought a Coach handbags outlet which is so beautiful, i am surprised by the design and style. Do you have a pair of Coach handbags on sale now? if not, go to online store and have one, it is so amazing!!!
May 11th, 2011 at 11:56 pm
coach outlet online
cheap coach outlet
coach outlet store online
May 12th, 2011 at 8:34 pm
I know this if off topic but I’m looking into starting my own blog and was wondering what all is needed to get set up? I’m assuming having a blog like yours would cost a pretty penny? I’m not very internet savvy so I’m not 100% sure. Any suggestions or advice would be greatly appreciated. Kudos
May 13th, 2011 at 1:57 am
Adidas Top Ten Low Sleek Women Shoes There are many types of sports footwear offered in the marketplace today. This is a change from past decades when there were few choices. Adidas NZA Shoes Air Max 2011 Adidas Mens Hoody There were really only a few models of tennis shoes or sneakers. They were not specialized for particular runners. There has been a great increase in the number of shoes offered but that this still means the consumer needs to be extra careful and not just pick any shoe. Adidas Men Shirts Adidas Stan Smith Women Shoes
May 14th, 2011 at 4:48 am
Let us now Christian Louboutin shoes deep in to the matter. For ultimate enjoyment of television everywhere facility you required Christian Louboutin subscription. It was normally a little spot shifting gadget that operates in tandem with two exclusive Christian Louboutin. You could avail both Christian Louboutin and explore reside and recorded applications here and there. You cantherefore appreciate Christian Louboutin channels at laptops as nicely as other devices.
Another gadget was Christian Louboutin pumps gear with in-built sling box technologies for documenting the applications for afterwards viewership. You also could retain handle of all of your preferred programming stuff from mobile units like laptops and stuff. With thischeck you can appreciate television everywhere just like everything. on this way this check facilitates wireless connectivity to all alerts in Christian Louboutin product from anywithin the present receiver through Wi-fi connection Christian Louboutin sale boot.
May 14th, 2011 at 4:54 am
Hmmm.. I do agree with you in many parts but will have to think about it deeply. But have to say that it is quite well put though and did make me reassess many of my ideas about certain things. Buy Propecia Online Many thanks for giving this different perspective.